VPC Peering
Important
Please note, this section is optional and is not required to be completed to proceed with this workshop. You may skip to Transit Gateway
A VPC peering connection is a networking connection between two VPCs that enables you to route traffic between them using private IPv4 addresses or IPv6 addresses.
In this lab, we will establish VPC peering connections between VPC A and VPC B, as well as between VPC A and VPC C and show that traffic flows between only those VPCs with direct peering links.
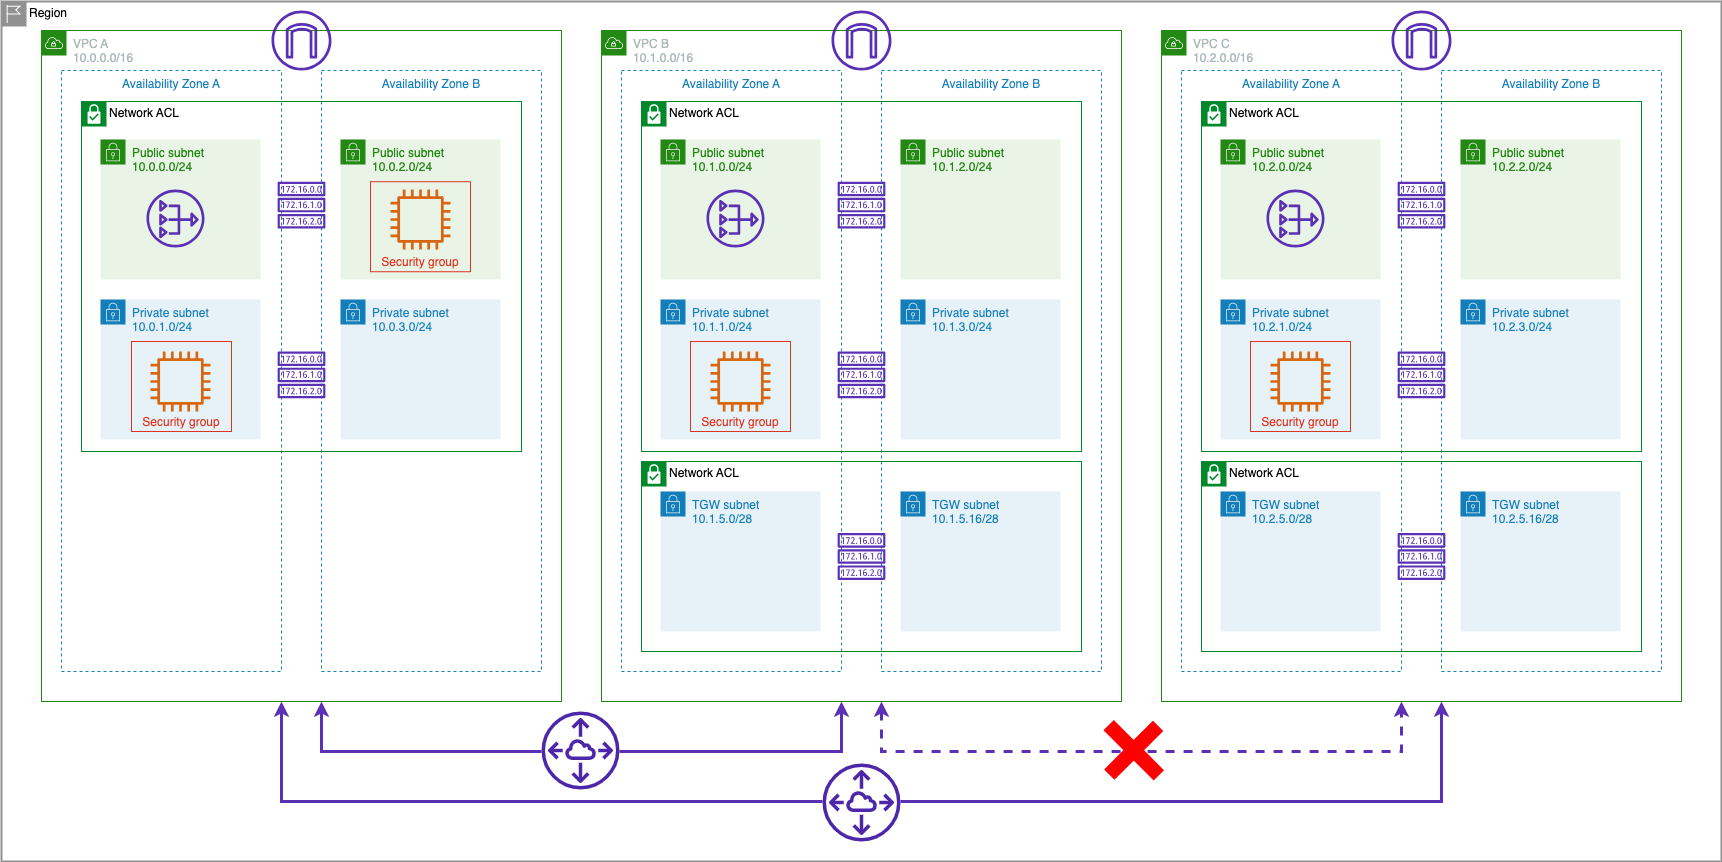
Note that all three VPCs have non-overlapping CIDRs. You cannot create a VPC peering connection between VPCs with matching or overlapping IPv4 CIDR blocks.
Setup VPC A and VPC B Peering
Create the Peering Connection Between VPCs A & B
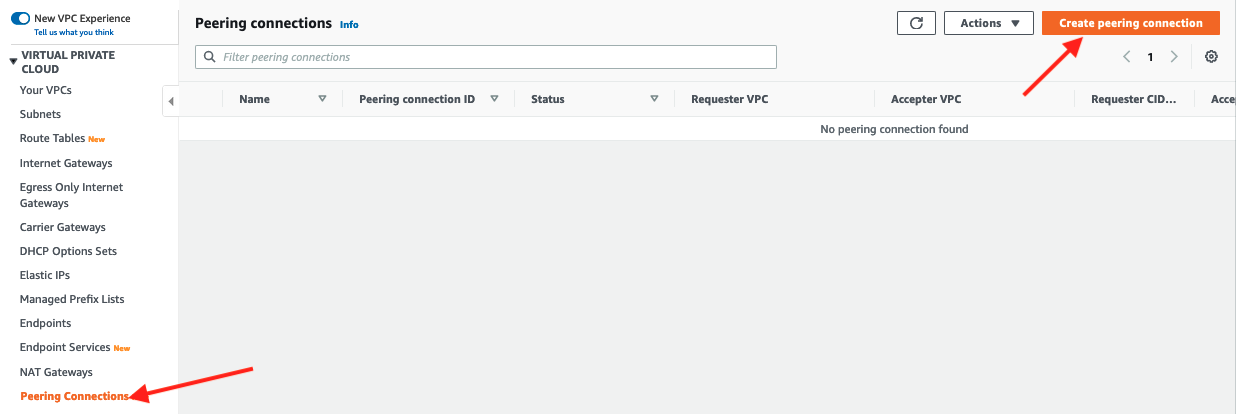
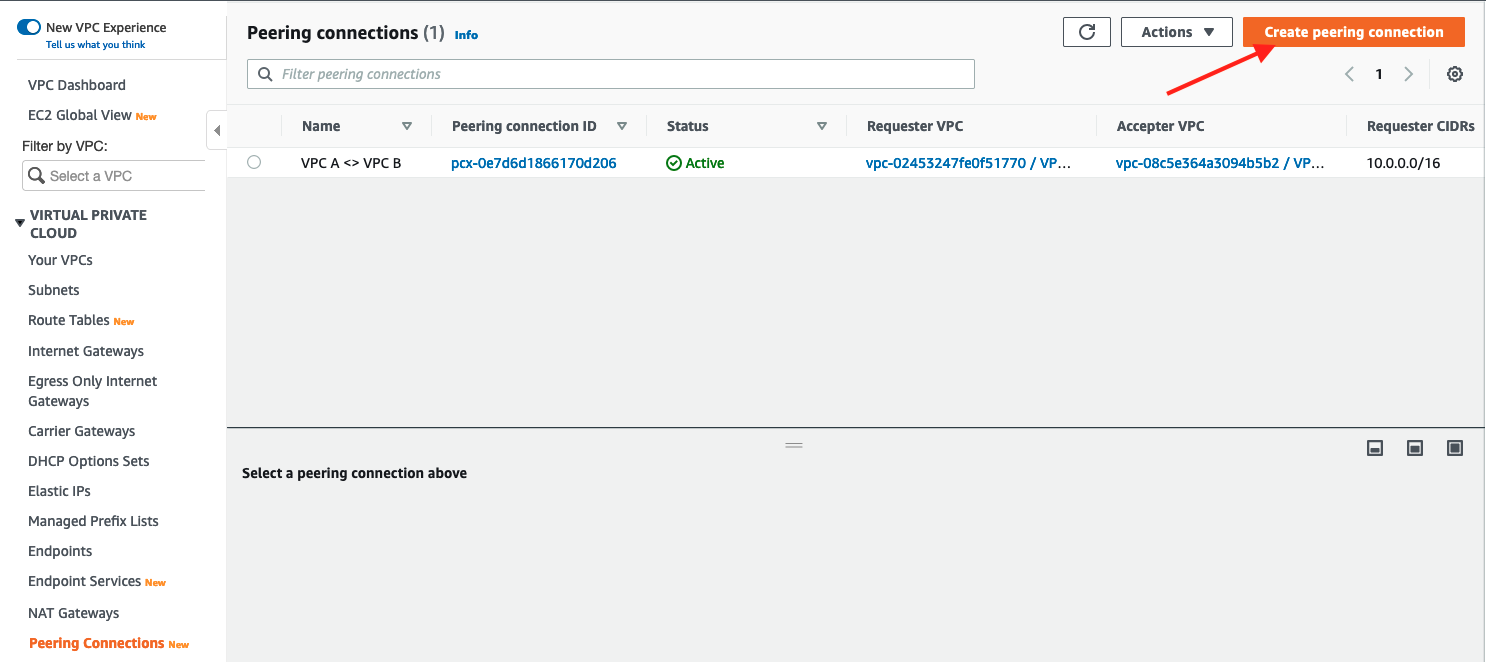
- In the VPC Dashboard click on Peering Connections
-
Click on Create peering connection in the right hand corner
3. Specify the Peering connection name asVPC A <> VPC B
4. Under Select a local VPC to peer with selectVPC Aas VPC ID (Requester)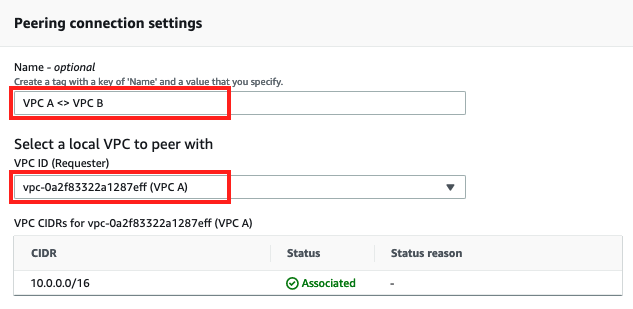
5. Under Select another VPC to peer with ensure thatMy Accountis selected for Account
6. For Region select the region for this workshopThis Region (us-east-1).
7. For VPC ID (Accepter) selectVPC B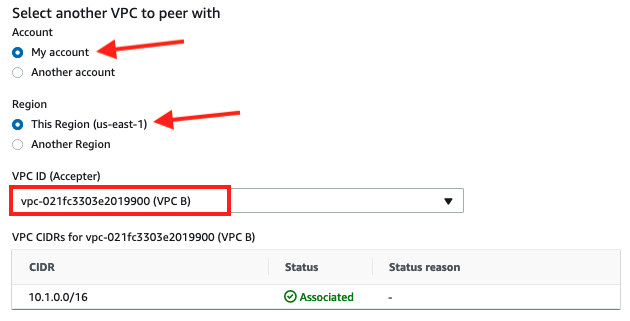
8. Click on Create peering connection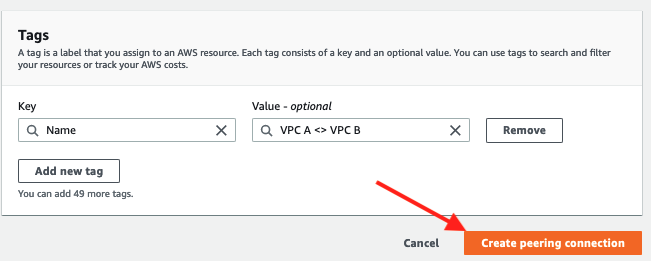
9. The newly created peering connection will be in Pending Acceptance state.
10. On the resulting screen, navigate under Actions and click Accept request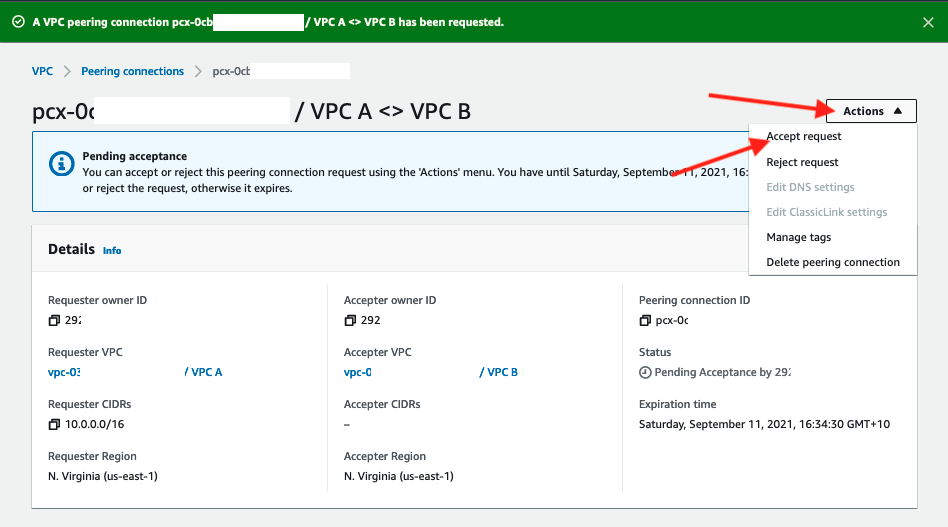
11. On the following pop-select, click Accept request
12. Click on Modify my route tables now in the resulting screen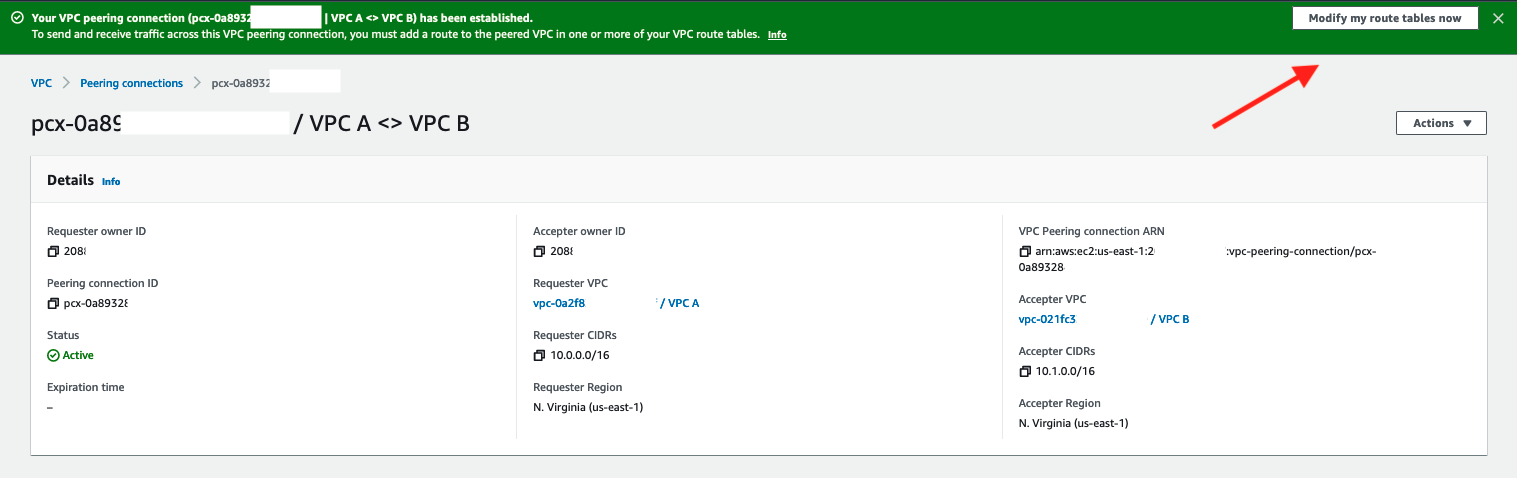
Update Route Table in VPC A
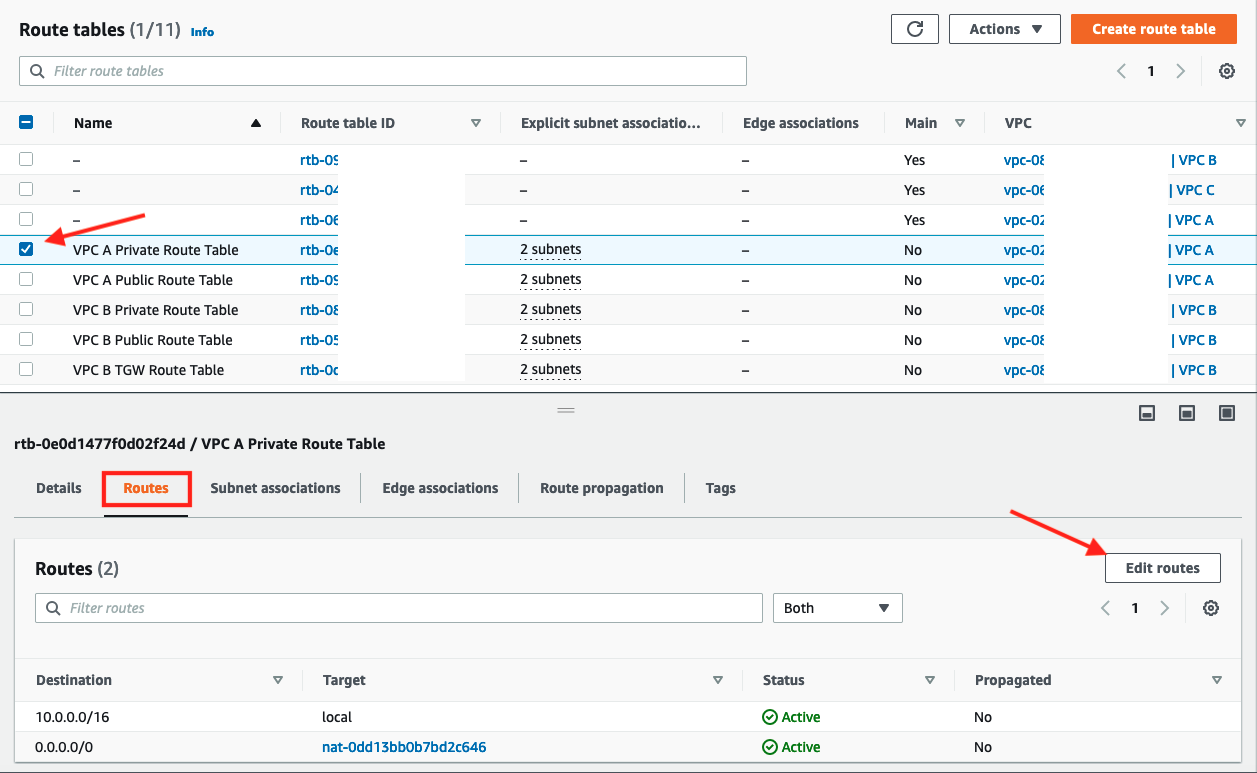
- Select the check box for the
VPC A Private Route Table - Scroll down and click on Routes tab
- Click Edit routes
-
Add route entry for "VPC B" using the CIDR range
10.1.0.0/16and selecting Peering ConnectionVPC A <> VPC Bfor the target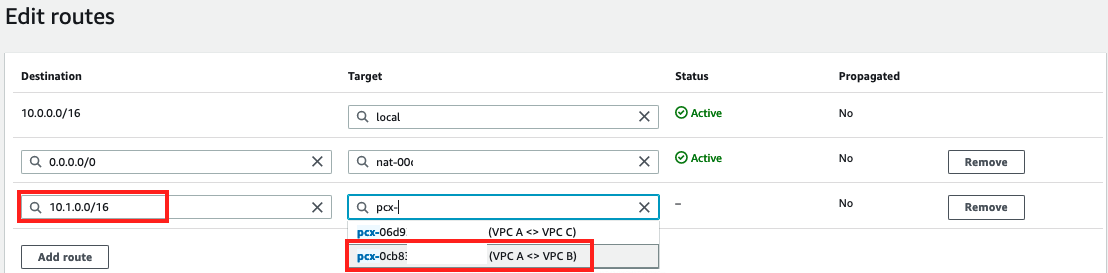
5. Click Save changes
6. Confirm that the new route appears in the Routes tab of the resulting screen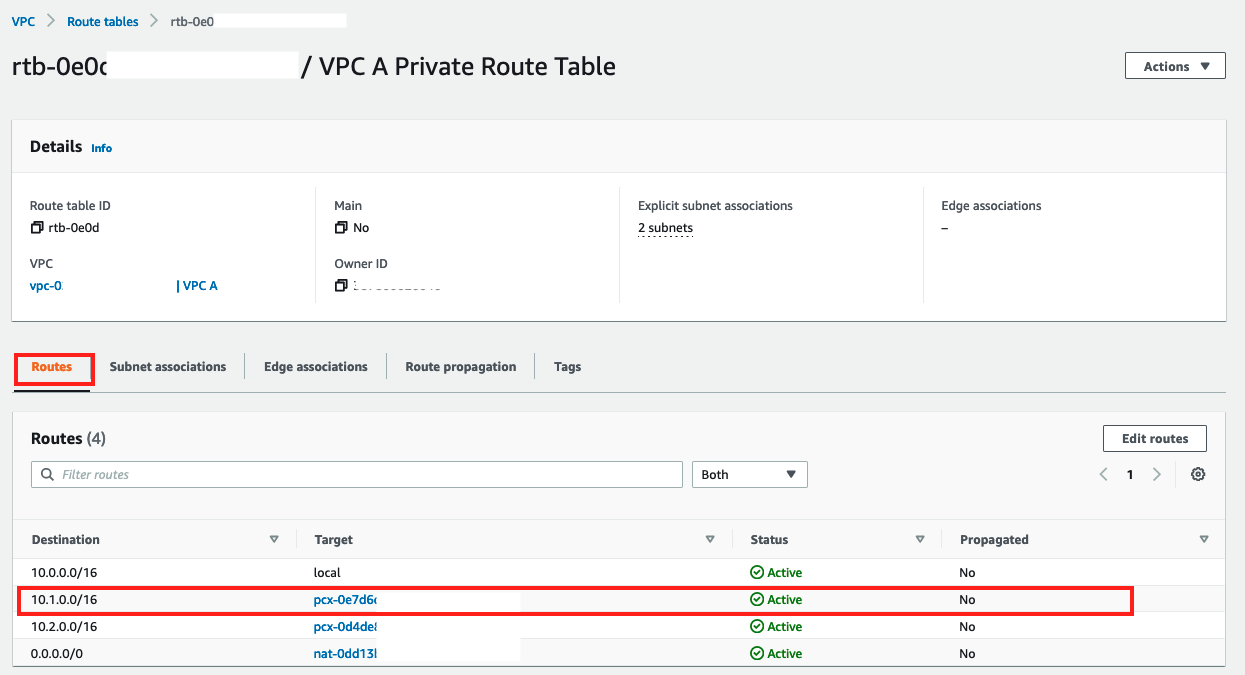
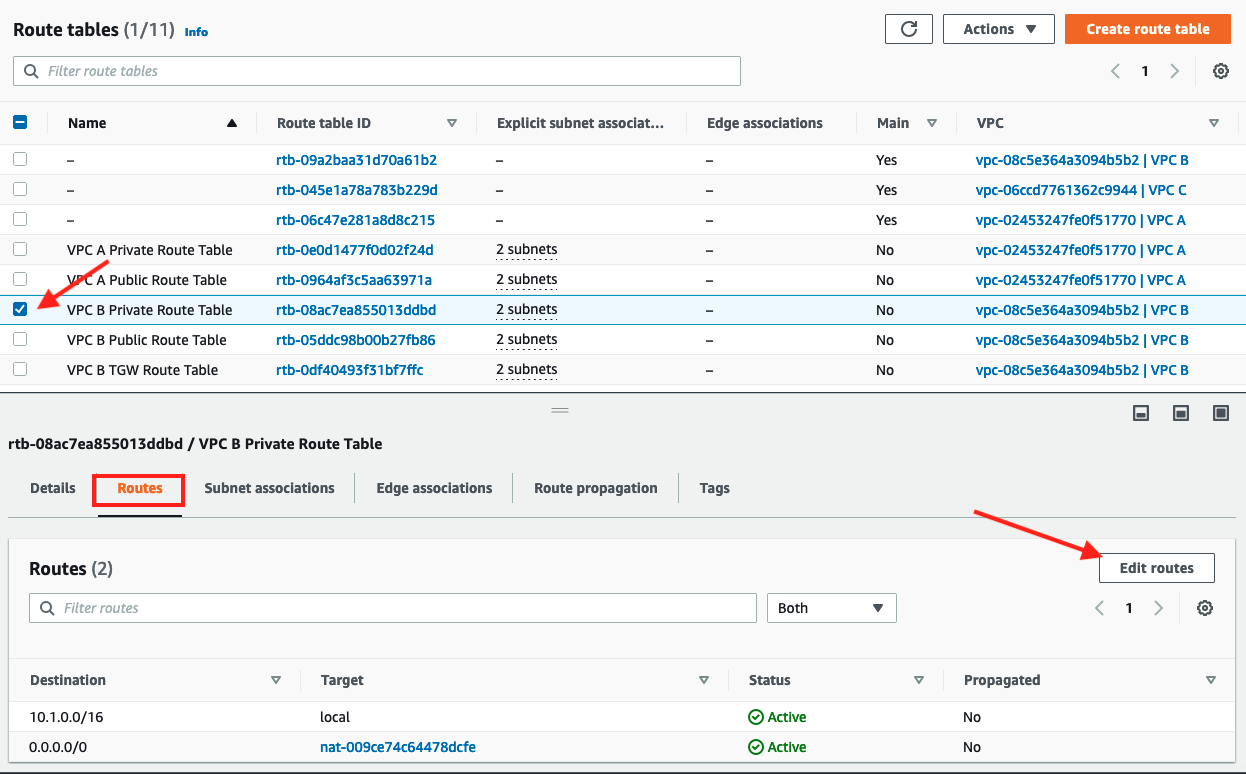
Update Route Table in VPC B
- Click on Route tables
- Select check box for
VPC B Private Route Table - Click on Routes tab
-
Click Edit routes
5. Add a route entry for VPC A using CIDR range10.0.0.0/16as the Destination andVPC A <> VPC Bas the target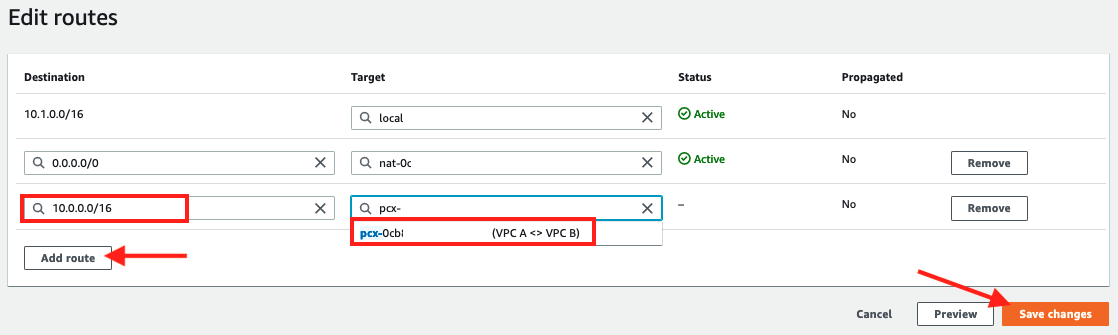
6. Click Save changes
7. The route table will be updated with routes for the peering connection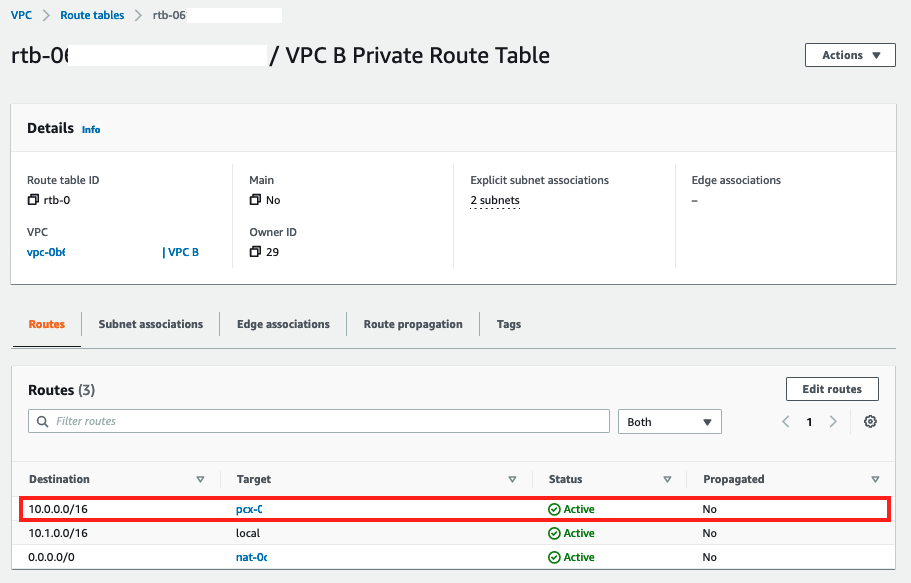
Setup VPC A and VPC C Peering
Create the Peering Connection Between VPCs A & C
- In the VPC Dashboard click on Peering Connections
-
Click on Create peering connection in the right hand corner
3. Specify the Peering connection name asVPC A <> VPC C
4. Under Select a local VPC to peer with selectVPC Aas VPC ID (Requester)
5. Under Select another VPC to peer with ensure thatMy Accountis selected for Account
6. For Region select the region for this workshopThis Region (us-east-1).
7. For VPC ID (Accepter) selectVPC C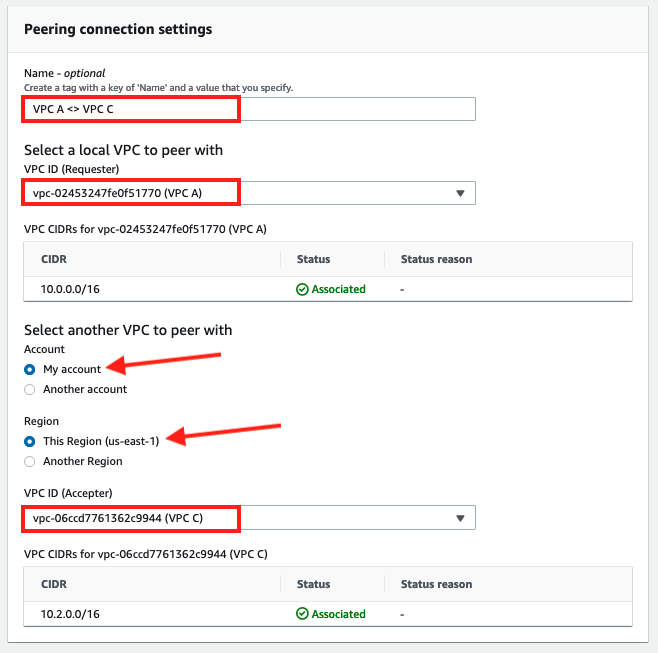
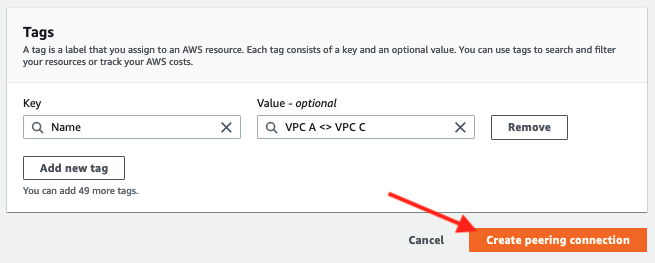
8. Click on Create peering connection
9. The newly created peering connection will be in Pending Acceptance state.
10. On the resulting screen, navigate under Actions and click Accept request
11. On the following pop-select, click Accept request
12. Click on Modify my route tables now in the resulting screen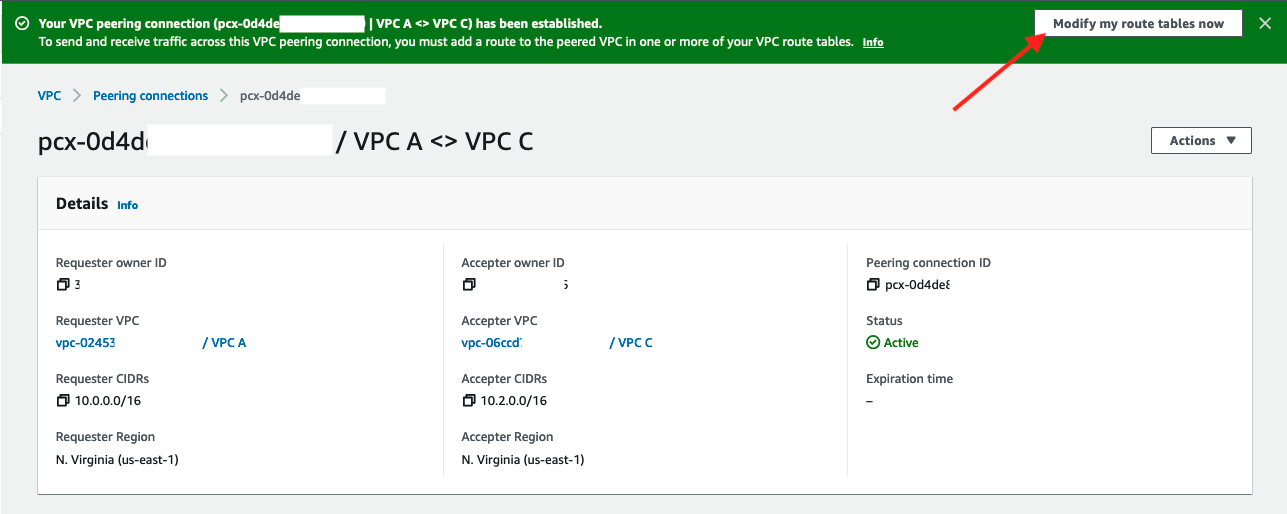
Update Route Table in VPC A
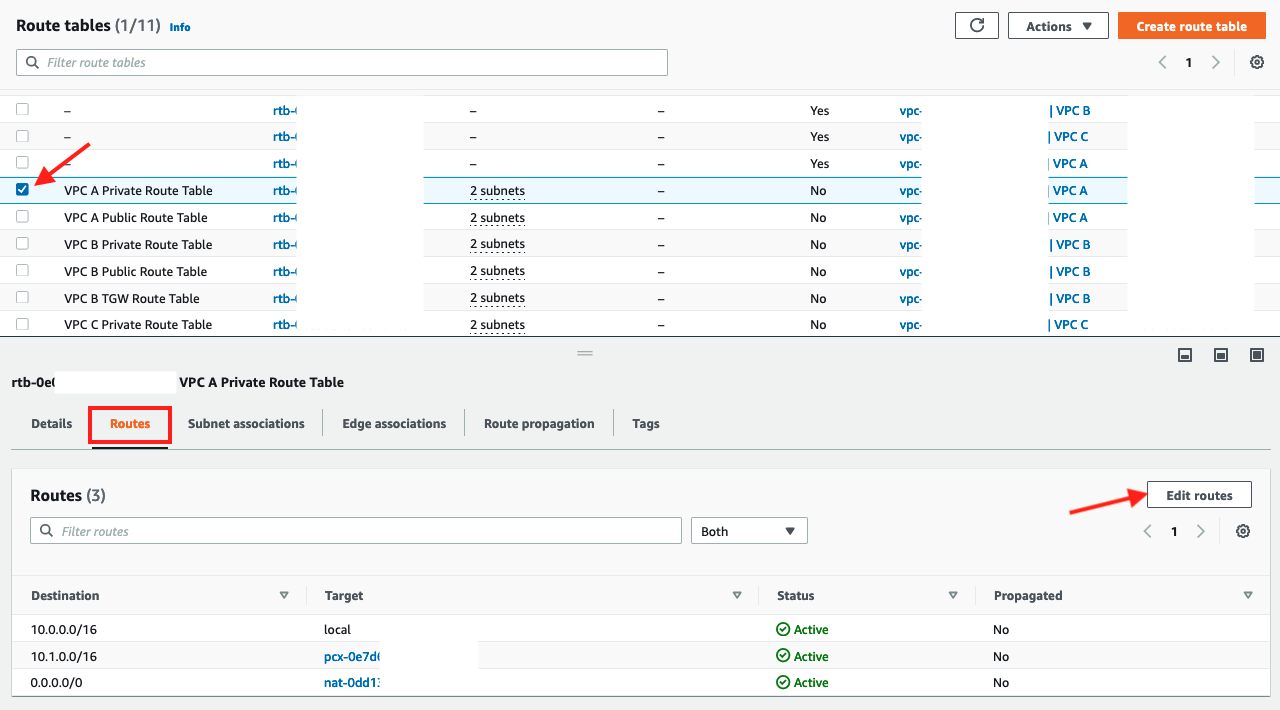
- Select check box for
VPC A Private Route Table - Scroll down and click on Routes tab
-
Click Edit routes
4. Add route entry for "VPC C" using the CIDR range10.2.0.0/16and selecting Peering ConnectionVPC A <> VPC Cfor the target
5. Click Save changes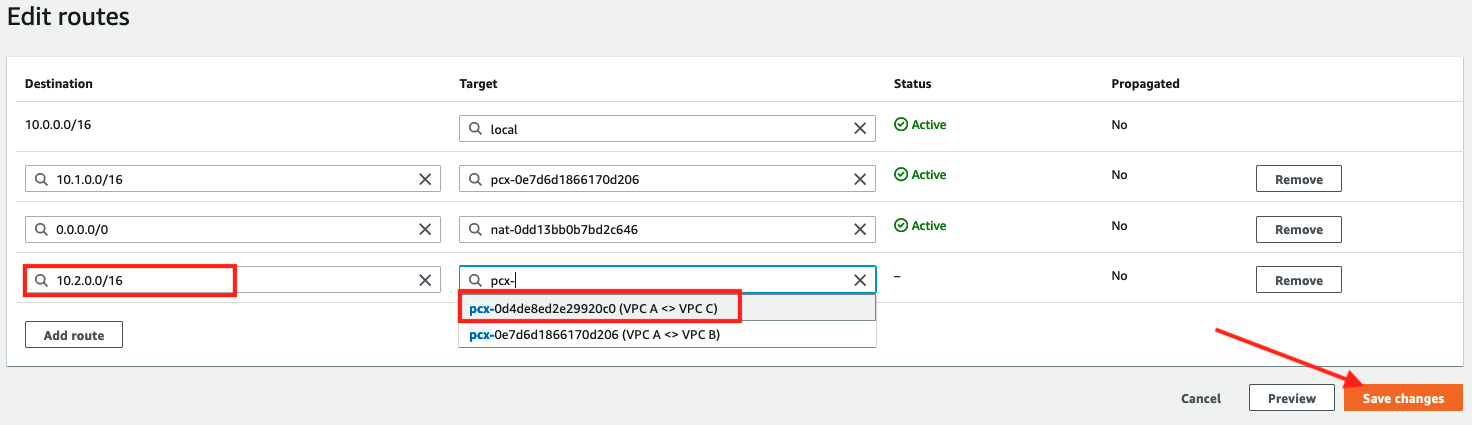
6. Confirm that the new route appears in the Routes tab of the resulting screen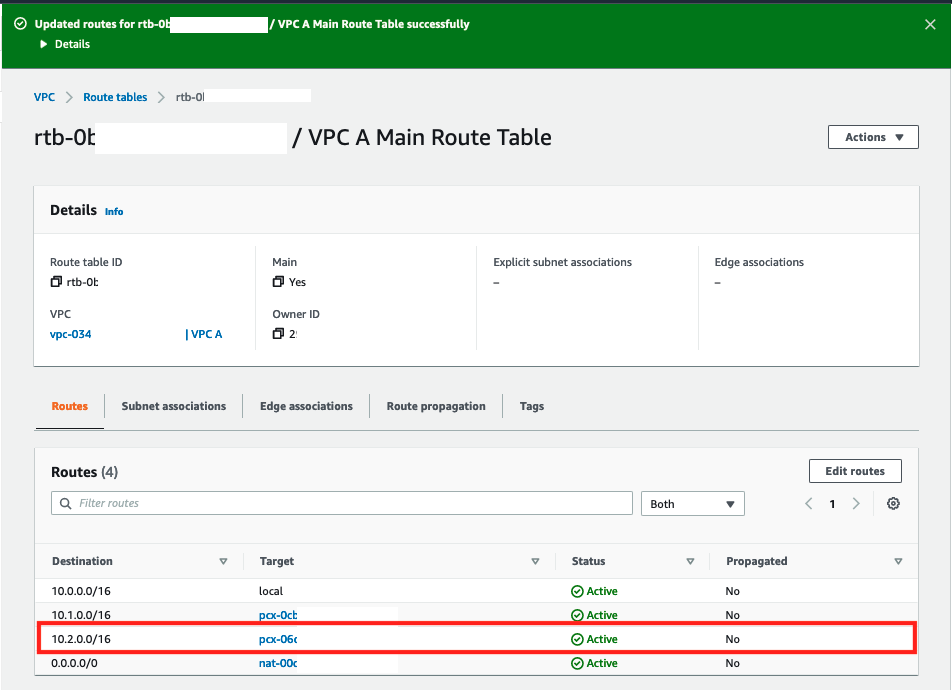
Update Route Table in VPC C
- Navigate back to Route Tables and select check box for
VPC C Private Route Table - Click on Routes tab
-
Click Edit routes
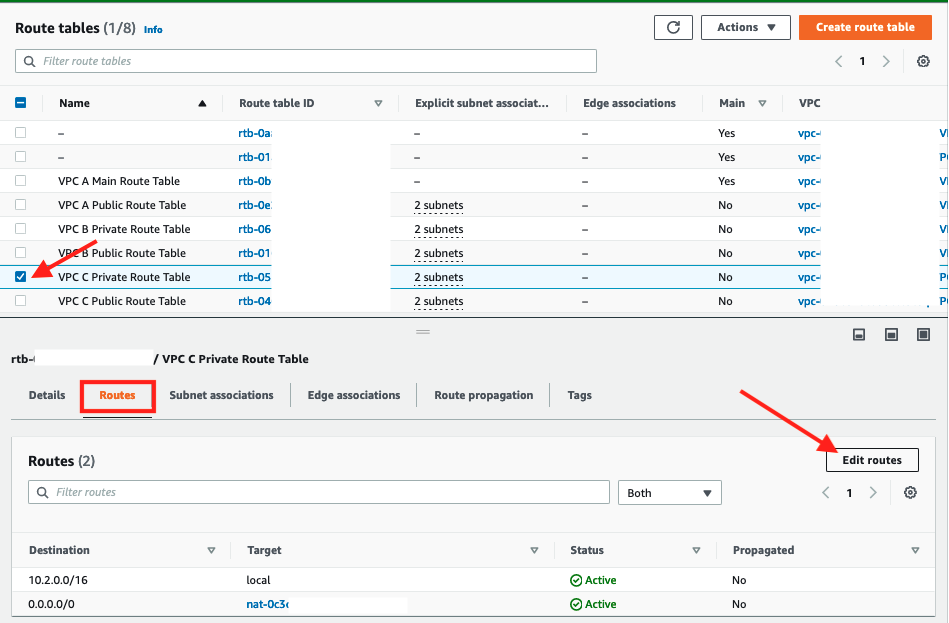
4. Add a route entry for VPC A using CIDR range10.0.0.0/16as the Destination andVPC A <> VPC Cas the Target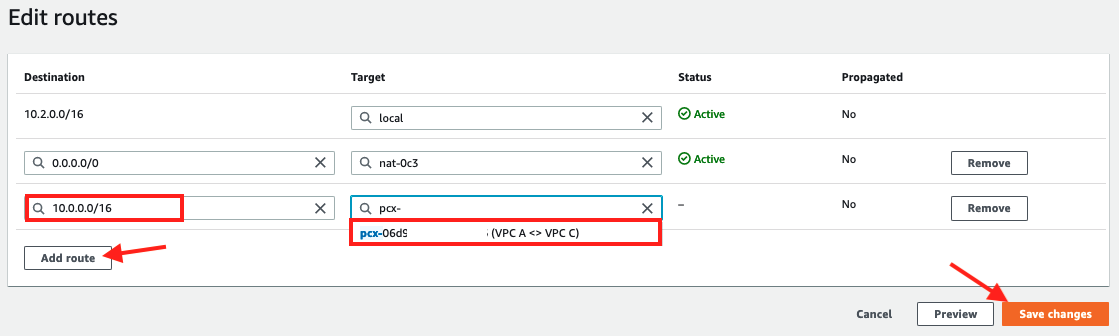
5. Click Save changes
6. The route table will be updated with routes for the peering connection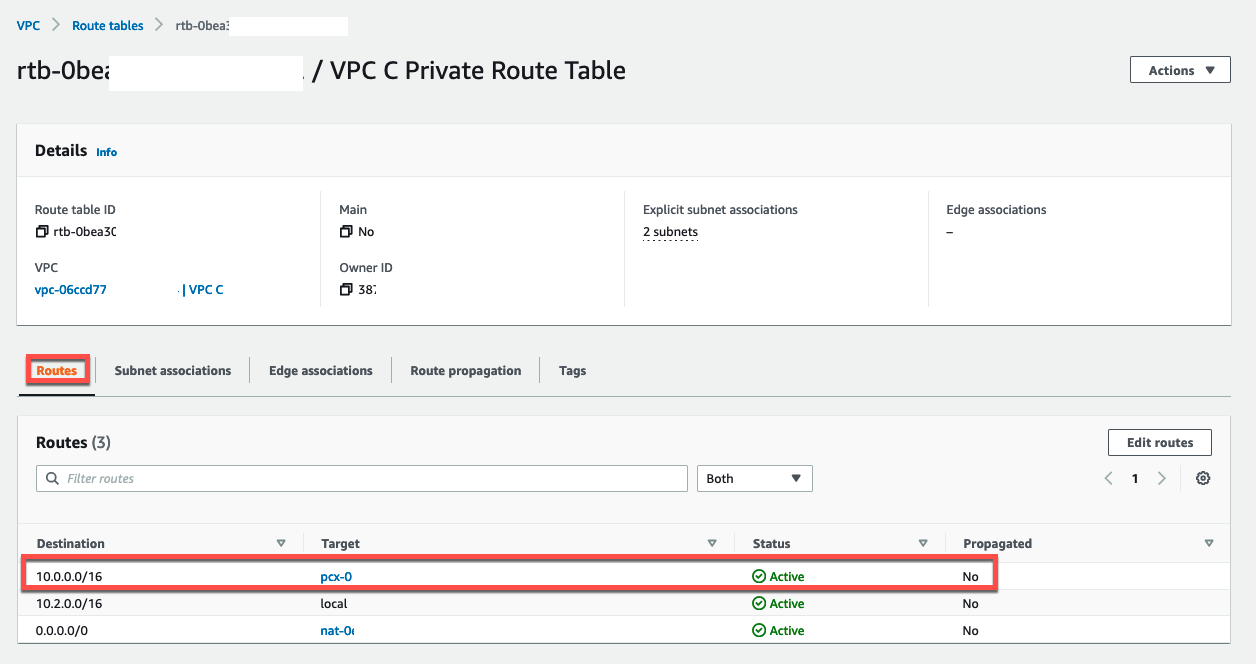
Check Connectivity
Check Connectivity from VPC A
- Proceed to EC2 Console.
-
Select the
VPC A Private AZ1 ServerEC2 instance and click the Connect button above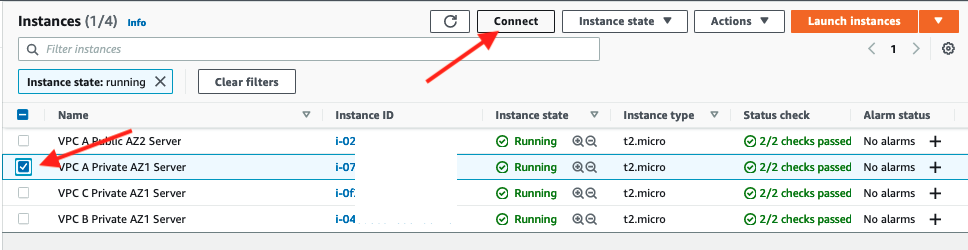
3. Click Connect in the Session Manager tab
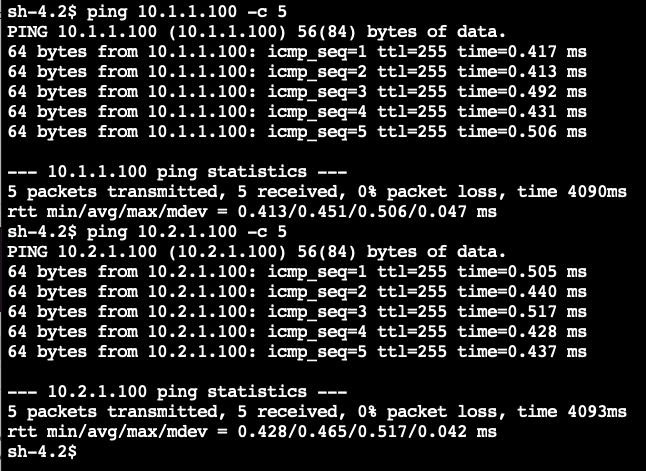
4. Try pinging EC2 instances in VPC B and VPC C using the private addresses of the instances
ping 10.1.1.100 -c 5
ping 10.2.1.100 -c 5
If peering and routing are configured correctly, you should be able to ping both instances.
Check Connectivity from VPC B
- Terminate the Session Manager connection and in the resulting screen click on Instances.
-
Select VPC B Private AZ1 Server EC2 instance and connect using Session Manager.

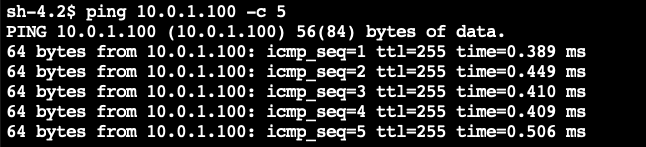
3. Ping the EC2 instance in VPC A using the IP address10.0.1.100
ping 10.0.1.100 -c 5
- Can you ping the instance in VPC C using the IP address
10.2.1.100?
ping 10.2.1.100 -c 5

Important
There is no direct peering between VPC B and VPC C. VPC B and VPC C cannot communicate via VPC A because VPC peering does not permit transitive routing.
- Terminate the Session Manager connection and close the browser tab.
Congratulations you've set up a peering architecture that connects VPC A to VPC B and VPC C but prevents VPC B and VPC C communicating.
While this approach can be used to interconnect many VPCs, managing many point-to-point connections can be cumbersome at scale. A more scalable approach is to utilize AWS Transit Gateway so we will now remove the point-to-point peering connections between VPCs in preparation for setting up Transit Gateway (TGW) to interconnect the three VPCs
Delete VPC Peering Connections
- In the VPC Dashboard navigate to Peering Connections
-
Select the
VPC A <> VPC Bpeering connectoin and delete it by clicking Actions and selecting Delete peering connnection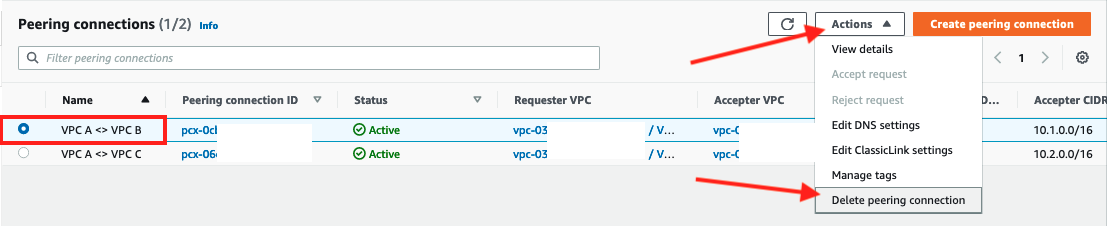
3. Select the checkbox to Delete related route table entries to avoid traffic blackholing scenario.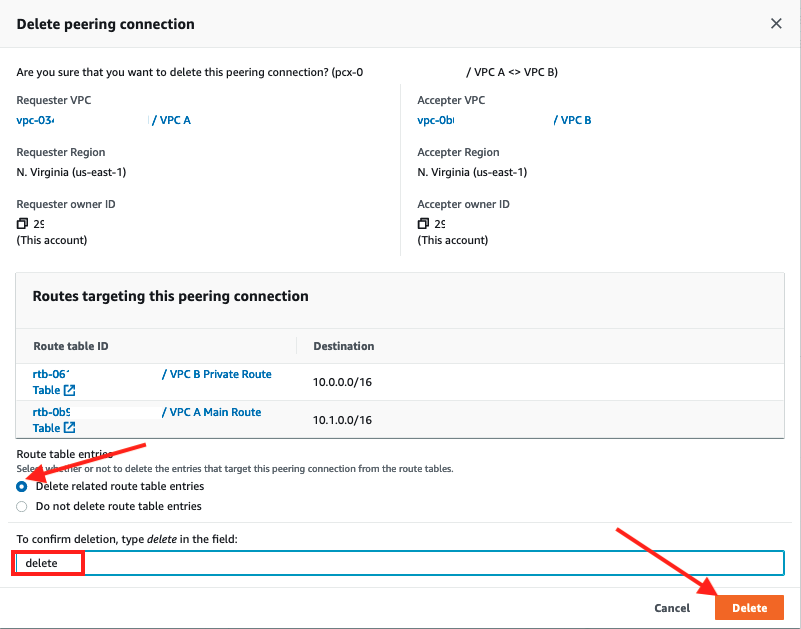
4. Typedeletein the text box and click Delete
5. Repeat deletion of VPC peering for theVPC A <> VPC Cconnection.
Congratulations you now have now completed this section of the lab.