Establish VPN Connection
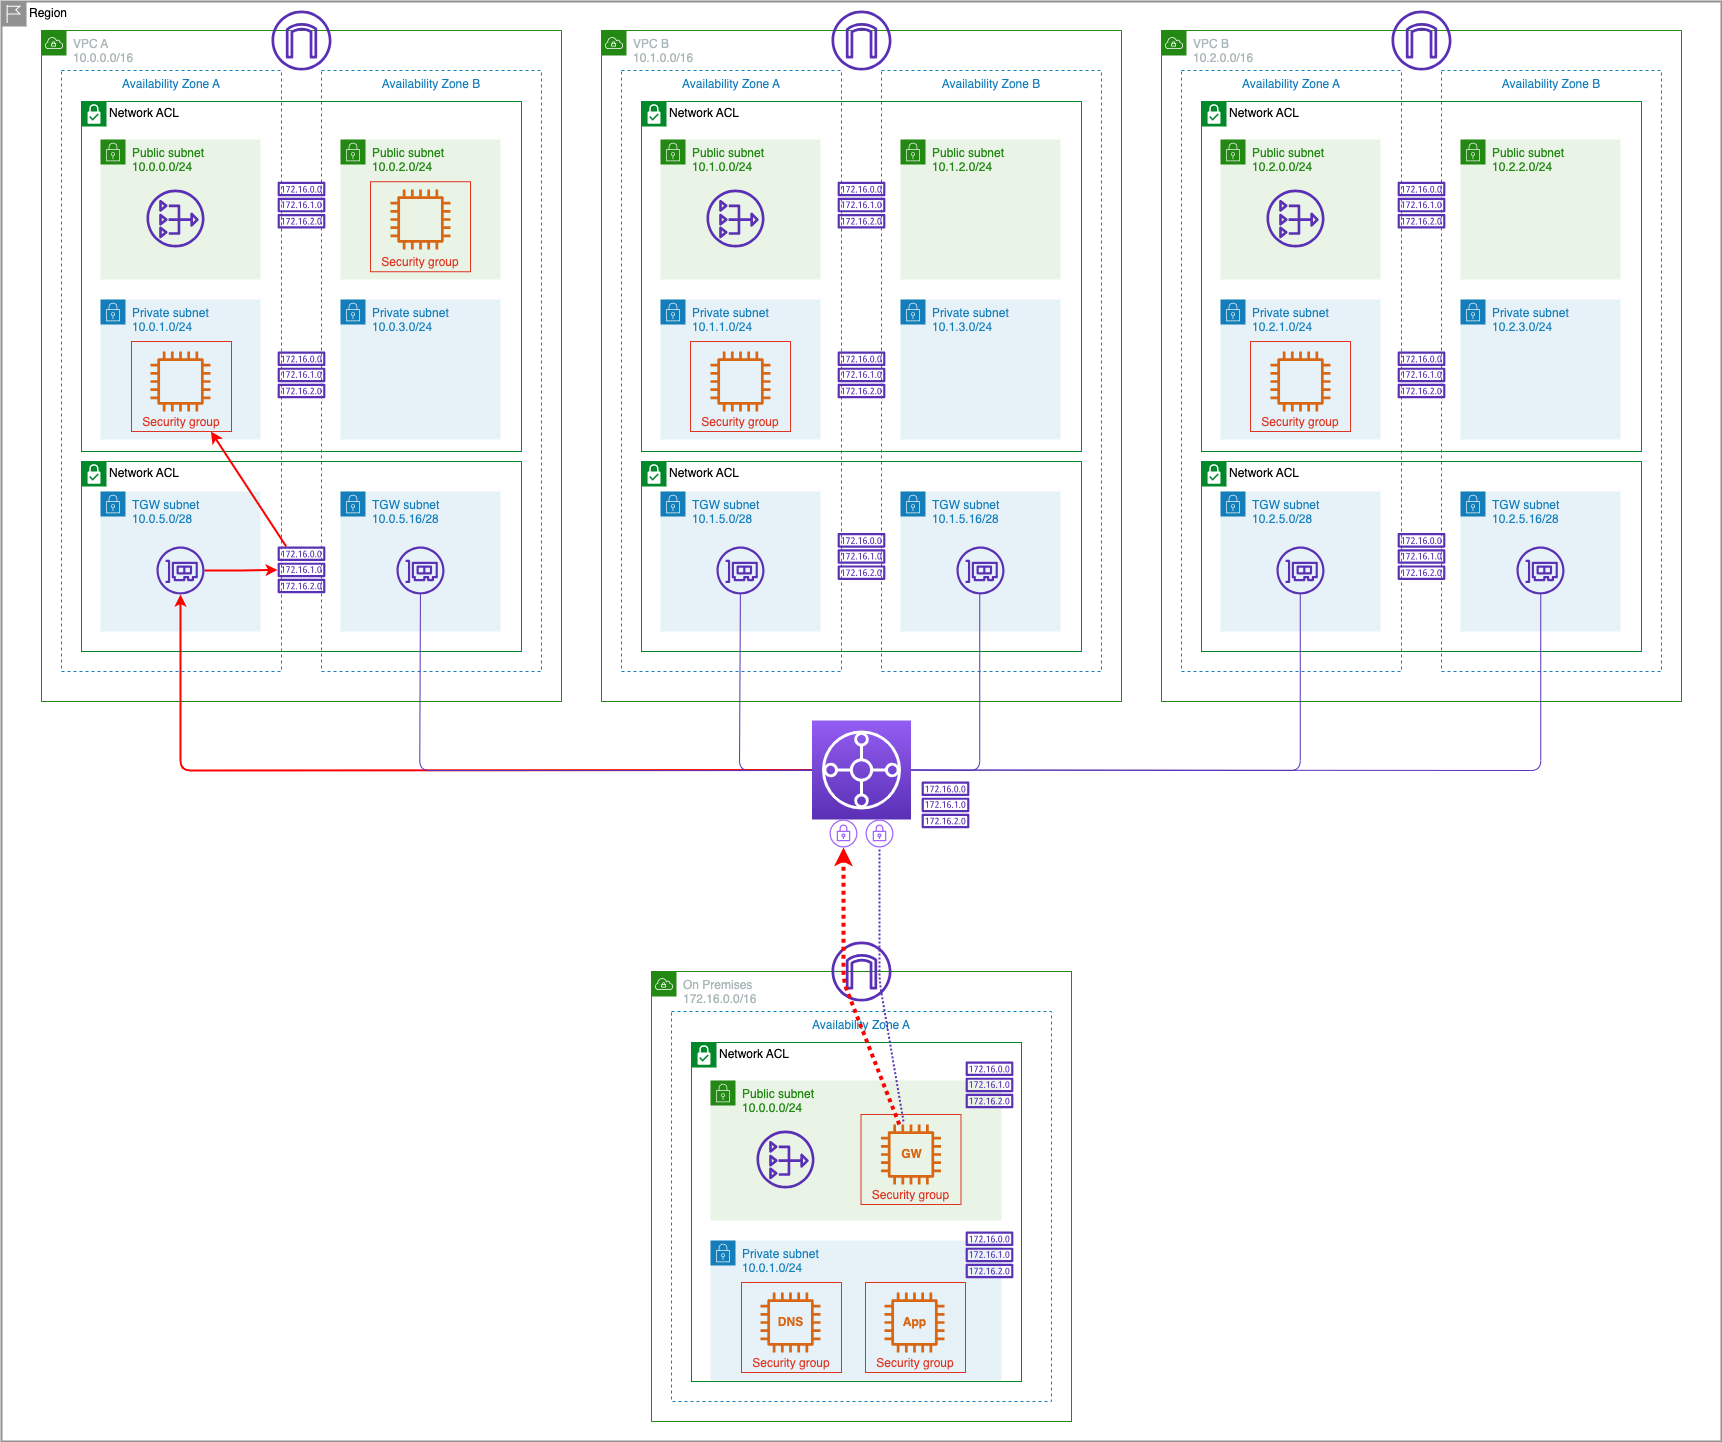
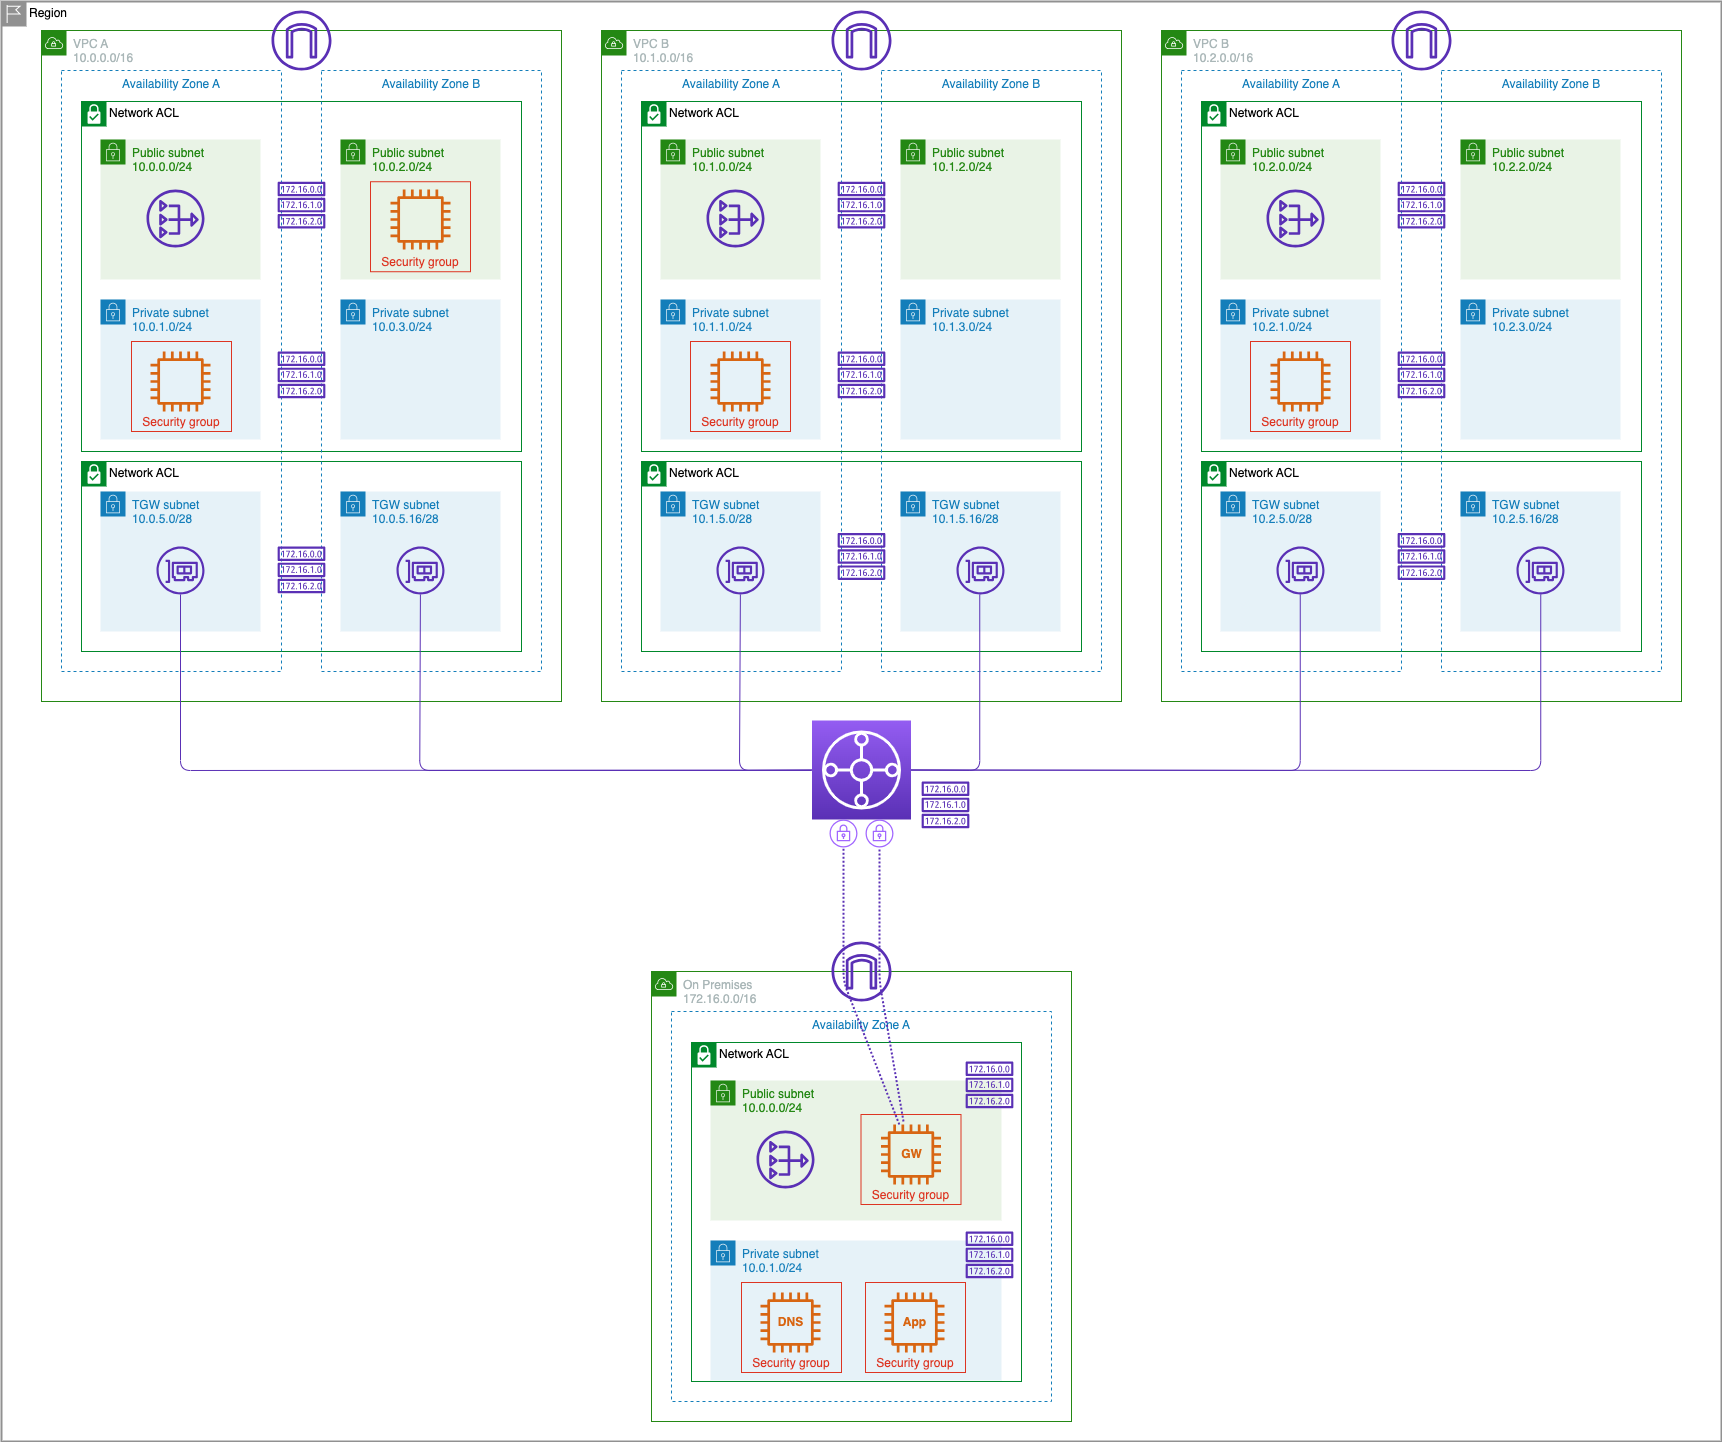
In the earlier Multiple VPCs lab we created a Transit Gateway to interconnect our the VPCs. To integrate the simulated datacenter environment, we will establish a VPN connection between the Transit Gateway and a customer gateway device at the datacenter. Since this is a simulated environment, we will use OpenSWAN running on an EC2 host as the Customer Gateway.
Subscribe to 8000v Router
- Click the following link to subscribe to the 8kv router in AWS Market Place: Cisco 8000v BYOL Router on AWS Market Place
Important
Make sure you have deployed BOTH Cloud Formation stacks in the on-premesis intro page. 1 for VPCs and TGW, and another for the on-prem environment.
Create TGW VPN Attachment
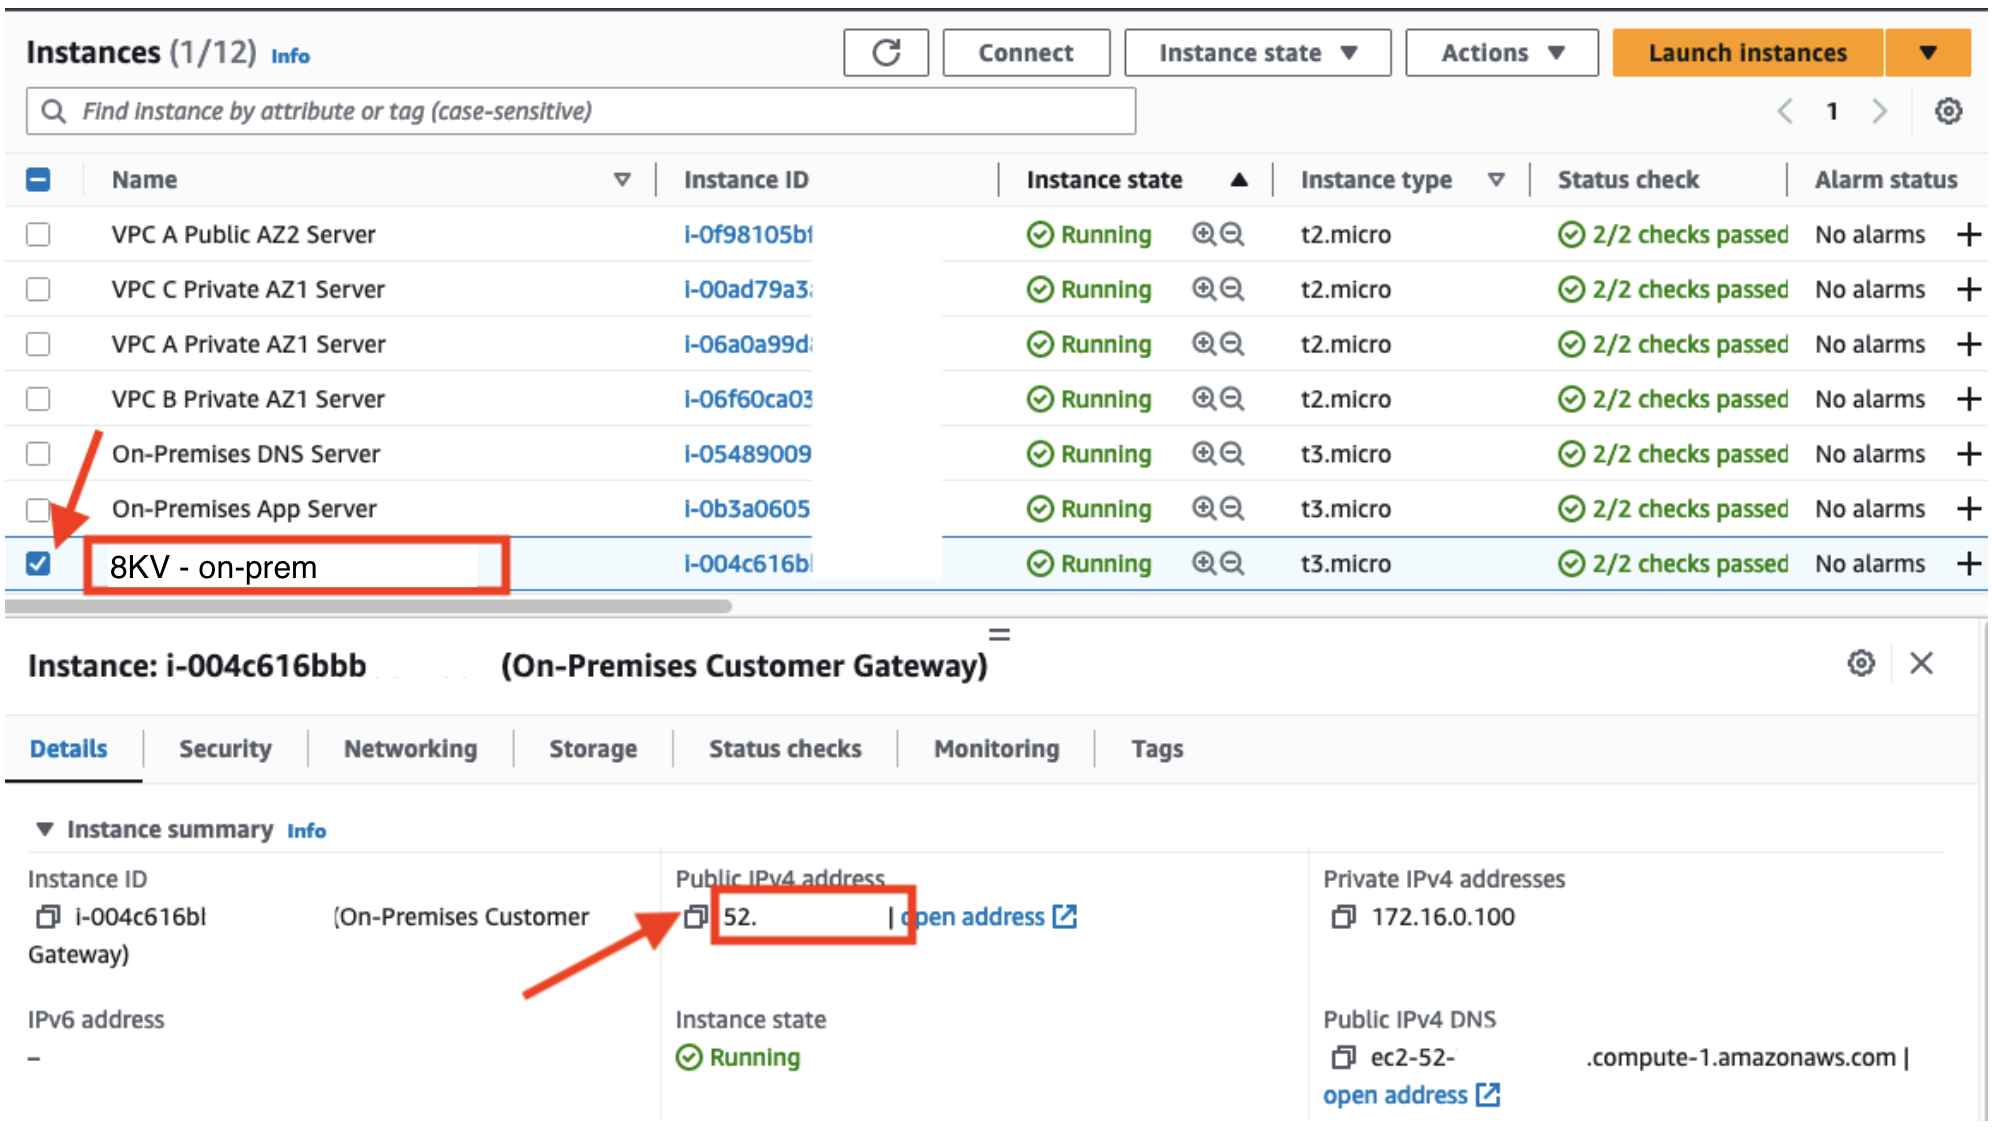
First, we need to capture the Public IP of the Customer Gateway that we will need in a later step.
-
In the EC2 Dashboard navigate to Instances
-
Select the check box beside the
8KV - on-premEC2 instance and copy down the Public IPv4 address
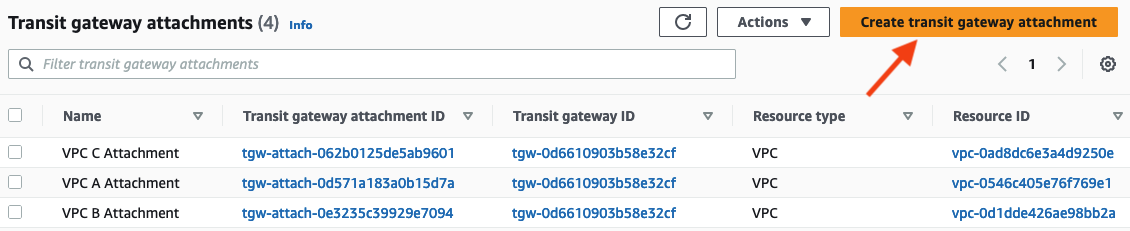
Now we can create the VPN attachment on the Transit Gateway.
-
In the VPC dashboard navigate to Transit Gateway Attachments
-
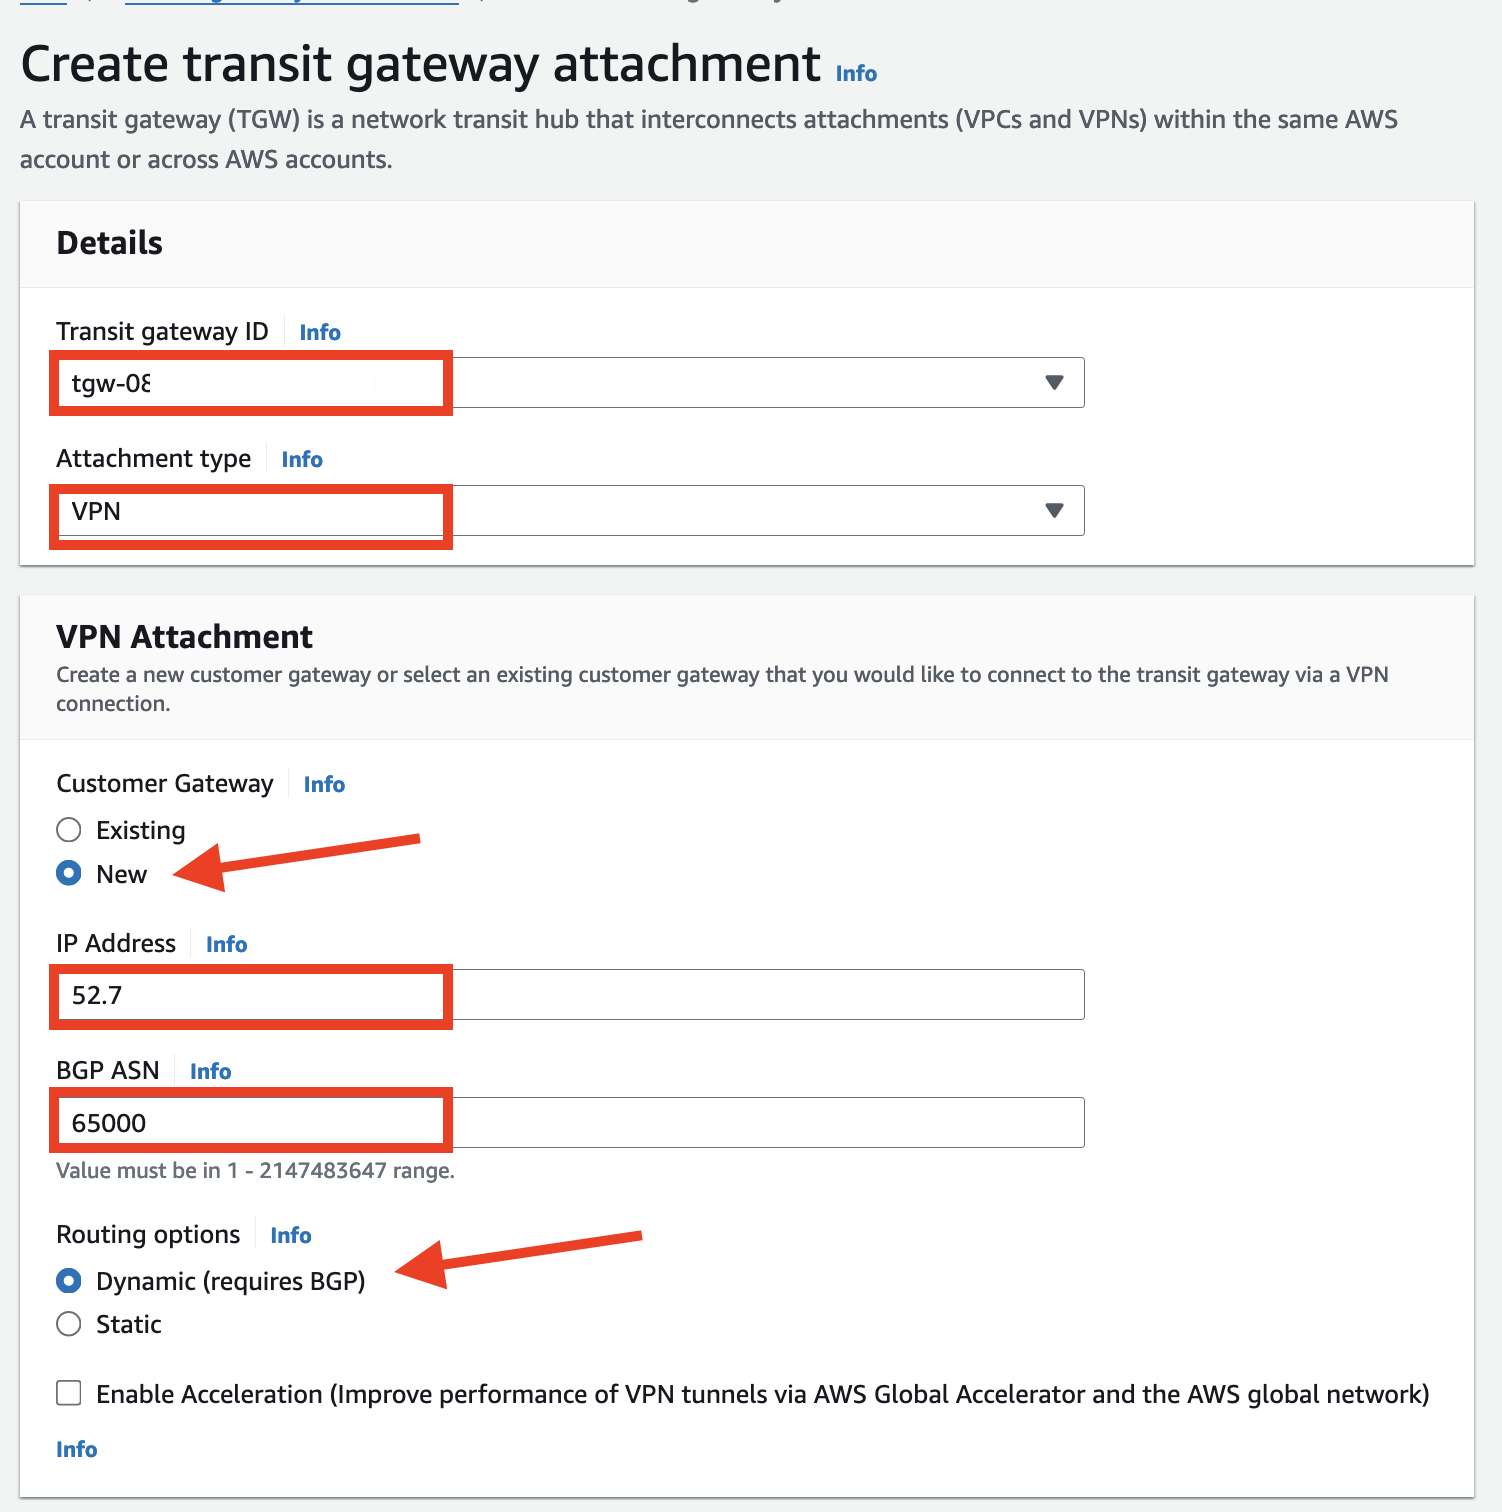
Click Create transit gateway attachment
-
Under Transit gateway ID select the Immersion Day TGW
-
Change Attachment type to VPN
-
Under Customer Gateway select New
-
For IP address, enter the Public IP of the
8KV - on-premEC2 instance that you captured in a previous step. -
Change the Routing Options to Dynamic routing.
-
Leave all other settings at their defaults. Click Create transit gateway attachment
- Refresh Transite Gateway Attachment page to see newly created VPN Attachment
Create Site-to-Site VPN Connection
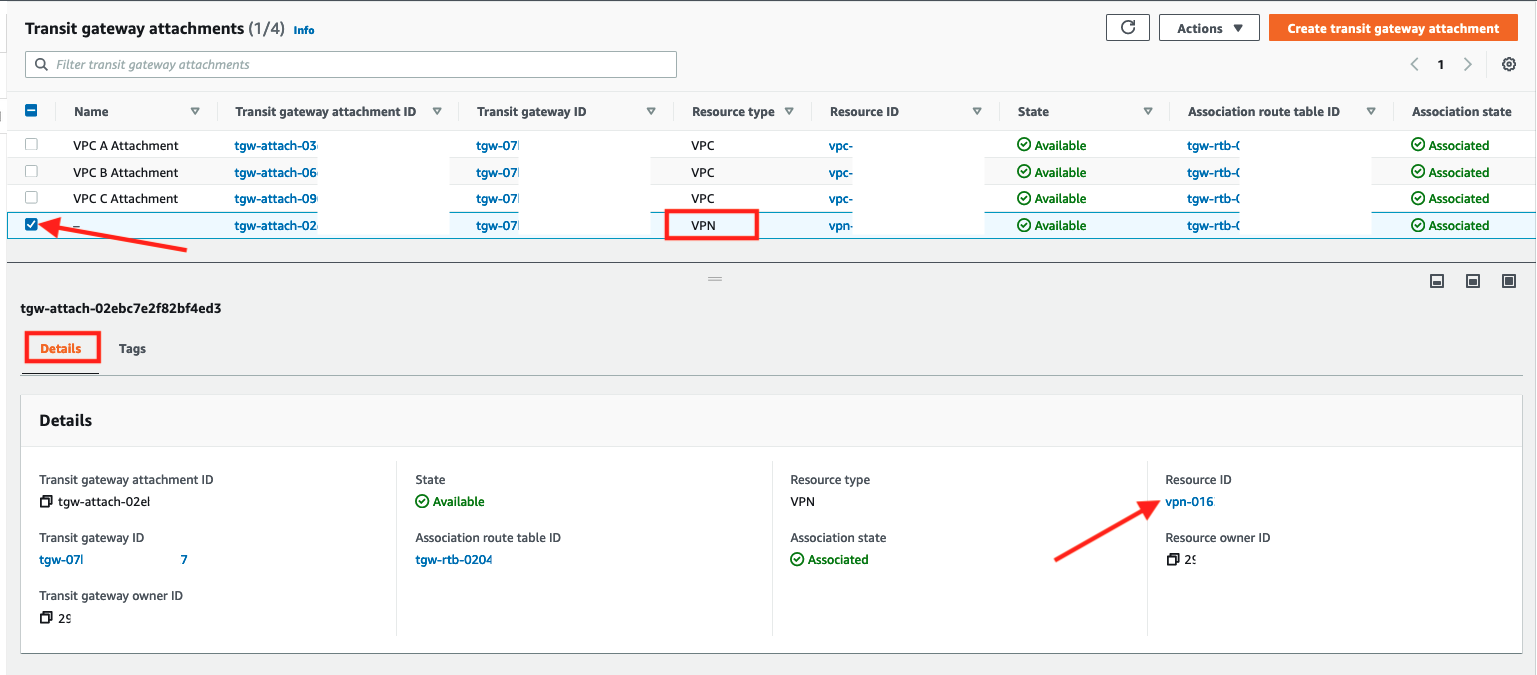
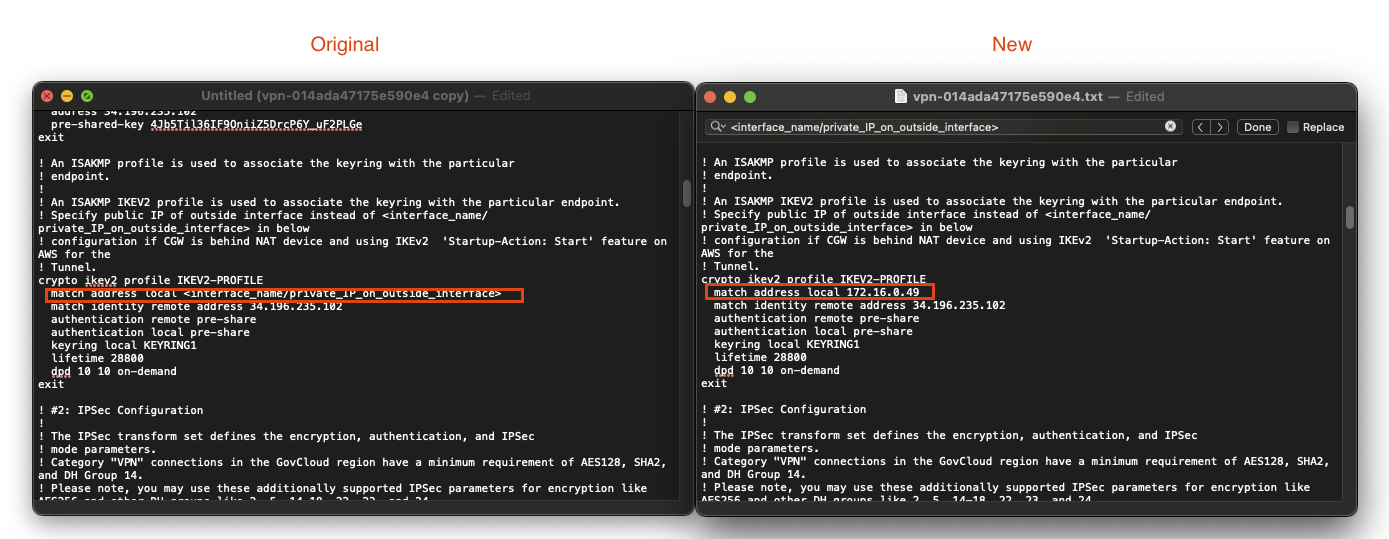
- Remain in the Transit Gateway Attachments dashboard and wait for the newly created VPN connection to transition to the available status. Scroll down to the details tab and click on the Resource ID for the Site-to-Site VPN (starting with vpn-)
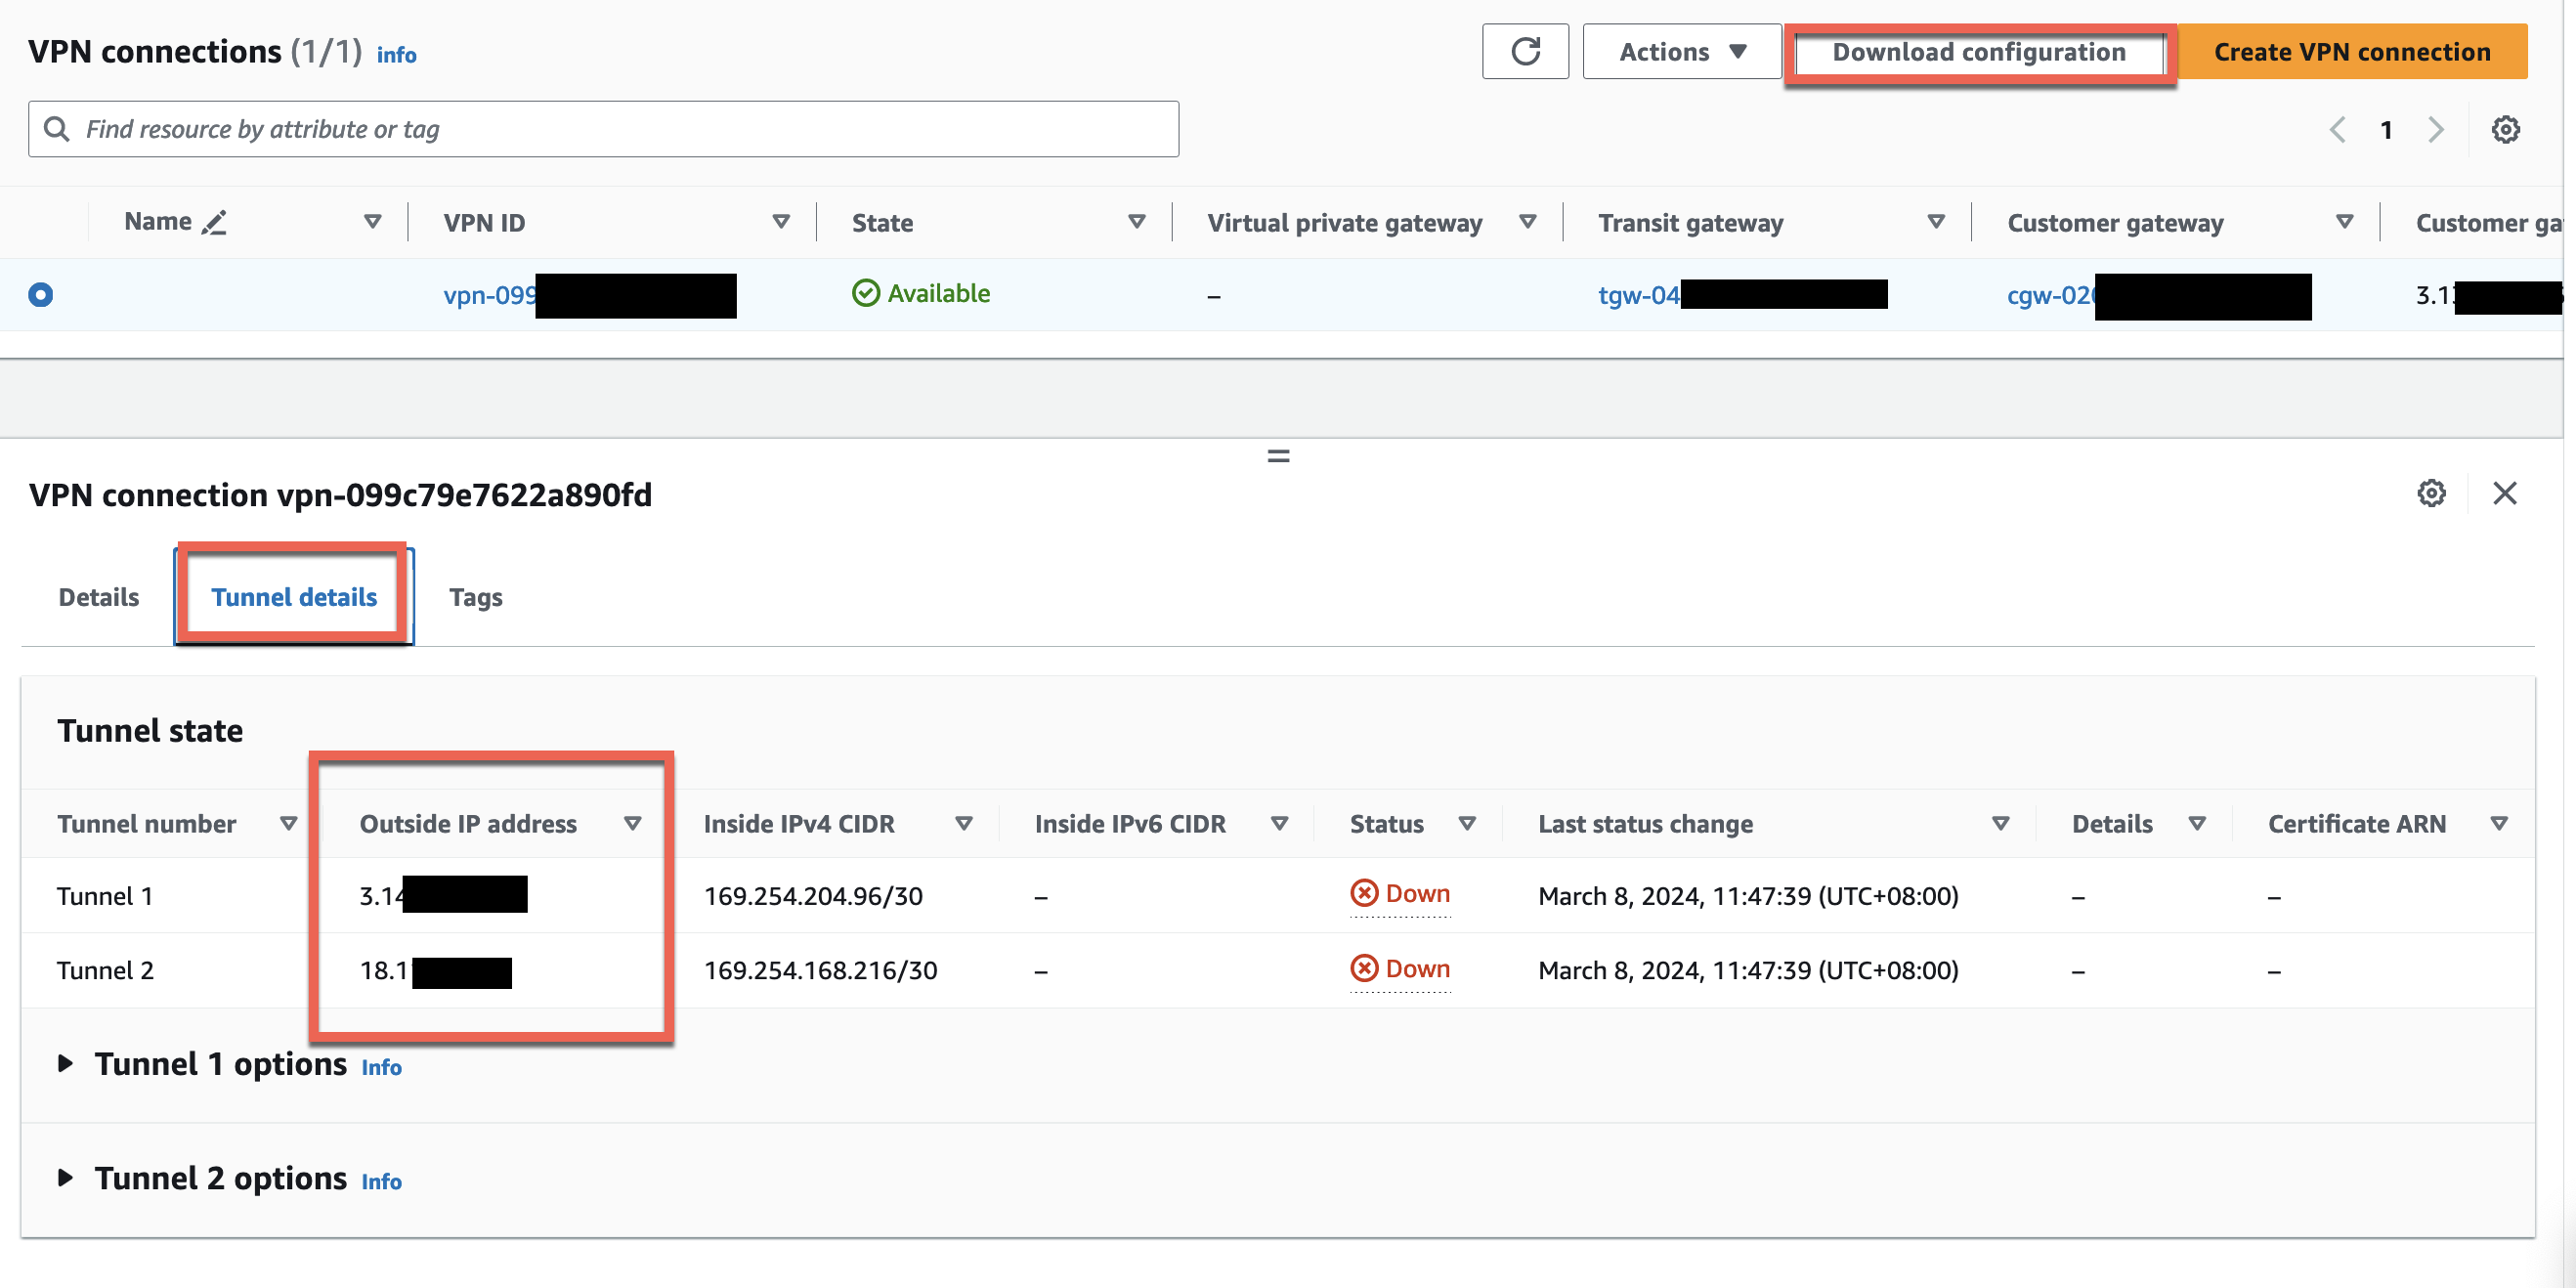
2. In the resulting screen, select the check box next to the VPN and click on the Tunnel details tab. Write down the two Outside IP addresses, you will need these at a later step. Click Download configuration
3. Select Cisco Systems, Inc for the vendor.
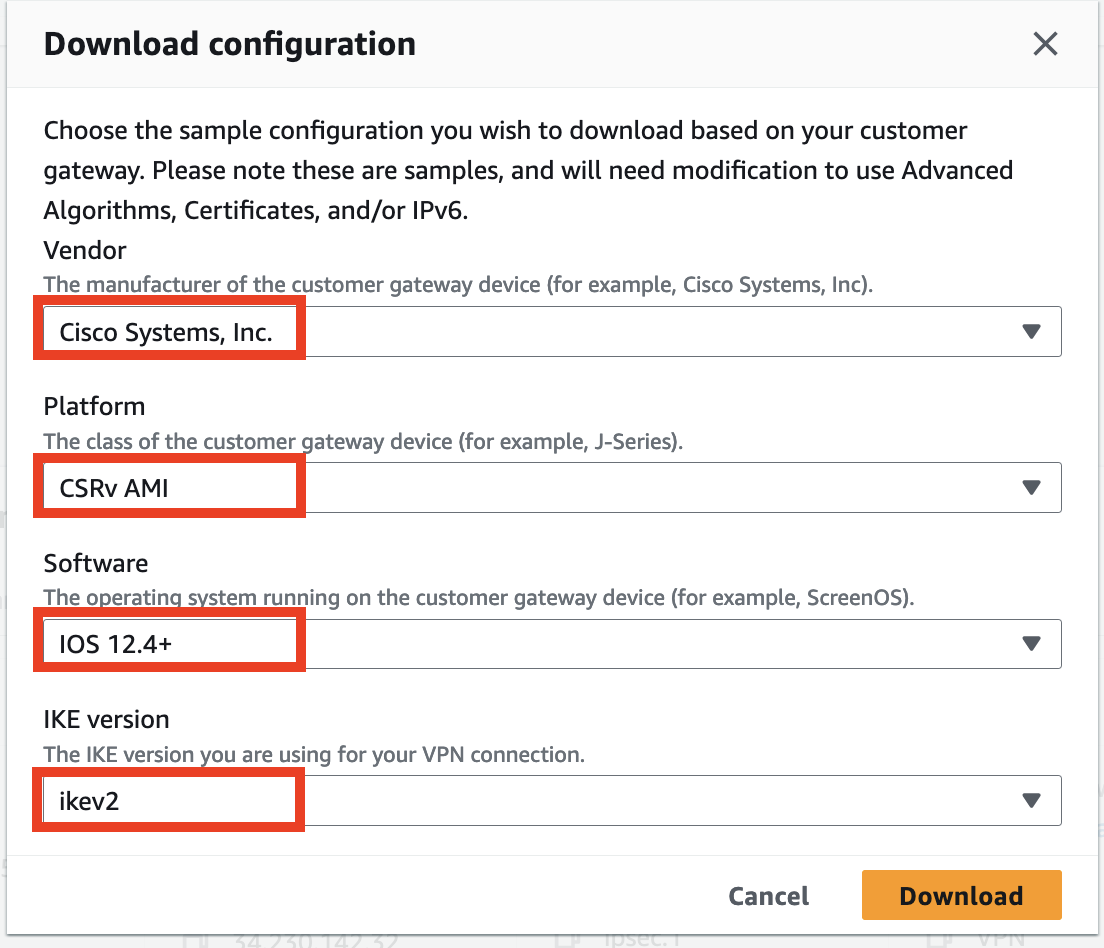
- Click Download and save the downloaded file for later.
- Click Cancel to close the window.
Create a new Transit Gateway Route Table for the VPN
The new VPN connection needs to be associated to a transit gateway route table. Since none of the existing ones are suitable (they do not have all the VPCs routes), we will create a new one.
-
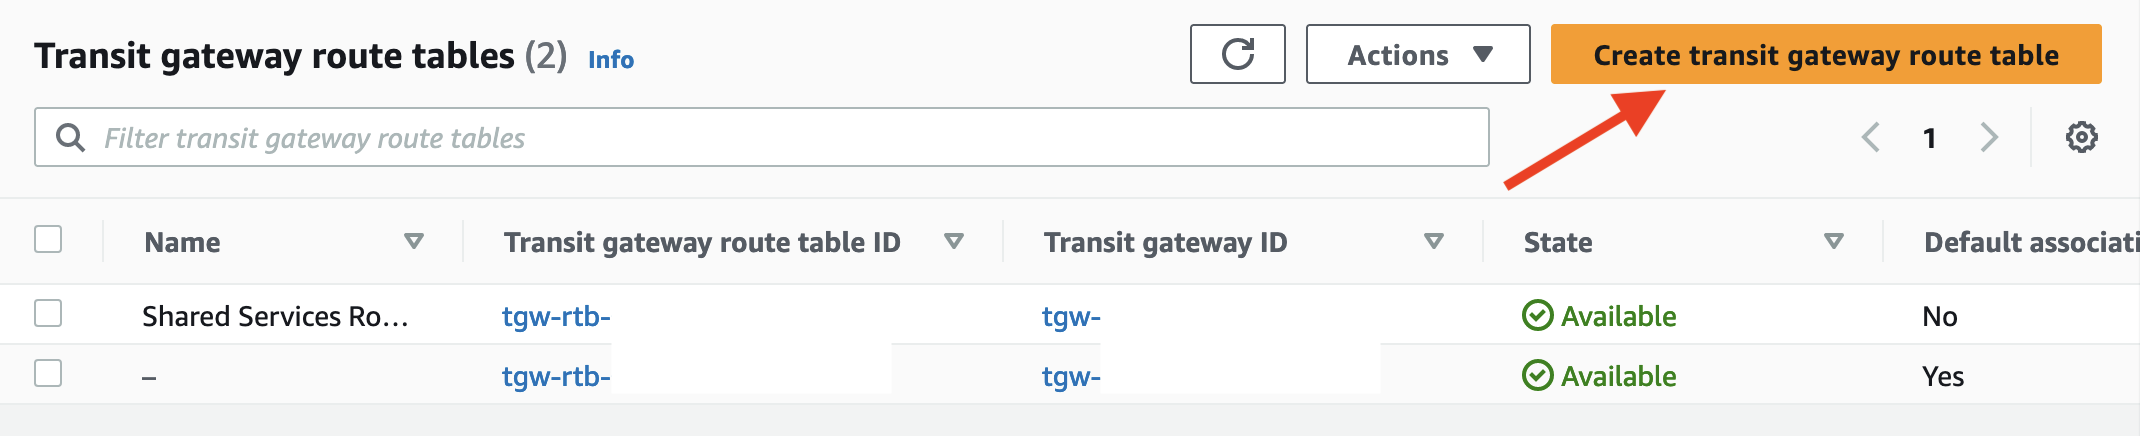
In the VPC console navigate to Transit Gateway Route Tables
-
Click Create transit gateway route table
-
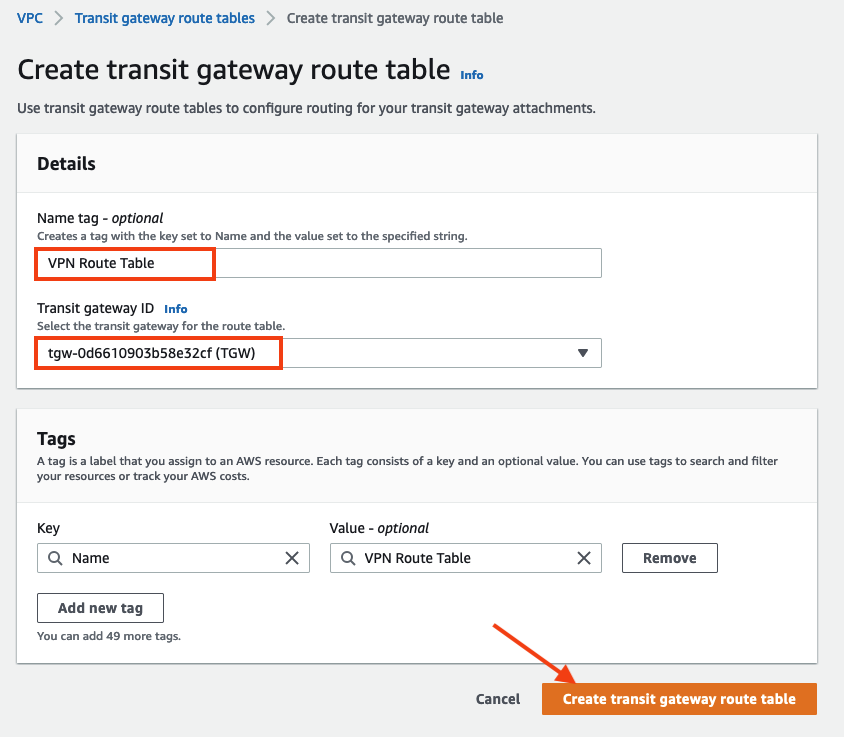
Enter the name
VPN Route Tableand select the Transit gateway ID. -
Click Create transit gateway route table
Delete VPN Attachment from Transit Gateway default Route Table
When we created the transit gateway, we left the option Default route table association enabled. This means that when we created the VPN attachment, it was automatically associated with the transit gateways default route table. Before we associate the VPN attachment to the new VPN route table, we have to disassociate it from the default route table.
Important
If you created the VPCs and TGW with Cloud Formation, you do not need to complete this step. Default route table association is not enabled in the NetworkingWorkshopMultiVPCandTGW CloudFormation template deployed in the Security Controls or Connecting to On-Premises prerequisites sections.
- Navigate back to Transit Gateway Route Tables or remove the Transit gateway route table ID: filter.
- Select the check box for the TGW default route table and scroll down to the Associations tab
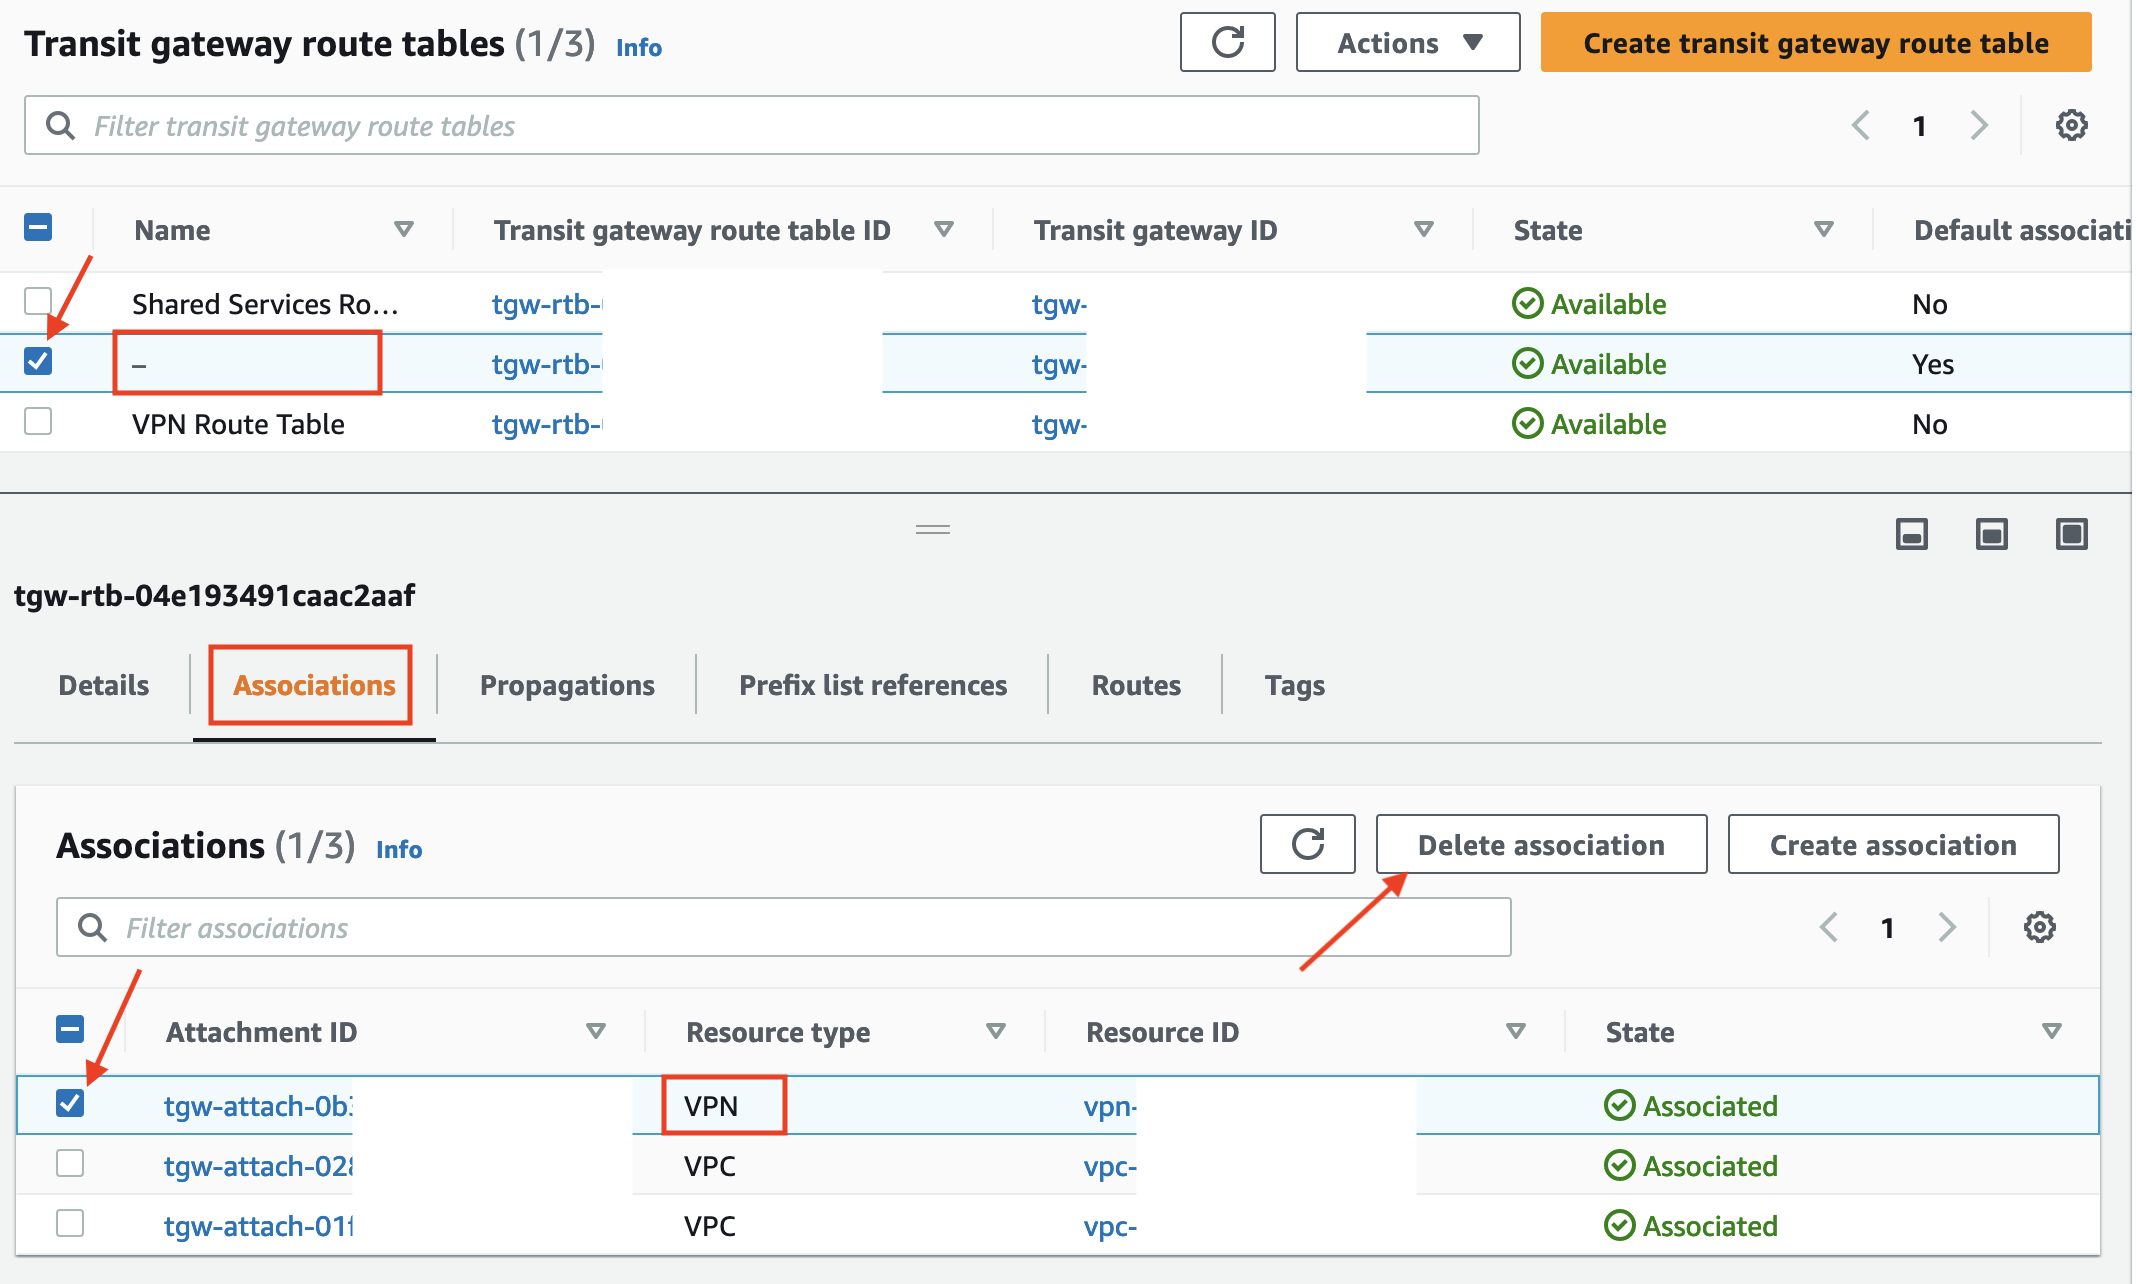
- Select the association with the resource type VPN and click Delete association
- Confirm the deletion by clicking Delete Association on the following screen
- The association will move into disassociating state.
Associate the VPN attachment to the new Transit Gateway Route Table
- Select the new
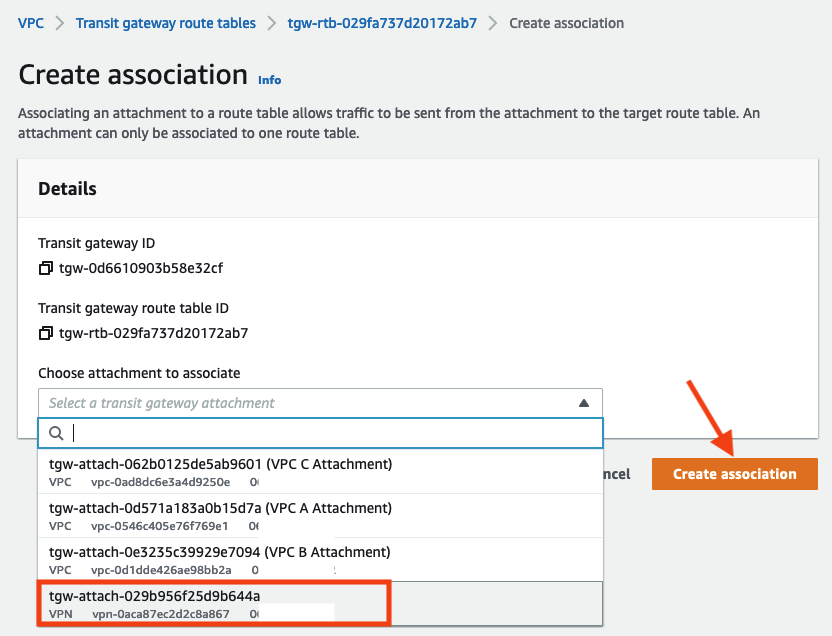
VPN Route Tableand click Associations tab. Click Create association
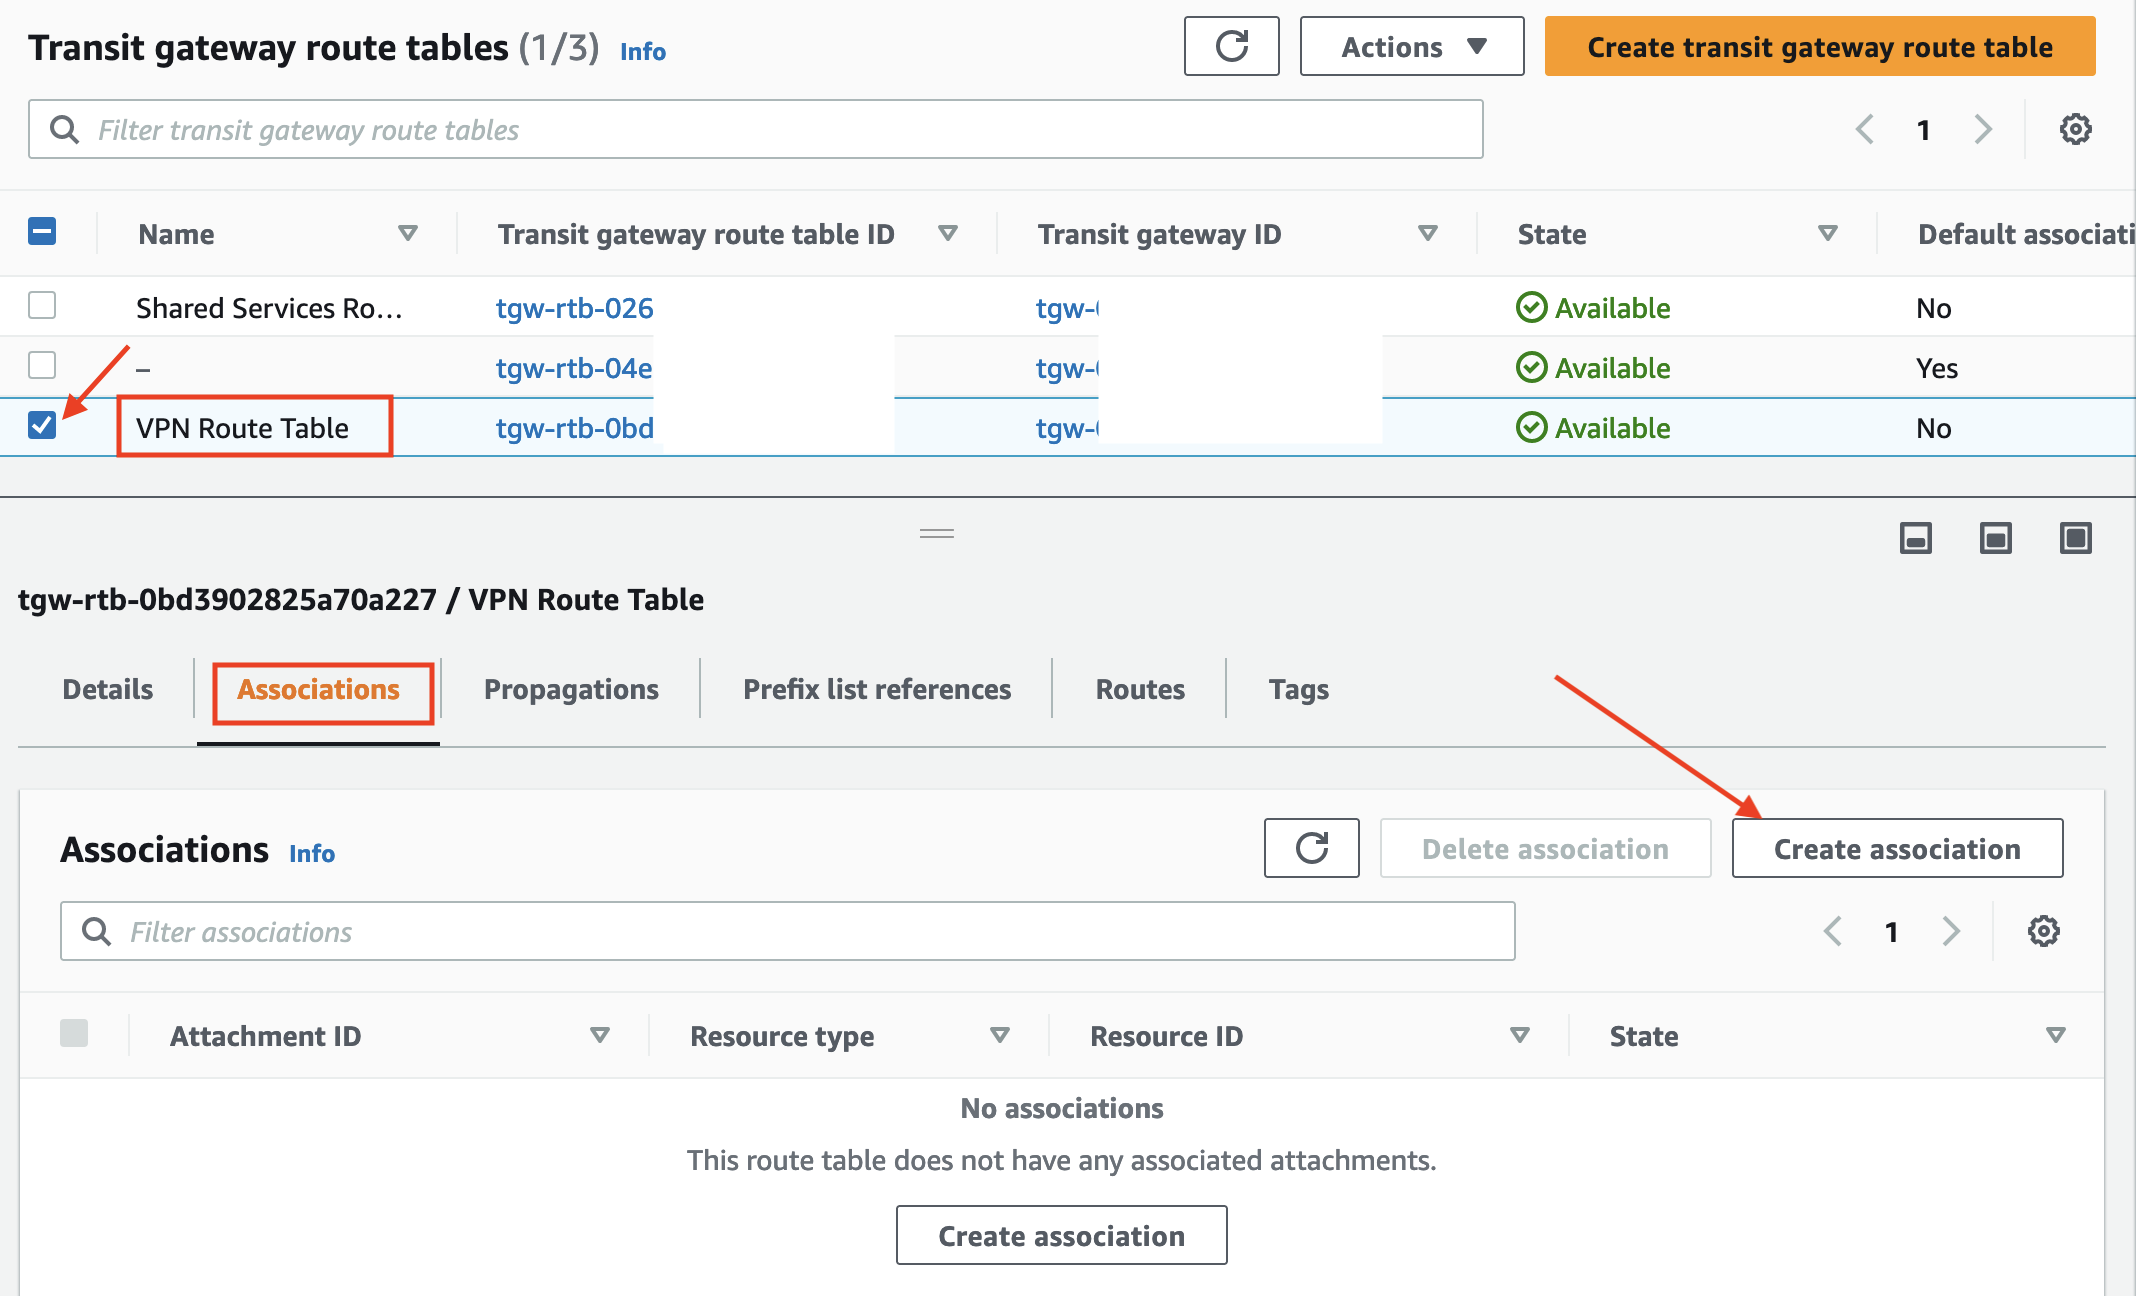
- Select the VPN Attachment from the list and click Create association
-
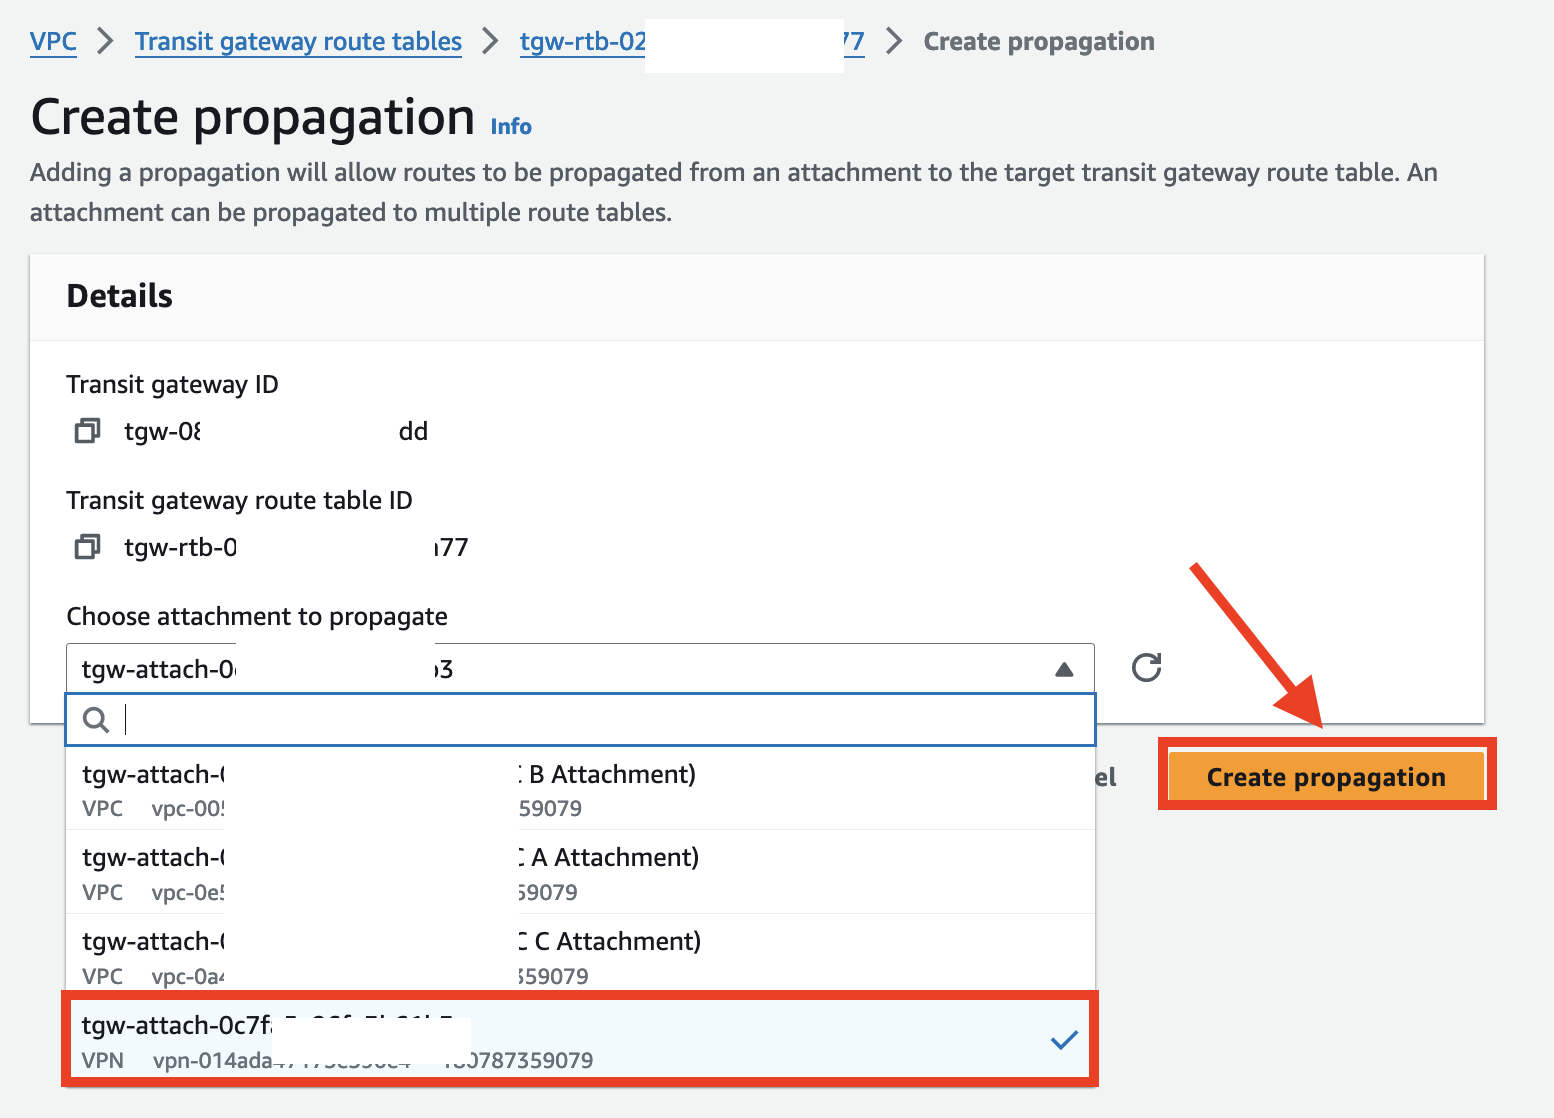
Keep the VPN Attachment selected and click Propagations tab and click Create propagation
-
Select the VPC A attachment and click Create propagation.
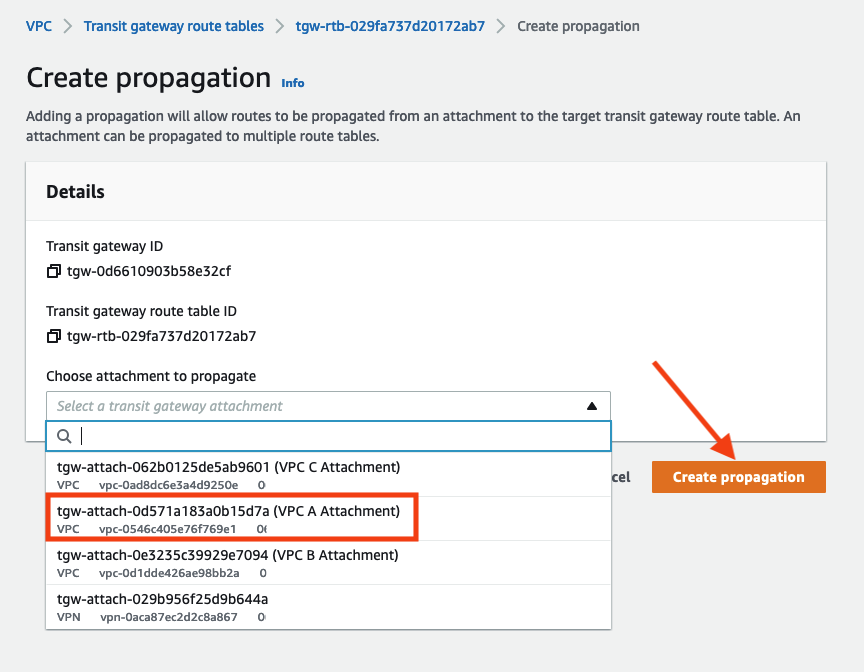
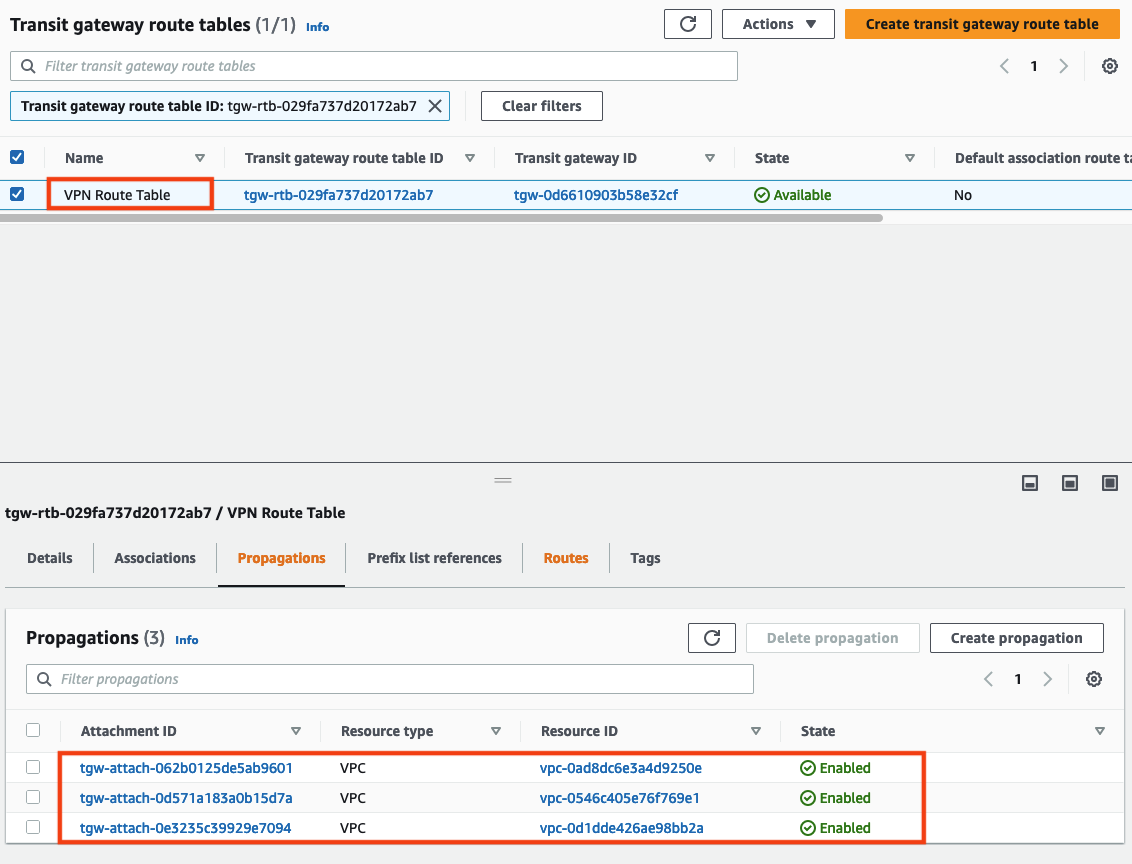
- Repeat this step for VPC B and VPC C.
The VPN connection is now associated to this route table, and has the ability to route to VPC A, B, and C.
Update Route Tables with On-Premise CIDR
Update Transit Gateway Route Table
Since we are using BGP dynamic routing for our VPN connection, we need to allow the VPN to propagate learned routes into the Transit Gateway Route Table by creating a propagation.
1. In the VPC console navigate to Transit Gateway Route Tables
2. Select the check box for the Transit Gateway's Shared Services Route Table route table and then select the Propagations tab in the lower pane, and click Create Propagation.
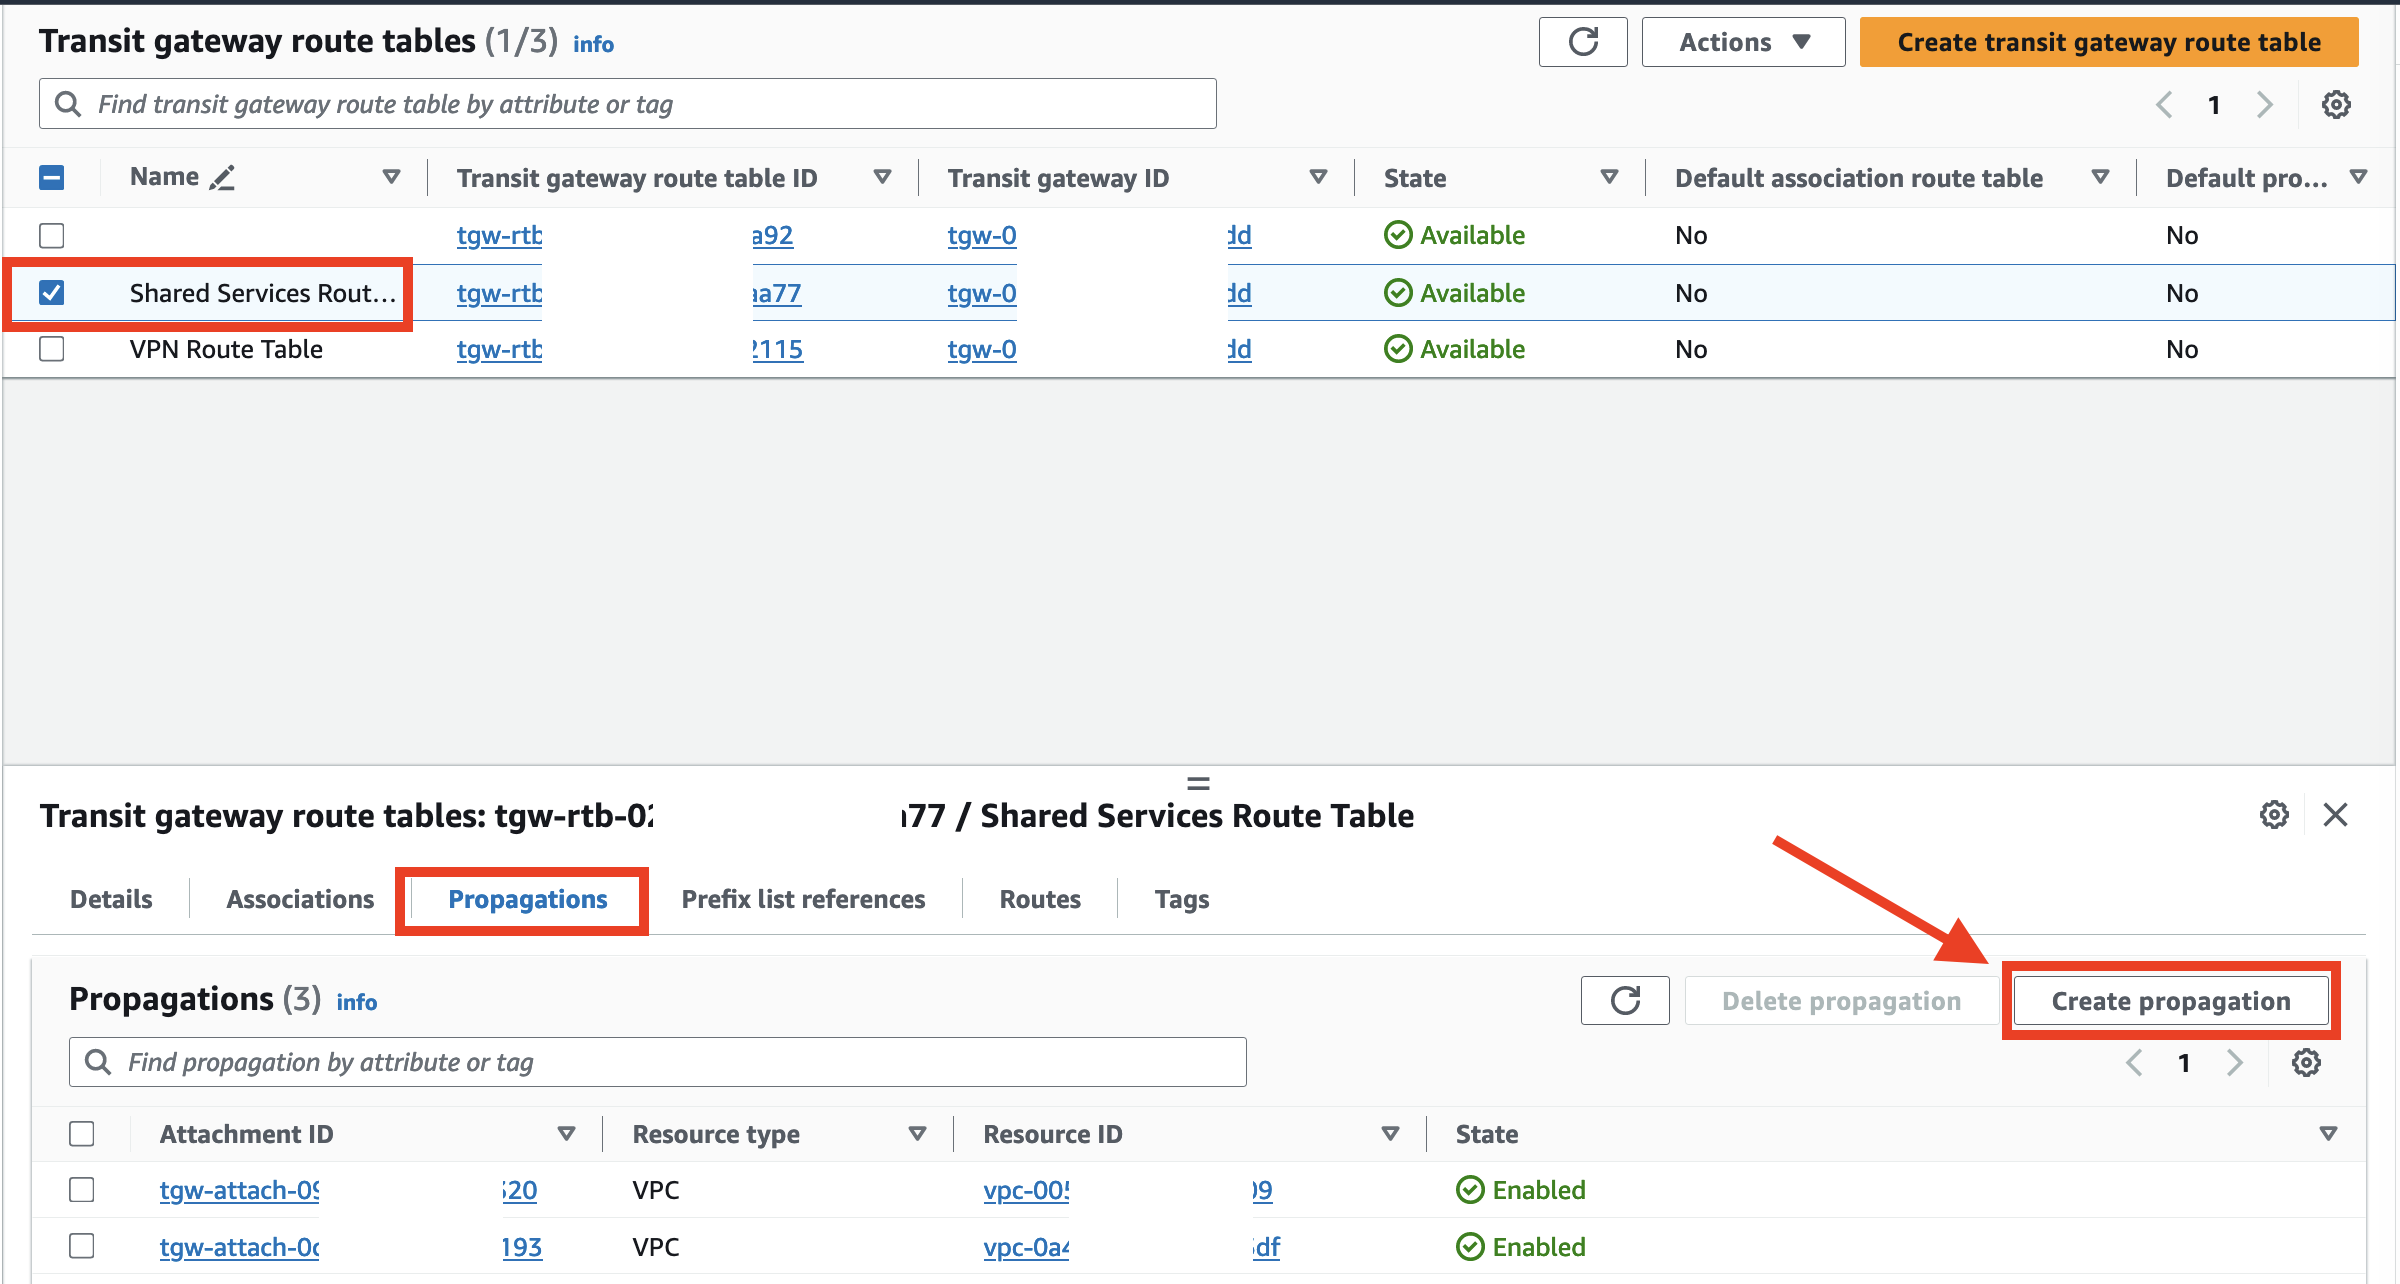
- Select the VPN Attachment and click Create Propagation.
- The route will not propagate until BGP is established.
Update VPC A Route Table
Now that we have a Transit Gateway Attachment through which to send traffic to our on-premises network we need to add routes from our AWS VPCs to the Transit Gateway for the on-premise CIDR block. For the purposes of this lab you're only going to add an entry to the private route table for VPC A.
1. In the VPC Dashboard navigate to Route Tables
2. Select the check box next to VPC A Private Route Table and scroll down to the Routes tab and click on Edit routes
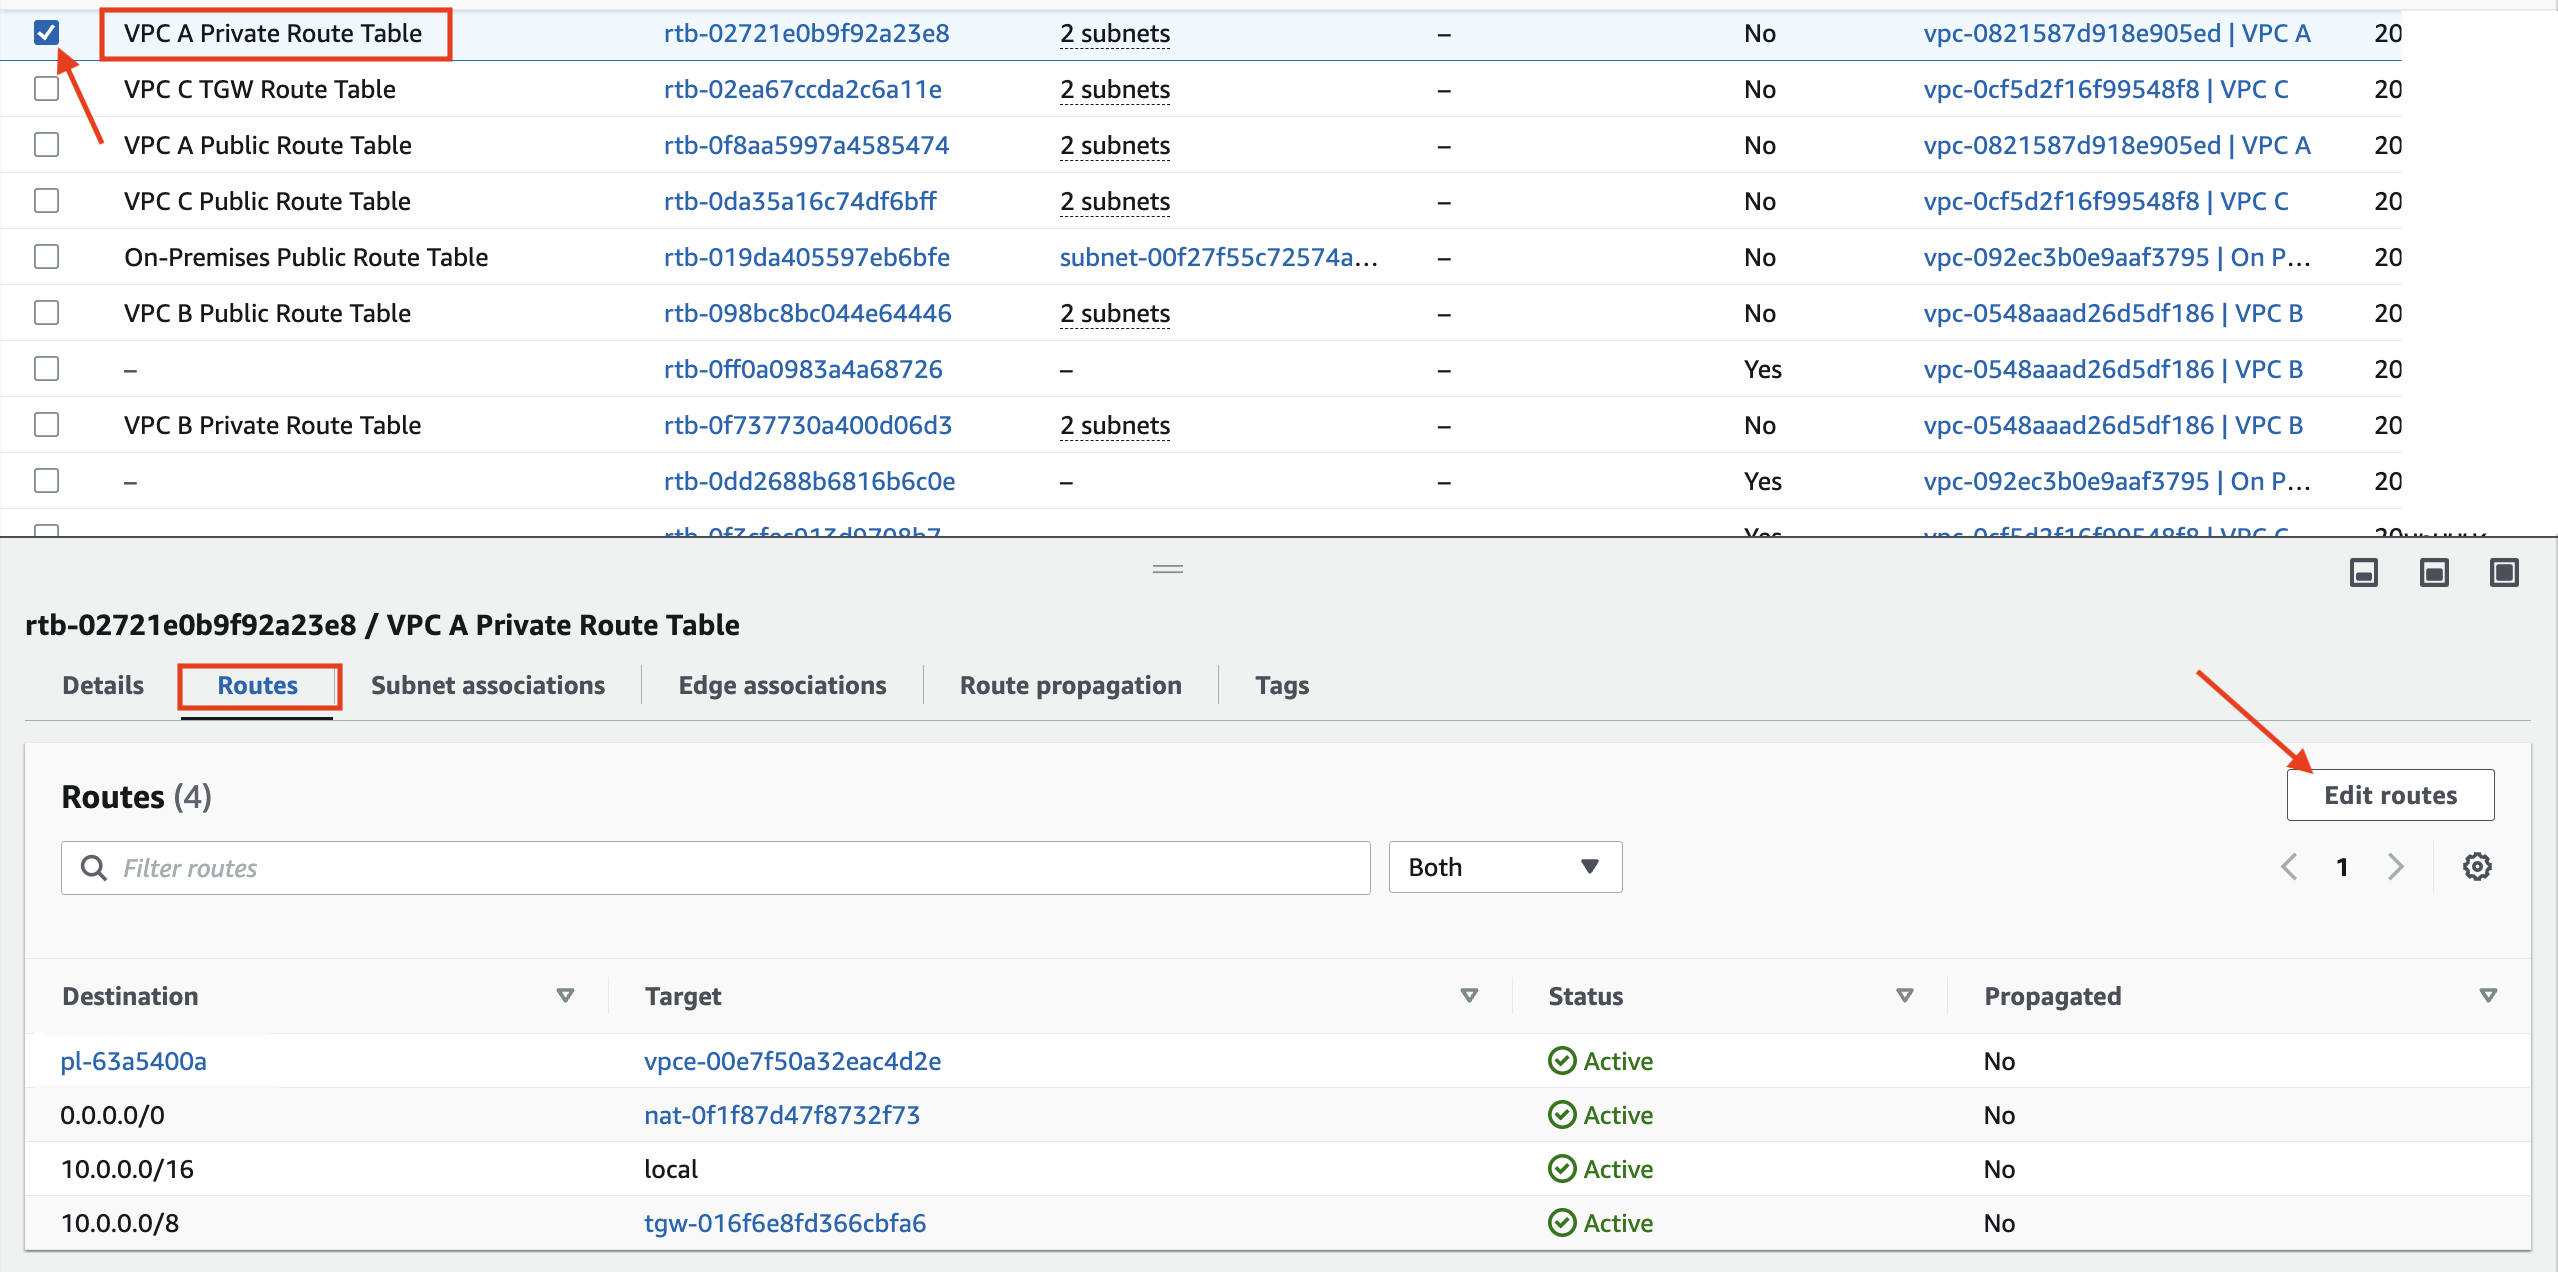
3. Add a route for 172.16.0.0/16 toward Transit Gateway VPC A Attachment. Under Target select Transit Gateway and then choose the VPC A Attachment.
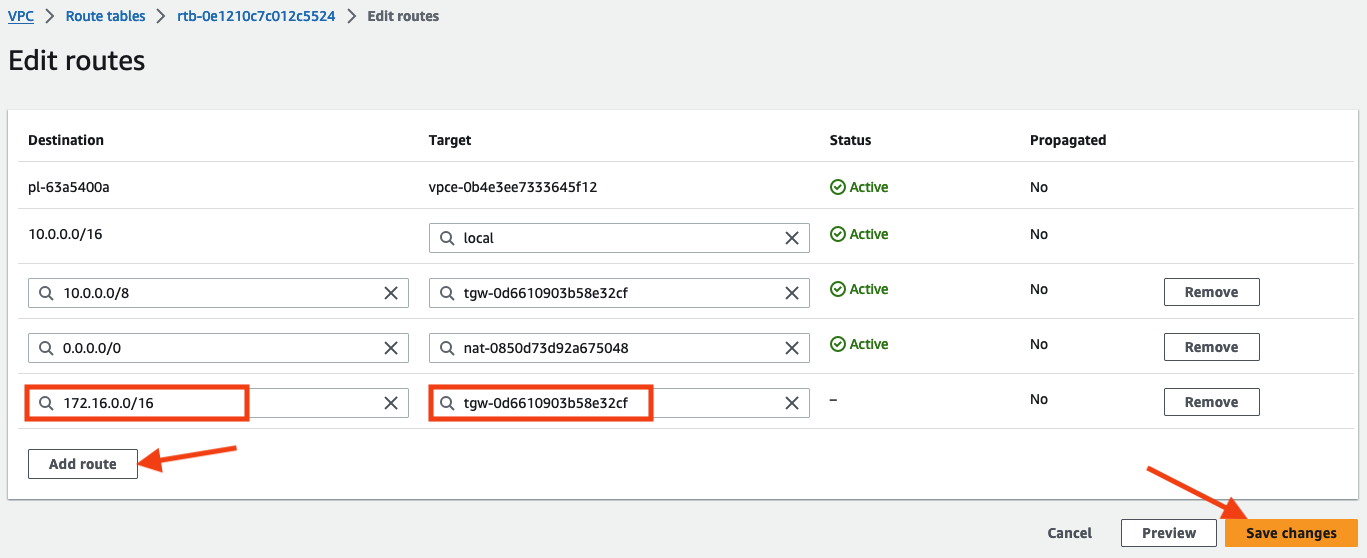
4. Click Save changes
VPC A will now have the ability to route to the simulated on-premesis environment
Please repeat this step for the VPC B and VPC C Private Route Tables.
There is no need to configure the routing in the on-premesis VPC. This was configured for you in the on-premesis CloudFormation template.
Update the customer gateway EC2 instance's security group
We will need to allow the AWS VPN endpoints to communicate with the On Premise Customer Gateway EC2 instance over IPSEC.
- In the EC2 Dashboard navigate to Instances
-
Select the check box beside the
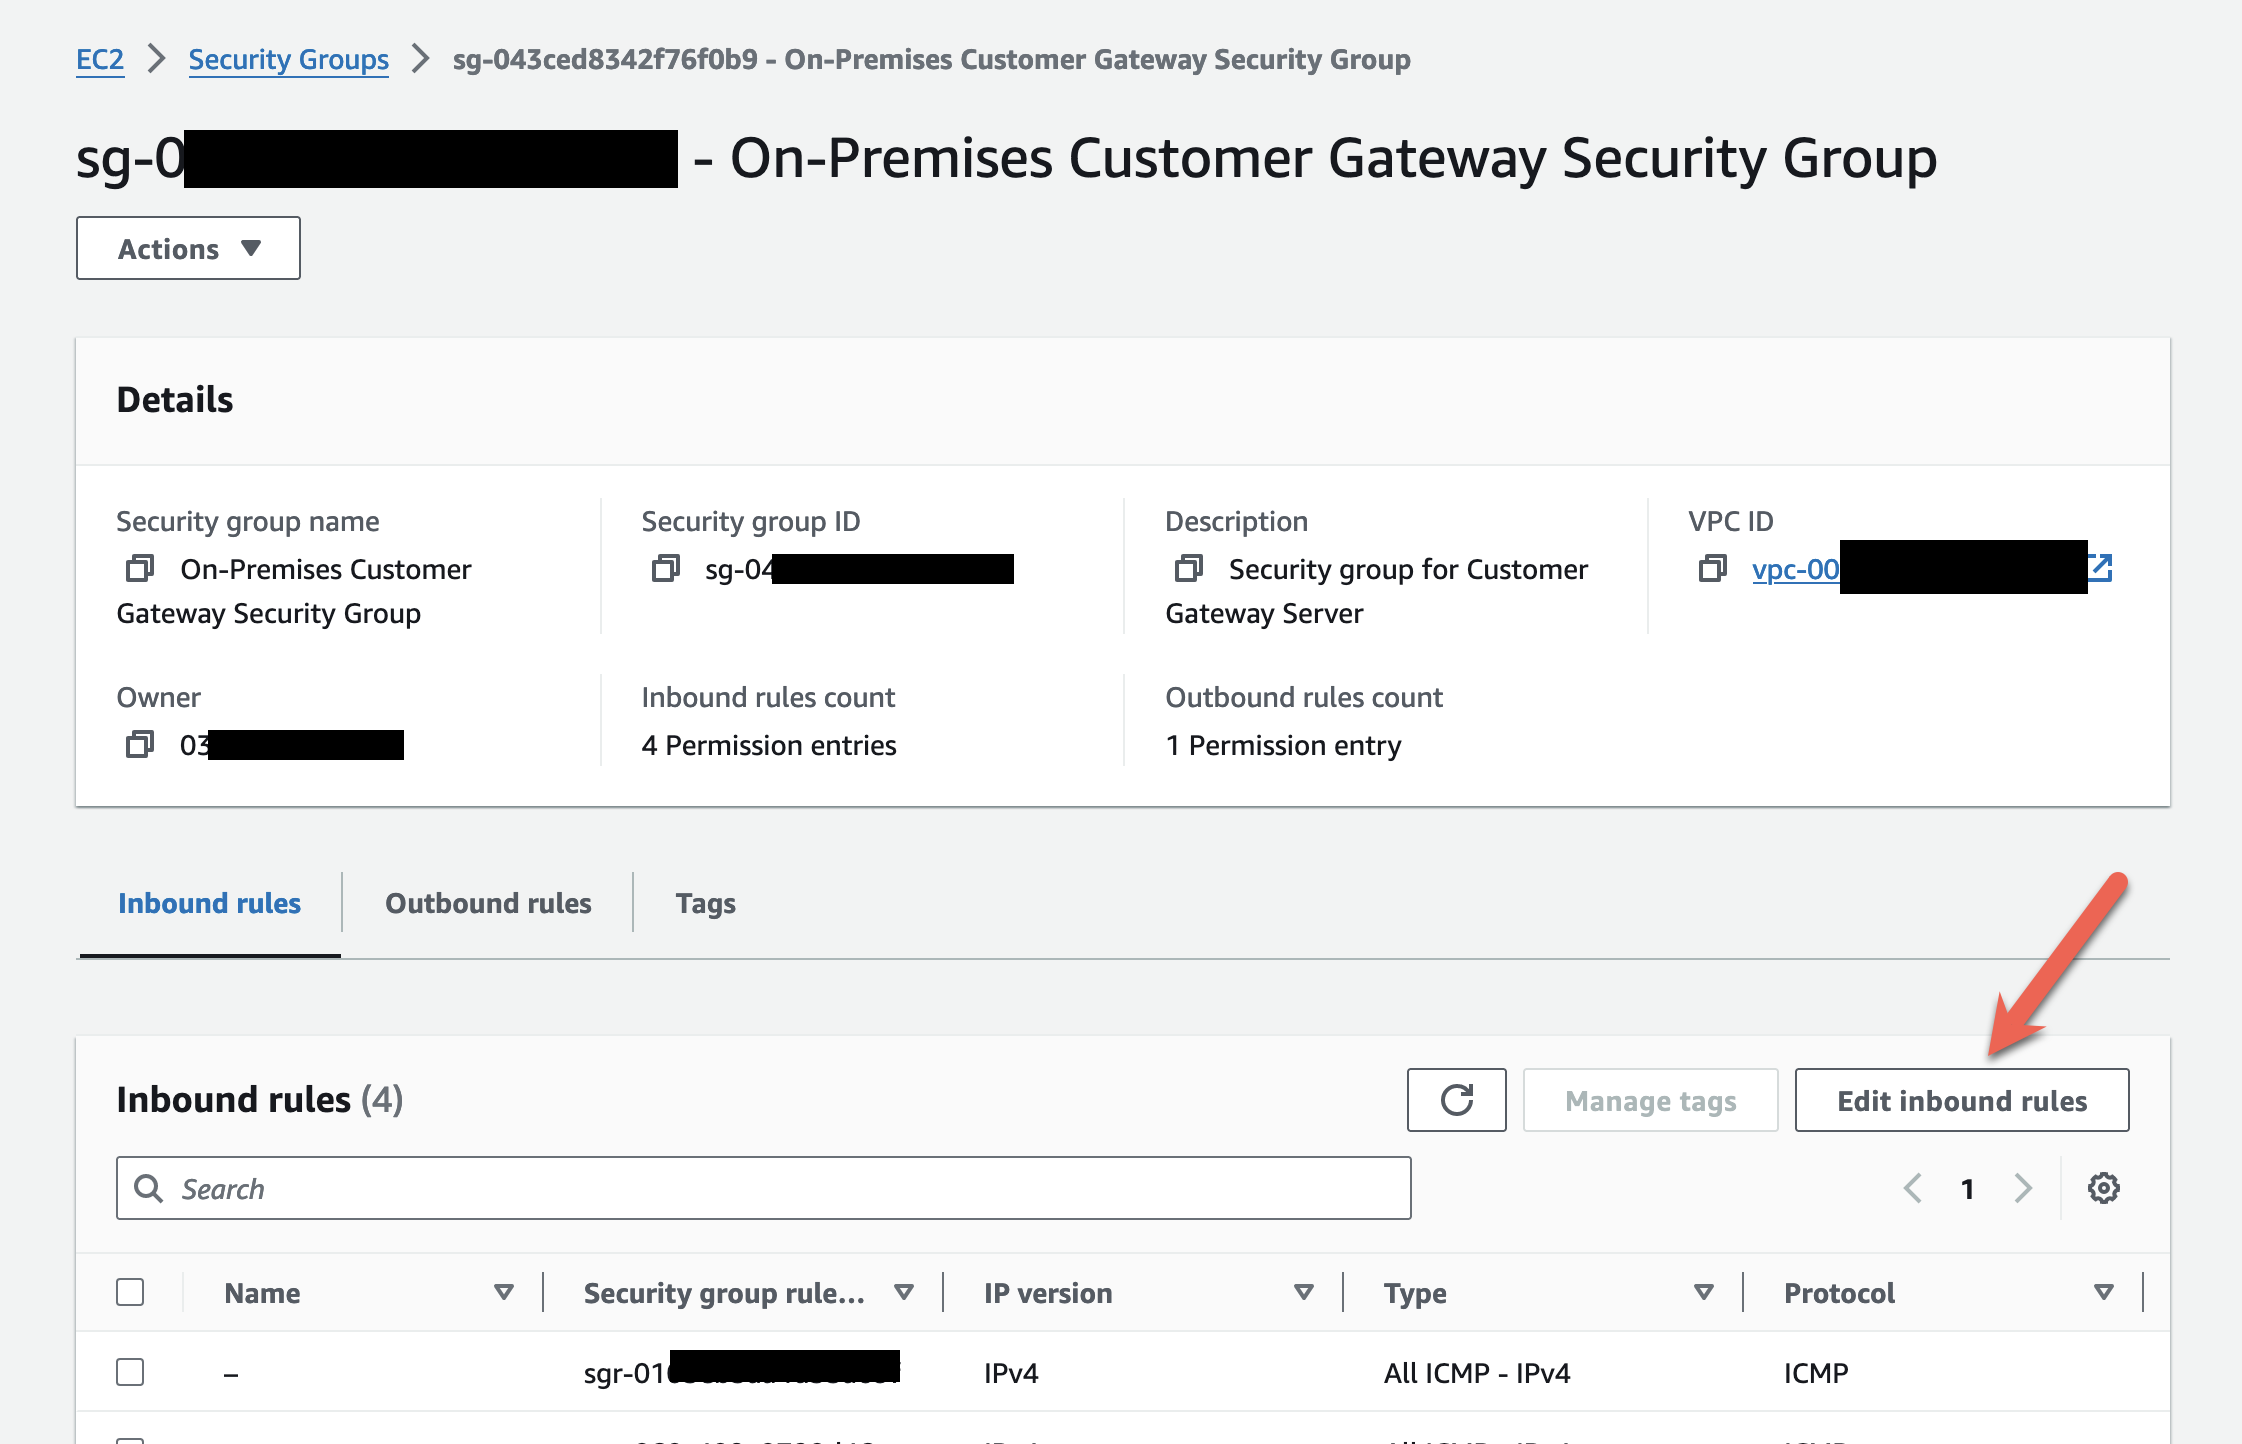
8KV - on-premEC2 instance, click the Security tab, and then click the On-Premises Customer Security Group.
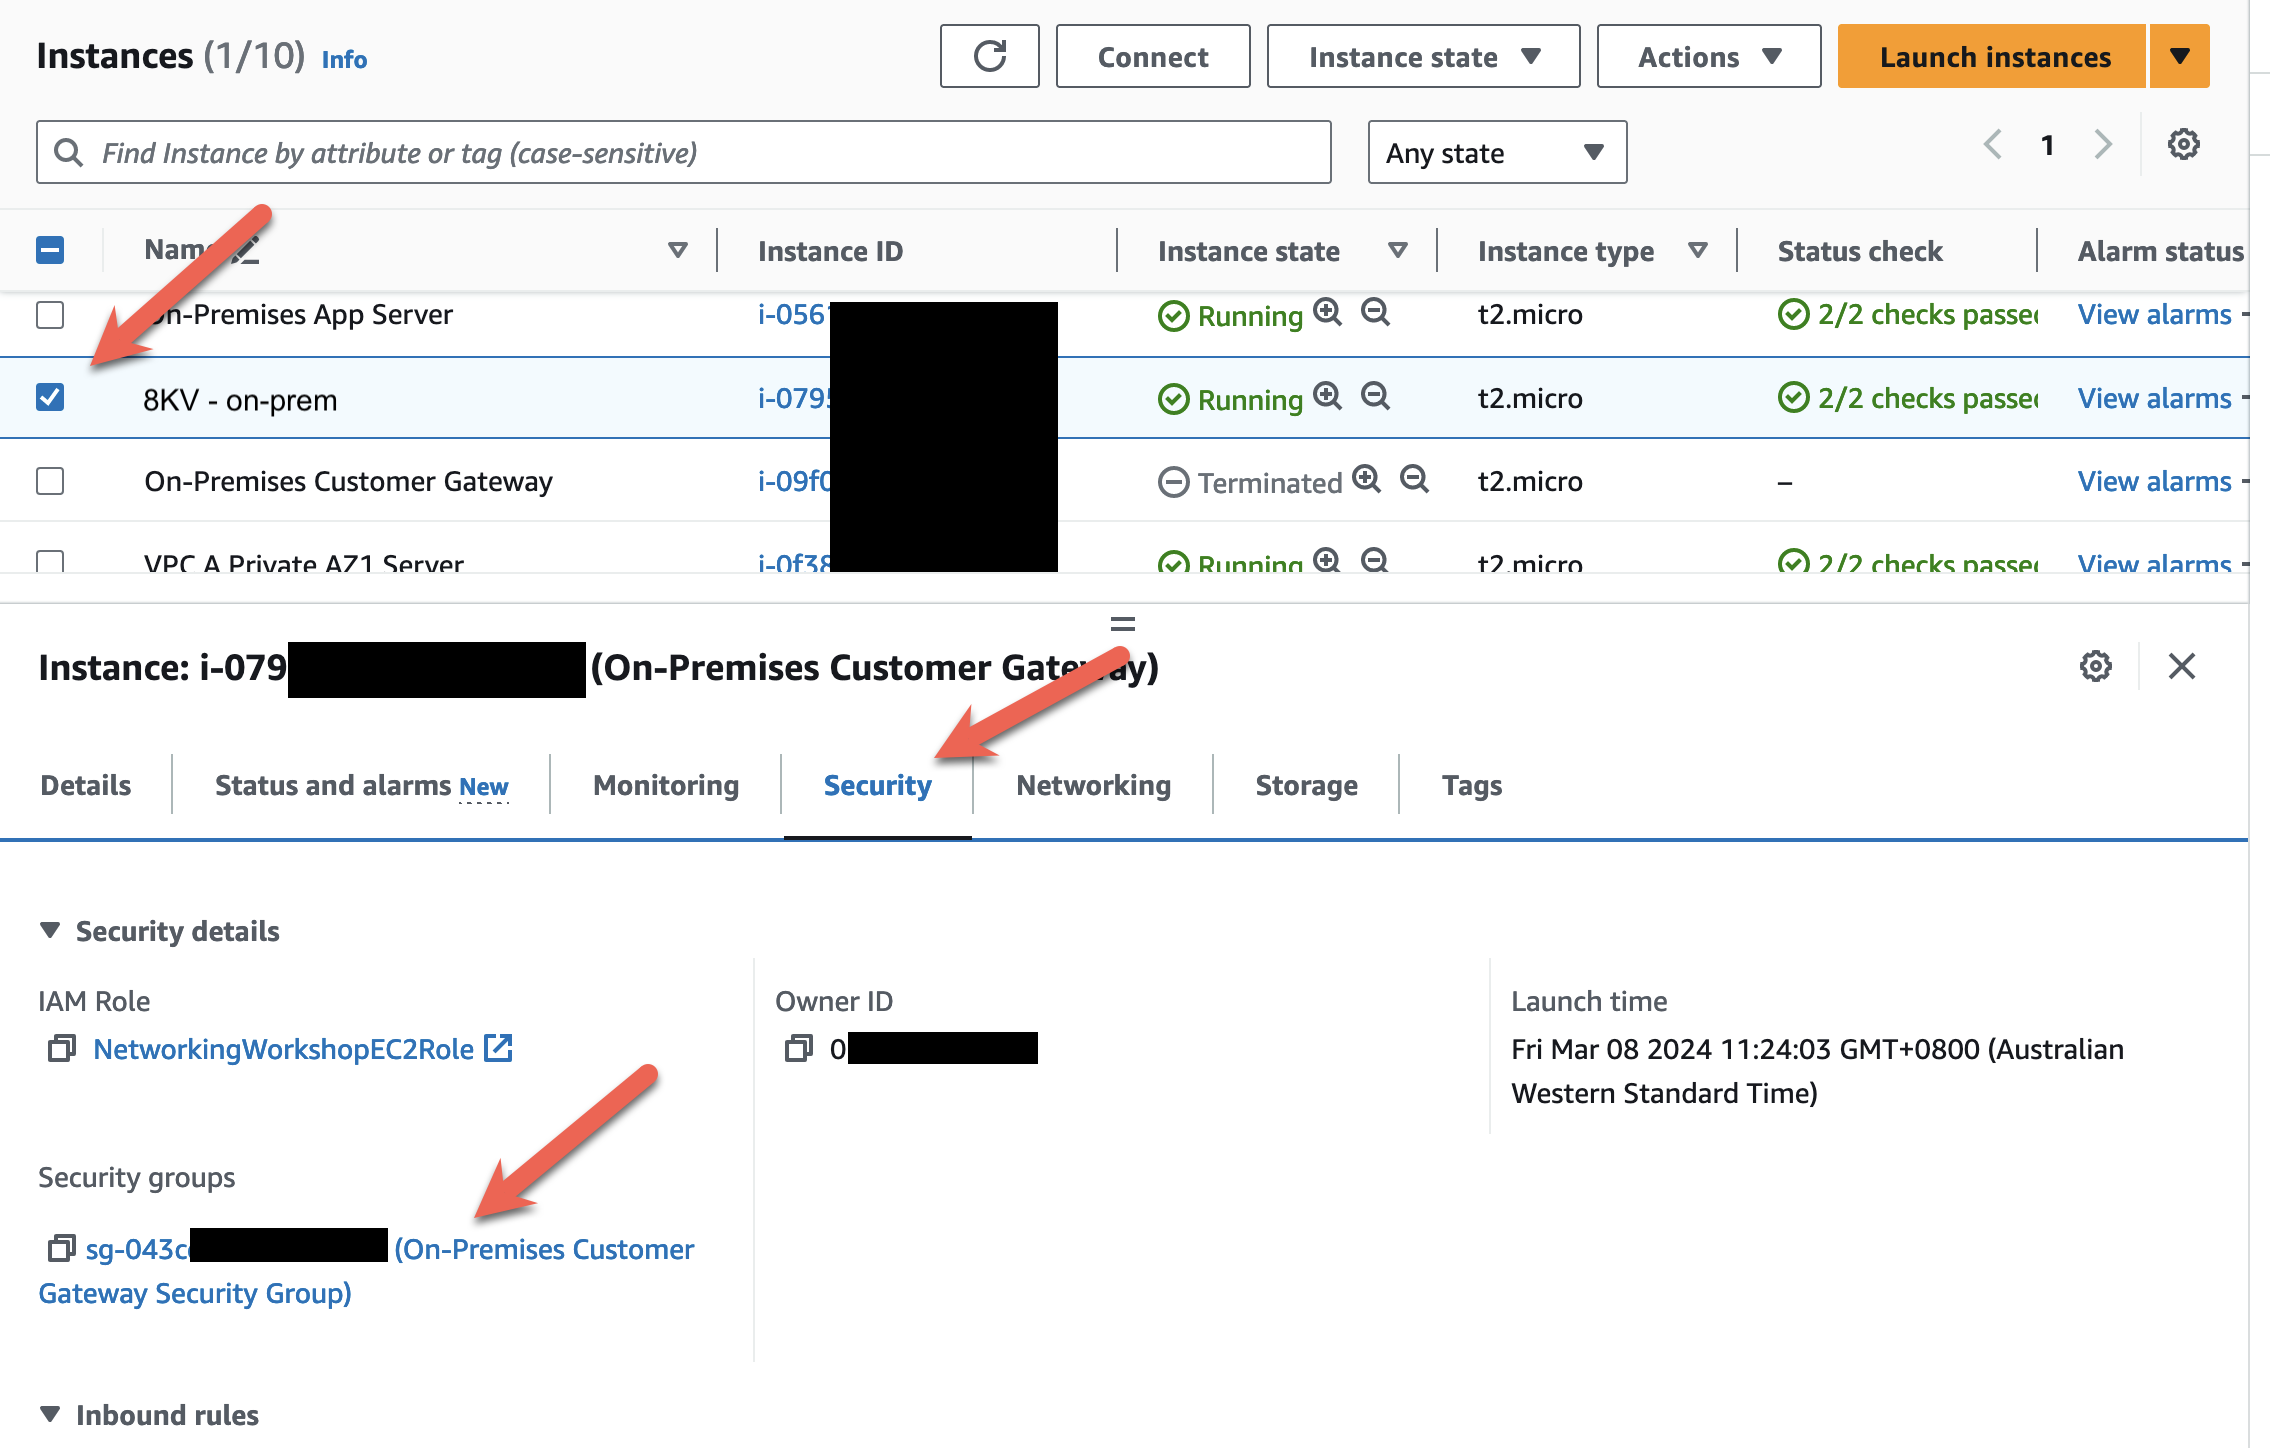
-
Click Edit inbound rules
-
Click Add rule. BGP, TCP port 179, must be allowed in the Security Group. We are using
0.0.0.0/0in the lab, but best practices in production would be to use the Tunnel IP address noted earlier. We are only using a single tunnel in this exercise.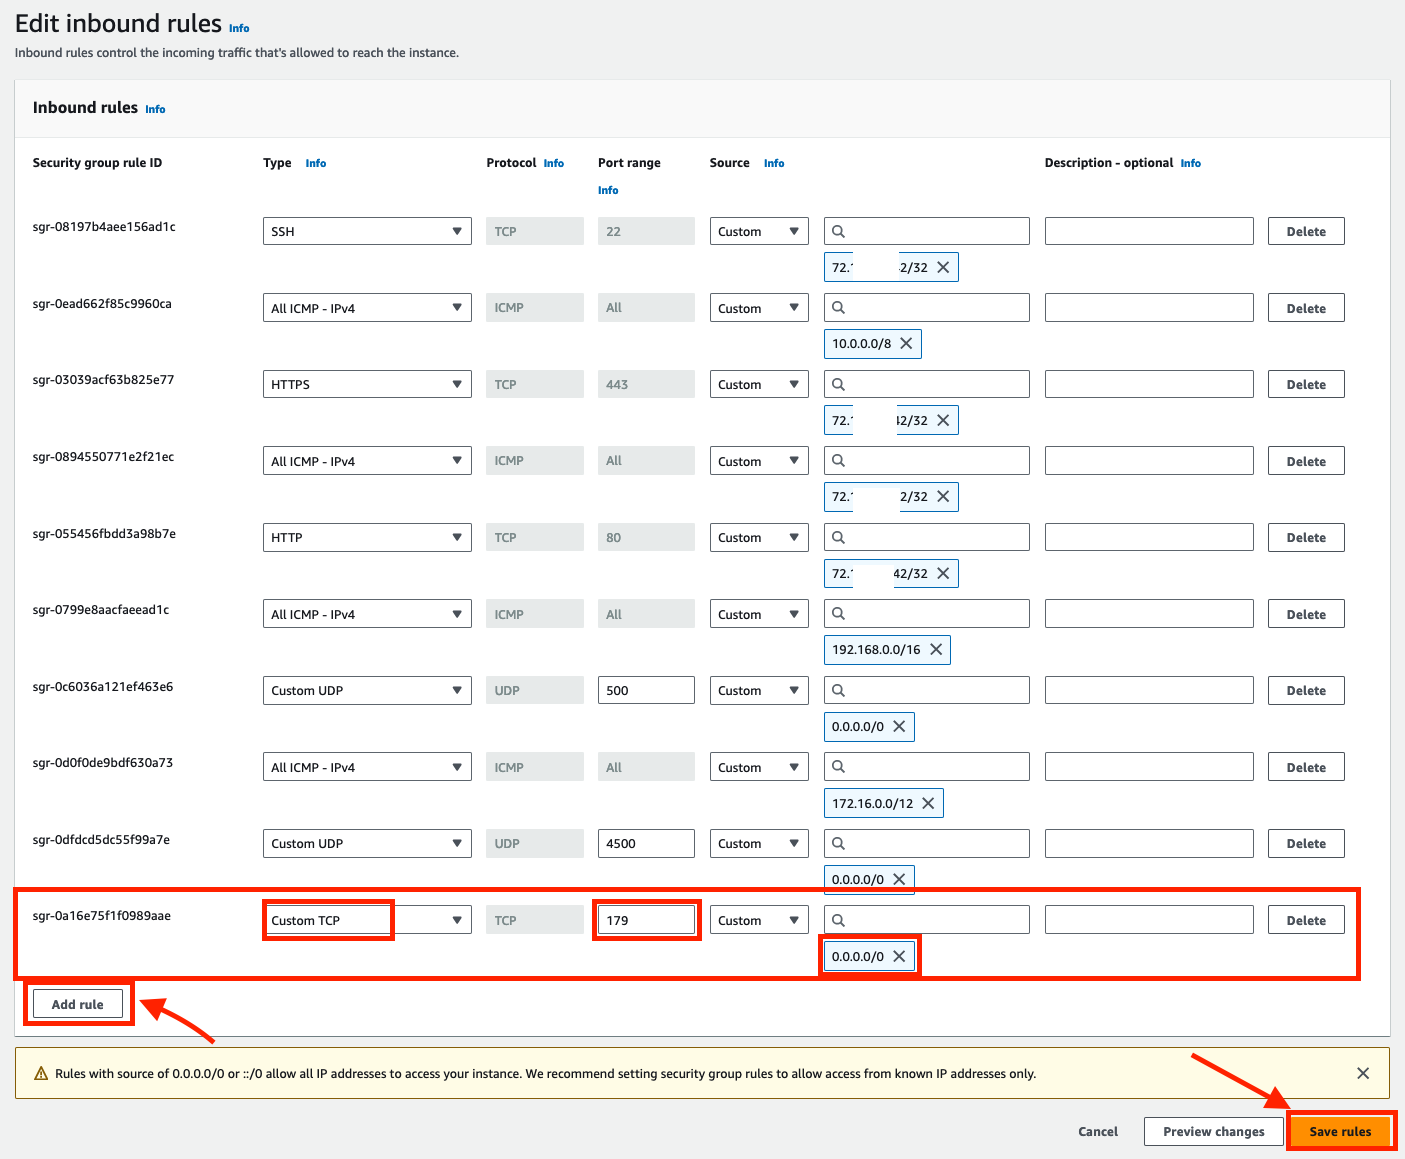
-
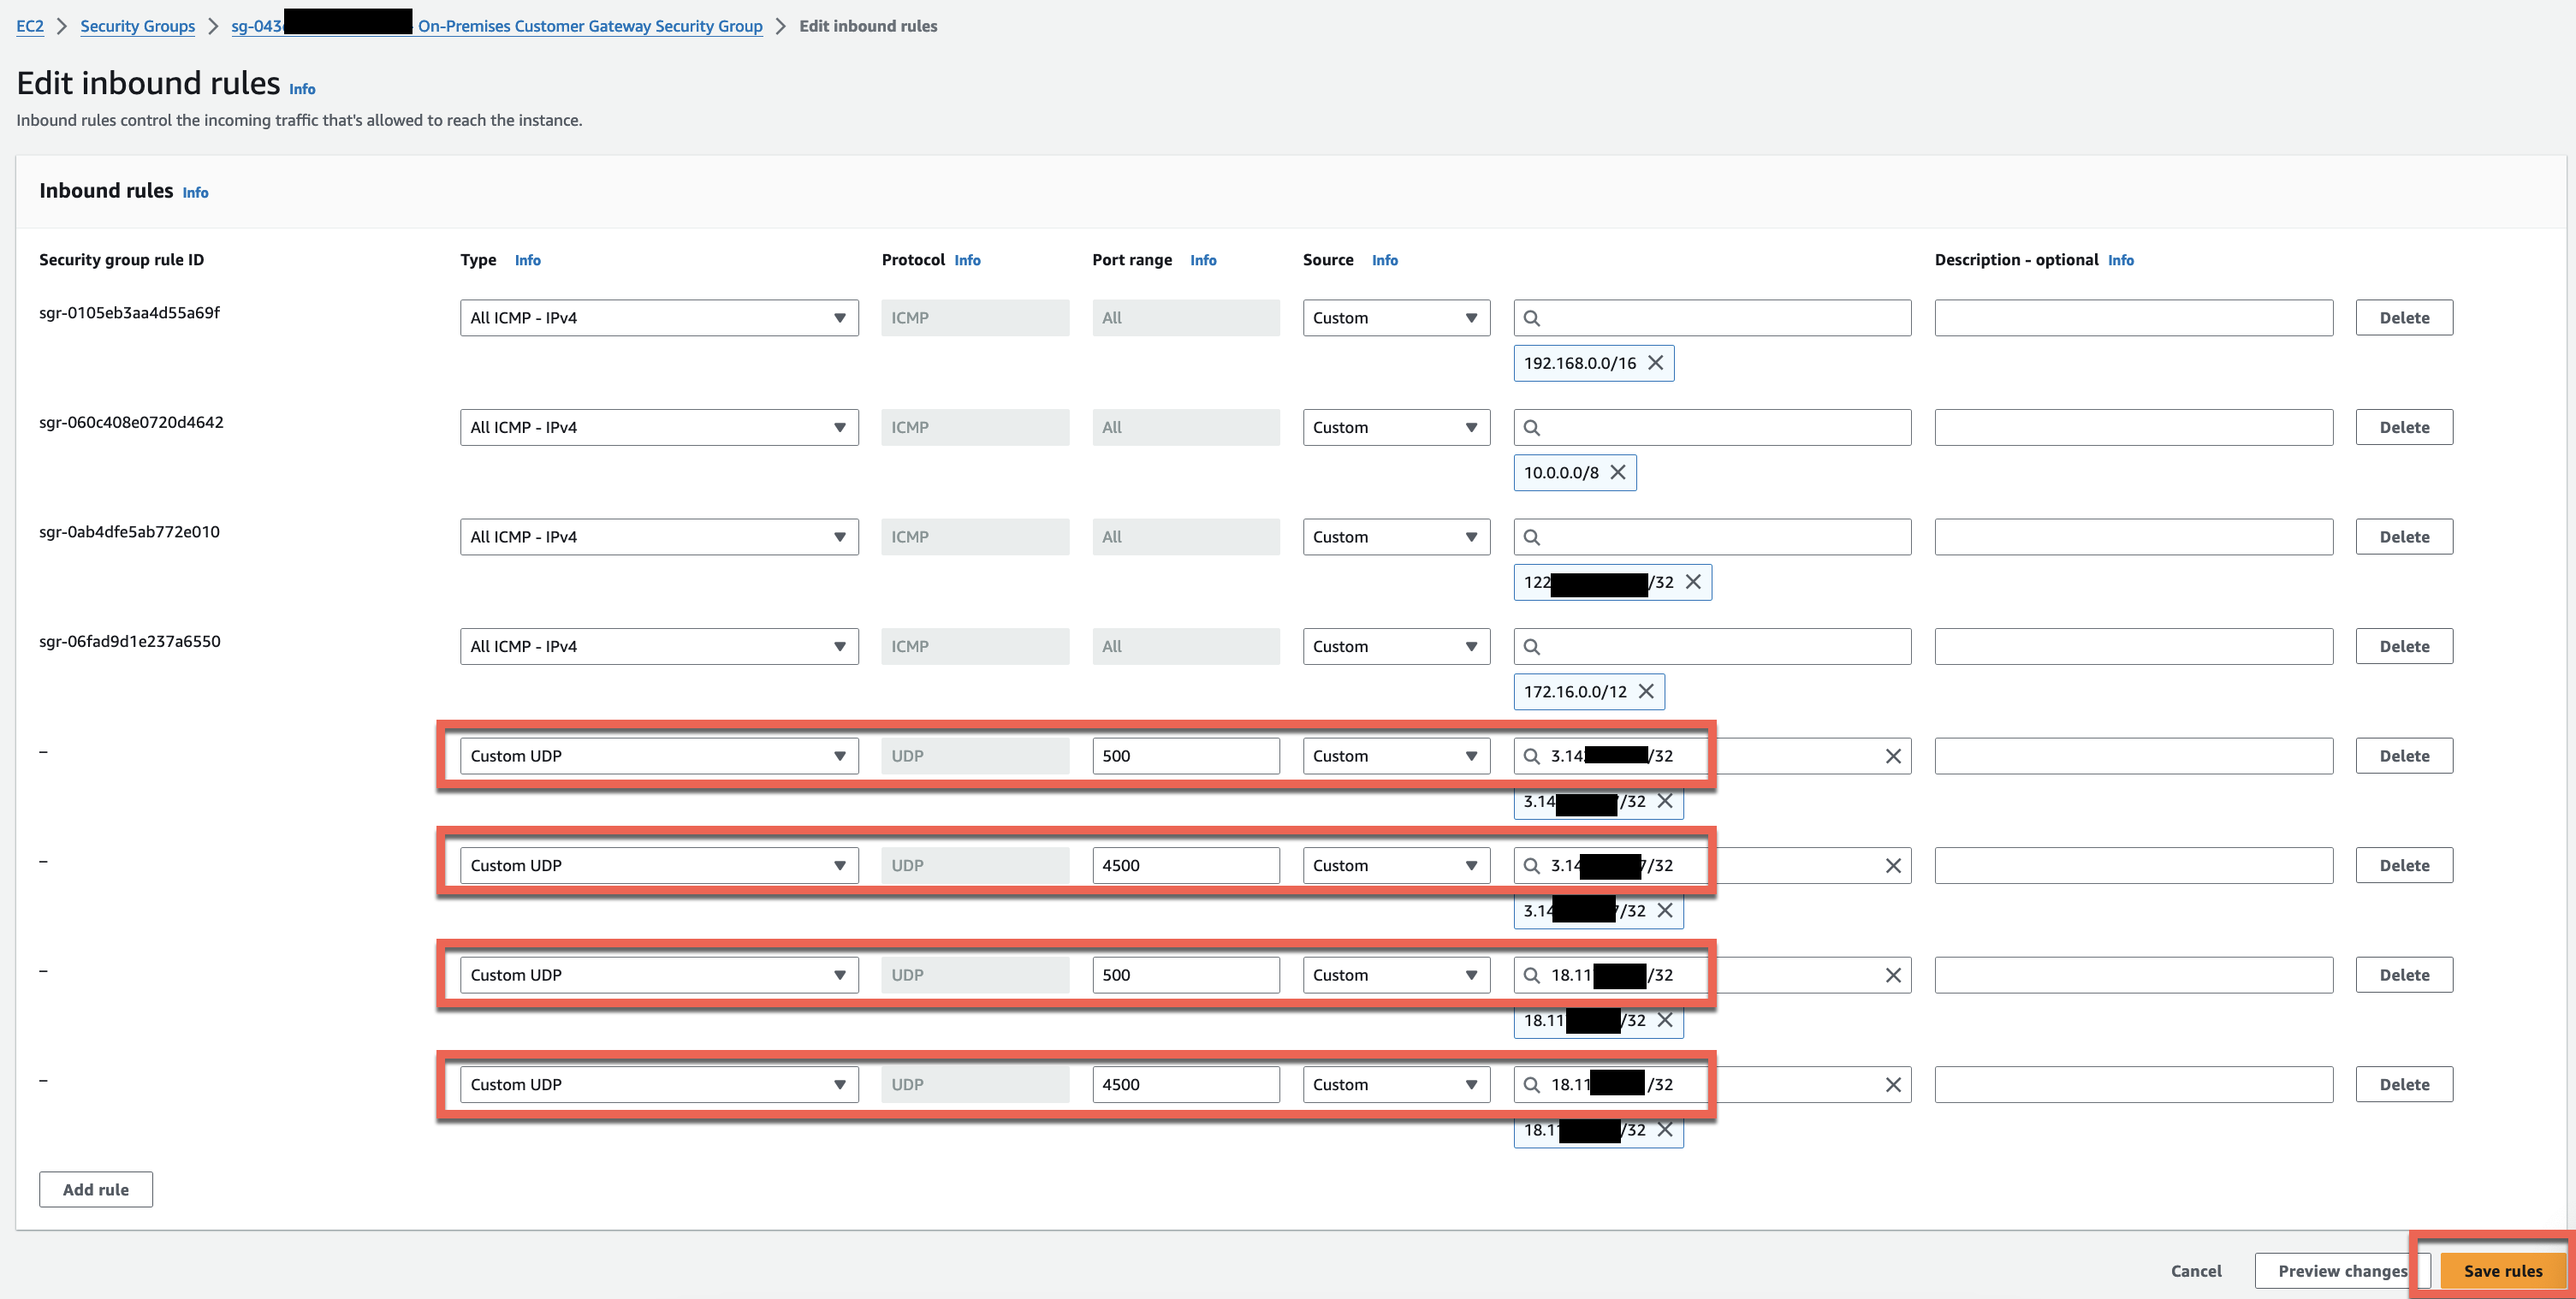
Optional: For IPSec tunnels, rules for UDP ports 500 and 4500 are open for ALL IPs, which cover the two tunnel "outside" addresses you noted when creating the VPN connection above. Best practice would be to create a rule for each. If you want to practice locking it down, use 4 rules total: port 500 and 4500 individually for each tunnel addresses. Use CIDR notation and append /32 to the end of the two tunnel IP addresses. Click Save Rules when done.
Configure Cisco Router and bring up the tunnel
Now that we have configured the simulated datacenter VPC and created the VPN connection to the Transit Gateway, we are ready to configure the Cisco 8000v router and bring up the tunnel. We can log into the device using SSH with the username / password created and we will use the configuration file downloaded previously to configure the VPN. We will only be configuring a single tunnel in this exercise but feel free to try and run the tunnels both active in ECMP mode.
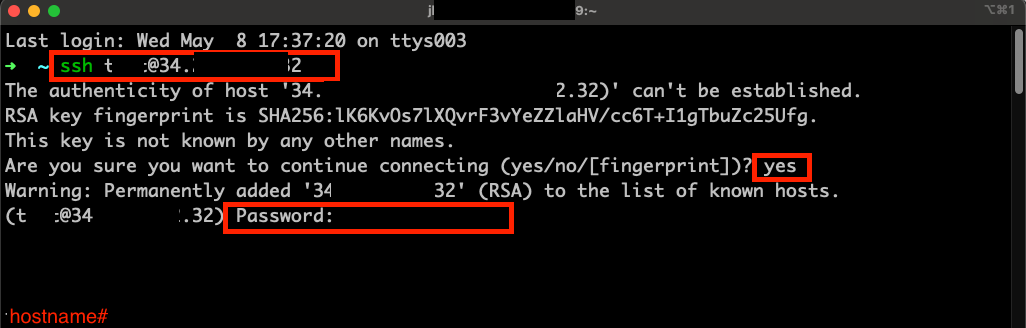
- Using the public IP of the 8kv instance we noted earlier, use your local laptop's terminal(iterm, CMD, powershell, PuTTy, etc) to SSH into the router:
ssh admin@<8kv IP>.
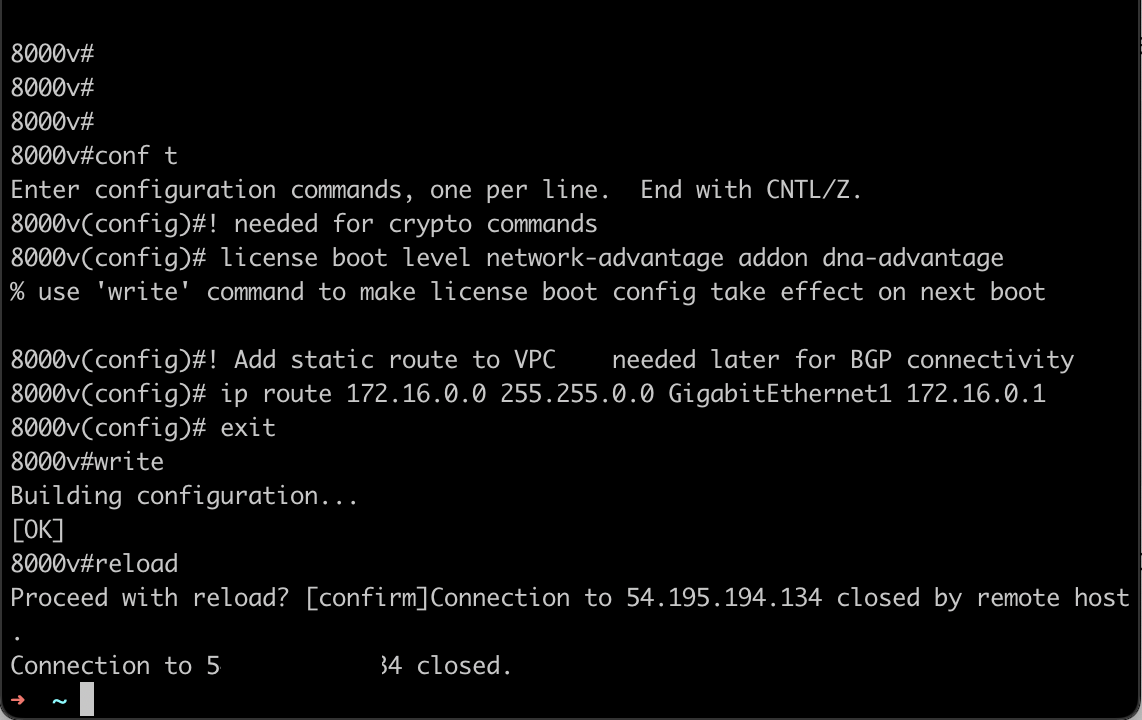
- First we need to ensure that crypto commands are accepted in the CLI. Enter the following commands and reload the device:
conf t
! needed for crypto commands
 license boot level network-advantage addon dna-advantage
! Add static route to VPC    needed later for BGP connectivity
 ip route 172.16.0.0 255.255.0.0 GigabitEthernet1 172.16.0.1
 exit
write
reload
Important
Two main commands above:
* license boot
* ip route
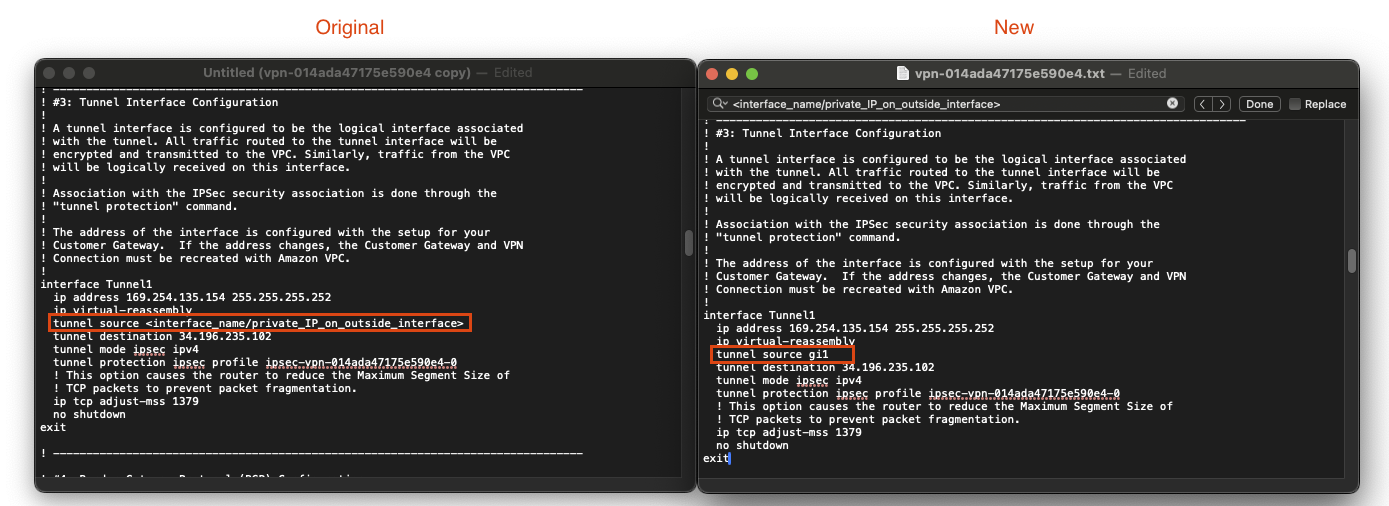
- Once reloaded (2-5 minutes), ssh back into the router to setup the crypto commands. Please refer to the downloaded config file and use the following find / replace commands inside the txt file:
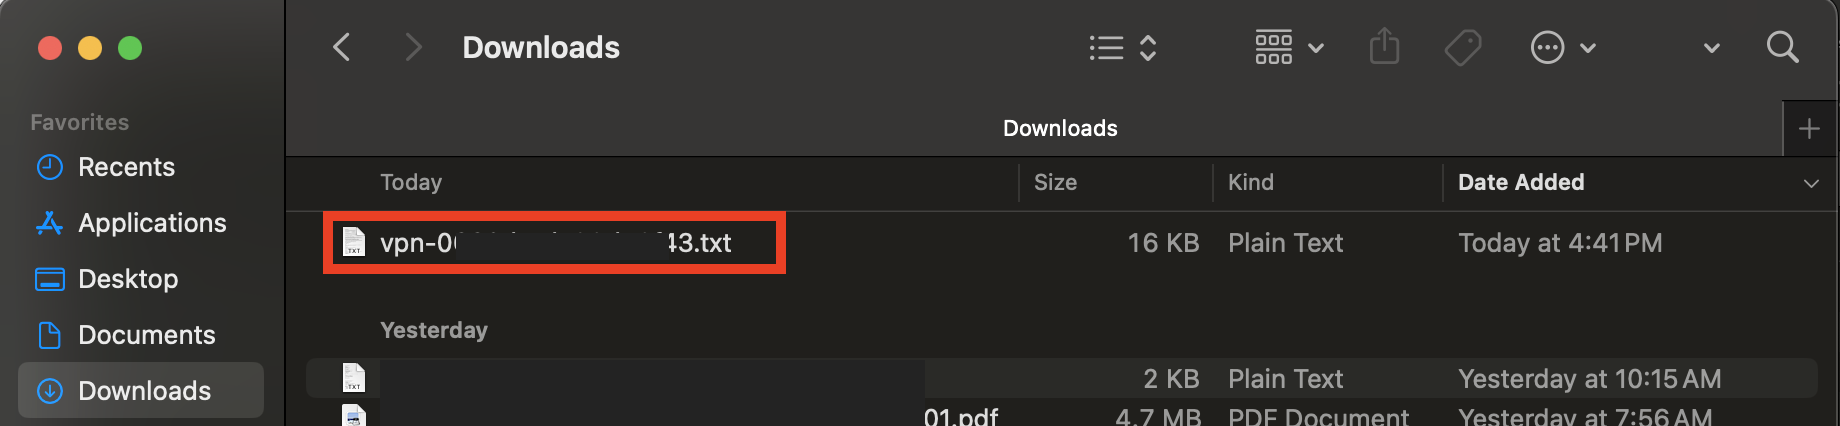
- Do a
cntl/cmd-ffind of the first 2 instance of the following string:<interface_name/private_IP_on_outside_interface>and replace it with the local ip address on Gi1 interface. You can find the ip by running the following command on the 8kv:
show ip int br | in GigabitEthernet1
First string found undercrypto ikev2 policy POLICY1
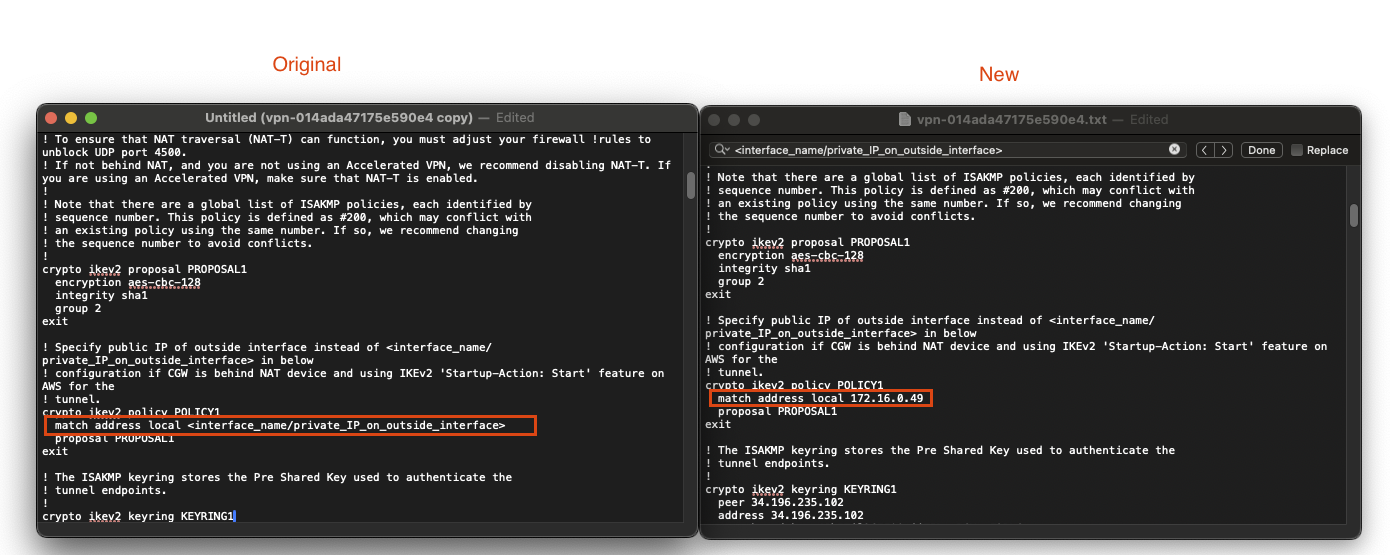
Second string found undercrypto ikev2 profile IKEV2-PROFILE
- Find the phrase 1 more time, but this time replace it with:
gi1
Third string found underinterface Tunnel1
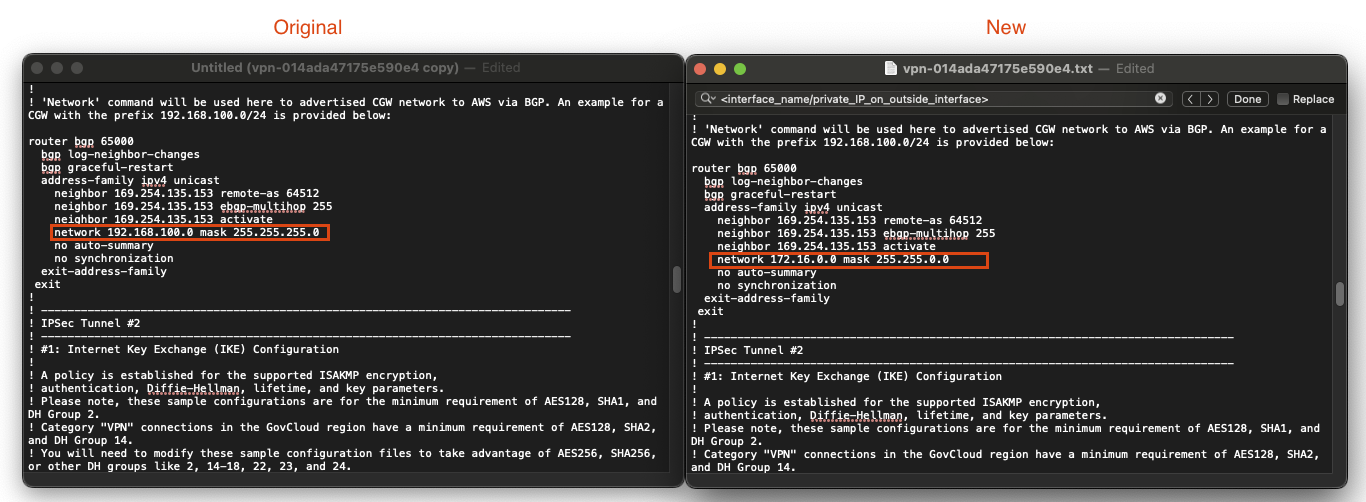
- Finally, we will change the BGP route statement to advertise the local on-prem network of 172.16.0.0/16. Find the following statement in the BGP section:
network 192.168.100.0 mask 255.255.255.0
and replace it with
network 172.16.0.0 mask 255.255.0.0
Fourth string found underRouter bgp 65000
- Remove all of the comments that are preceeded with an
!. Here is an example of the final config. Your values will be slightly different:
Final Config Example
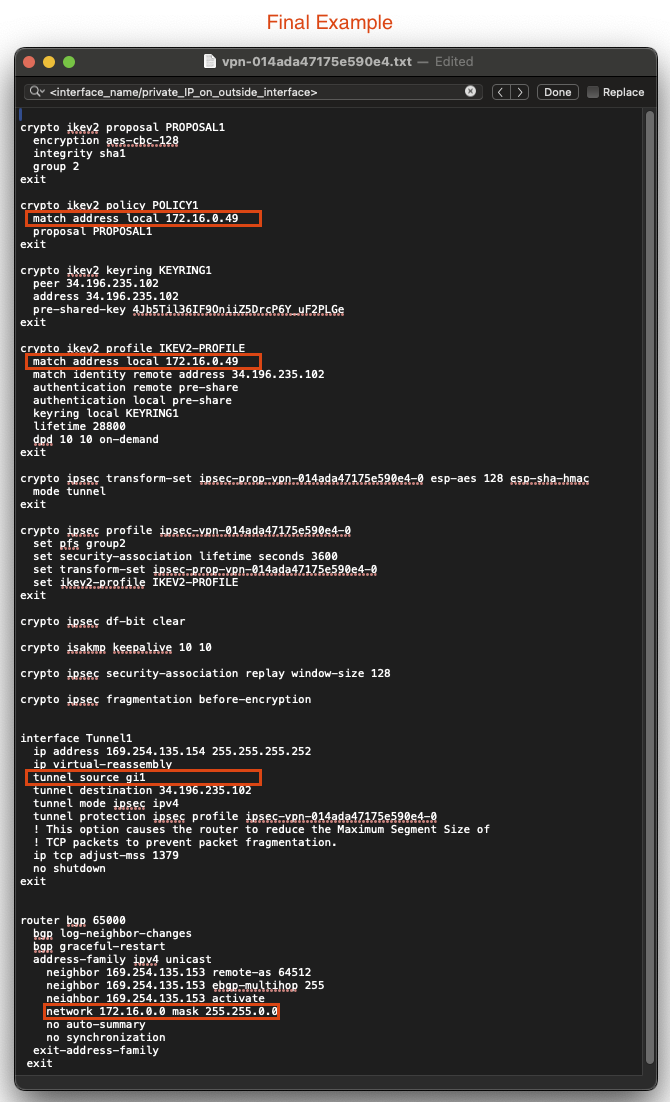
- Configure the router with the final Config by typing
conf tand pasting in the config. You can see the BGP statements by typingterm monbefore you paste.
Verify connectivity
ping 10.0.1.100 source gi1
Important
Note that it may take up to 30 seconds before the tunnel comes up and you start seeing ping responses.
- Troubleshooting:
- Verify that you've propagated the VPN attachment and see
172.16.0.0/16in the Shared Services TGW Route Table - Verify that you have set a return path to 172.16.0.0/16 in the VPC A Route table
Congratulations you've just connected the on-premises environment to AWS via a Site-to-Site VPN attached to the Transit Gateway