Hybrid DNS
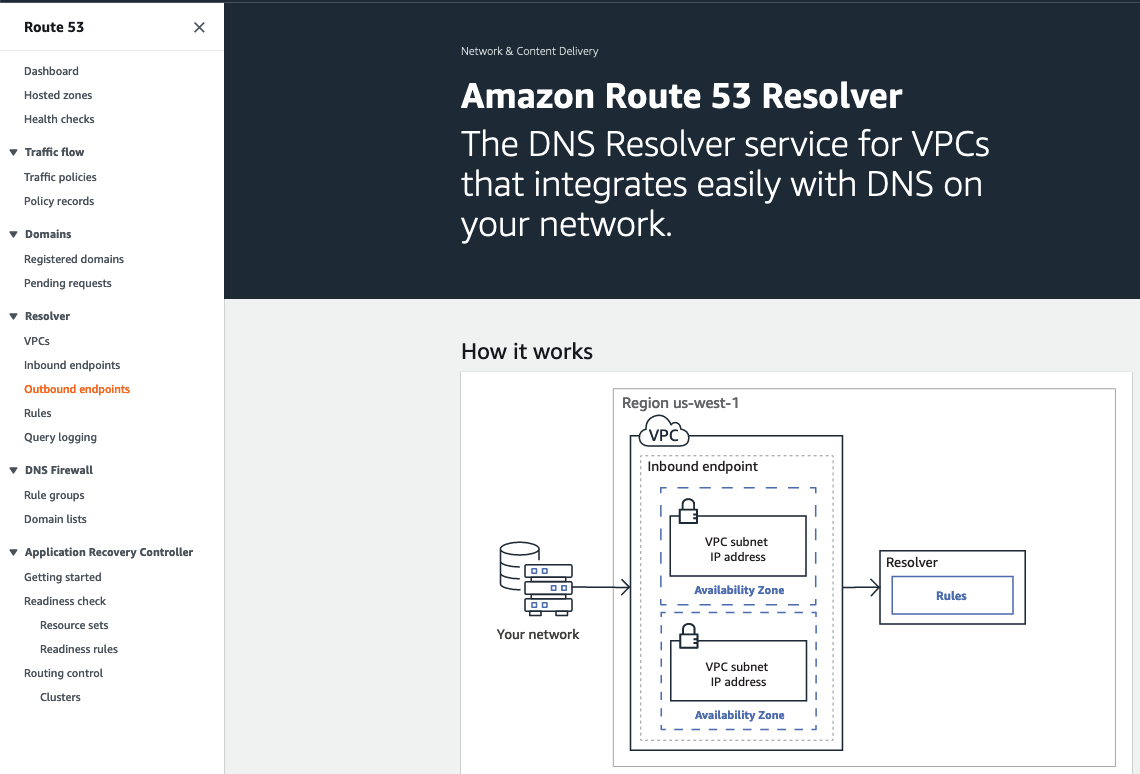
Route 53 Resolver makes hybrid cloud easier for enterprise customers by enabling seamless DNS query resolution across your entire hybrid cloud. You can create DNS endpoints and conditional forwarding rules to allow resolution of DNS namespaces between your on-premises data center and AWS VPCs.
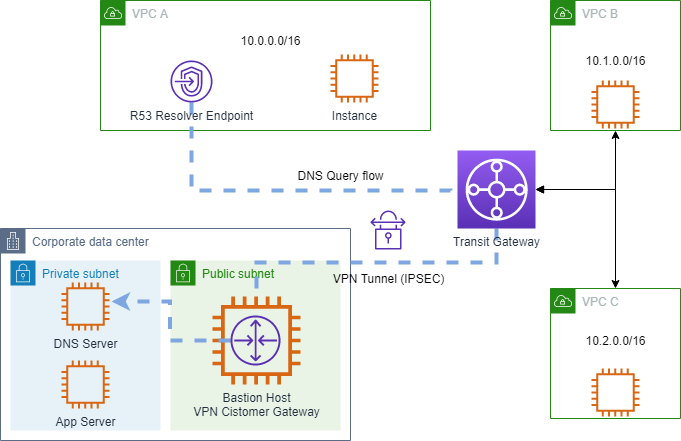
Recall that our simulated on-premises datacenter has a DNS server, providing authoritative name service for the example.corp domain where all internal application hosts are registered. In order to provide a complete hybrid-connectivity solution, we want to enable hosts in our AWS VPCs to resolve names of hosts in the datacenter environment. This can be achieved using Route 53 resolvers and conditional forwarding rules for the example.corp domain, while allowing the AWS instances to continue to take advantage of the highly available Amazon DNS service for all other name resolution inside the VPC and the internet.
For this exercise, we will focus on establishing DNS resolution from the AWS environment to the simulated datacenter, but it's important to note that the reverse is possible as well. Route 53 Resolvers supports inbound DNS queries that are conditionally forwarded from an on-premises DNS server. You can learn more about inbound DNS resolution in the AWS documentation.
Configure a Route 53 Resolver Outbound Endpoint
Route 53 Resolver uses endpoints to communicate with external DNS servers. An endpoint is an Elastic Network Interface (ENI) placed inside of a VPC which has connectivity to the existing DNS server. This may be a DNS server running on an EC2 instance, or a DNS server running on-premises accessible via Direct Connect or VPN. Since all three VPCs in our AWS environment have connectivity to the simulated datacenter via the Transit Gateway, we can use any of them for our endpoint. The endpoint will create interfaces in a minimum of two availability zones in your chosen VPC for high availability.
1. Navigate to Route 53,
2. Expand the hamburger on the top left and Under Resolver select Outbound endpoints
Important
If you have not been to the Route 53 Resolver console before, it will take you to a splash page that you see in the screenshot above. Under Resolver on the left menu, select Outbound endpoints again to take you to the screen you see in the screenshot below. You want to see the button Create outbound endpoint not Configure endpoints
- Click Create outbound endpoint.

-
Configure the settings for the outbound endpoint as follows:
- Endpoint name:
NetworkingDayOutbound - VPC in the Region: Select
VPC A - Security group for this endpoint: Select the
defaultSecurity Group for your VPC A, which already contains a rule permitting outbound connectivity. - Endpoint type: Select
IPv4 - IP address #1:
- Availability zone: Choose
us-east-1a - Subnet:
VPC A Private Subnet AZ1. - IP address:
Use an IP address that is selected automatically
- Availability zone: Choose
- IP address #2:
- Availability zone:
us-east-1b - Subnet:
VPC A Private Subnet AZ2. - IP address:
Use an IP address that is selected automatically
- Availability zone:
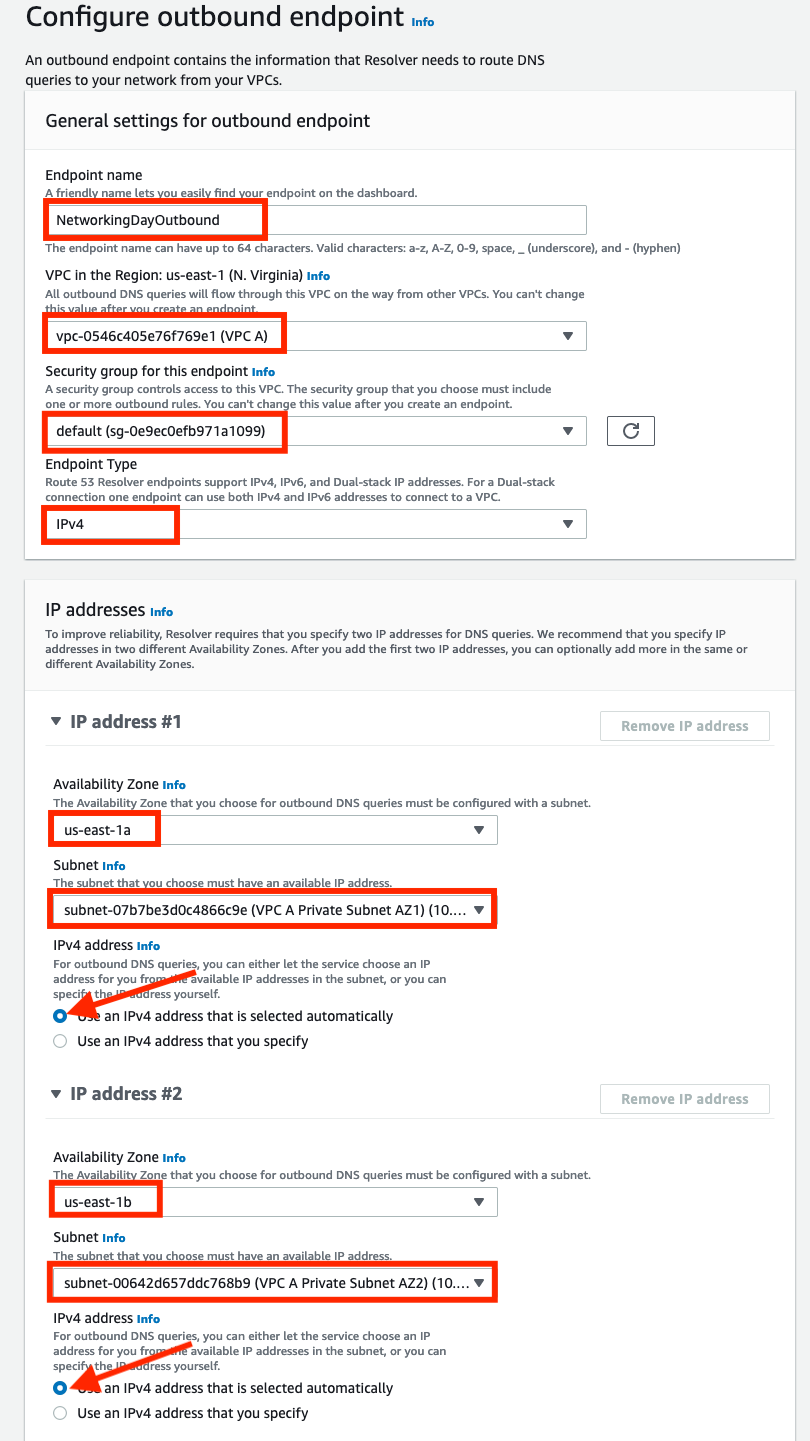
- Endpoint name:
-
Click Submit to create the endpoint.
-
Wait for the endpoint status to change to Operational. Then proceed to the next step.

Create a Route 53 Resolver rule for example.corp.
Now that we have created an outbound endpoint this provides the Route 53 Resolver with a path to the on premise DNS server via VPC A and the Transit Gateway's VPN connection. Next we need to configure a Route 53 Resolver Rule to direct queries for example.corp to the on premise DNS server via that endpoint. We will associate the rule with VPC's A, B, and C and this will cause Route 53 Resolver to use this rule whenever the VPC DNS resolver processes queries for example.corp from instances in any of those three VPCs.
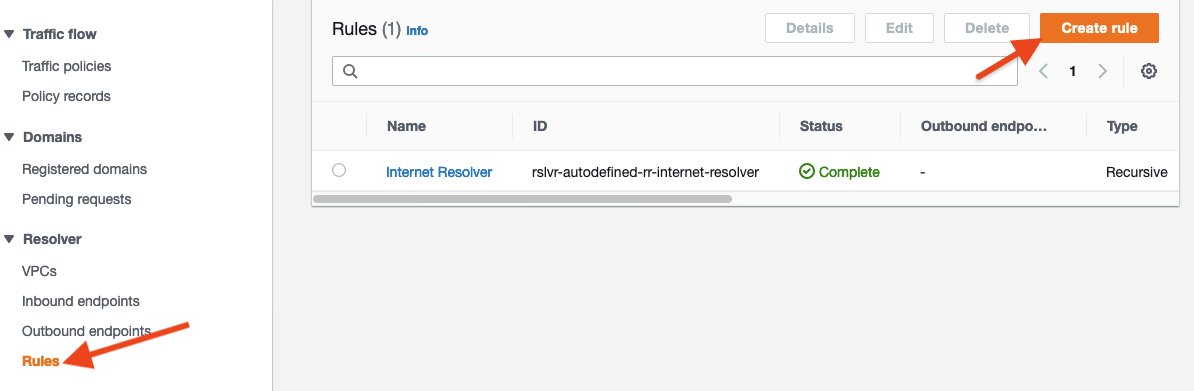
- While still in the Route 53 console, navigate to the Rules tab under Resolver
- Select Create rule
- Provide configuration for the rule:
- Set Name as
NetworkingDayRule - Leave Rule type as
Forward - Specify the Domain name as
example.corp. - Associate the rule with all three of your AWS VPCs:
VPC A,VPC B, andVPC C. - For Outbound endpoint choose the endpoint you created in the previous step:
NetworkingDayOutbound - Under Target IP addresses enter the on-premise DNS server IP address:
172.16.1.200
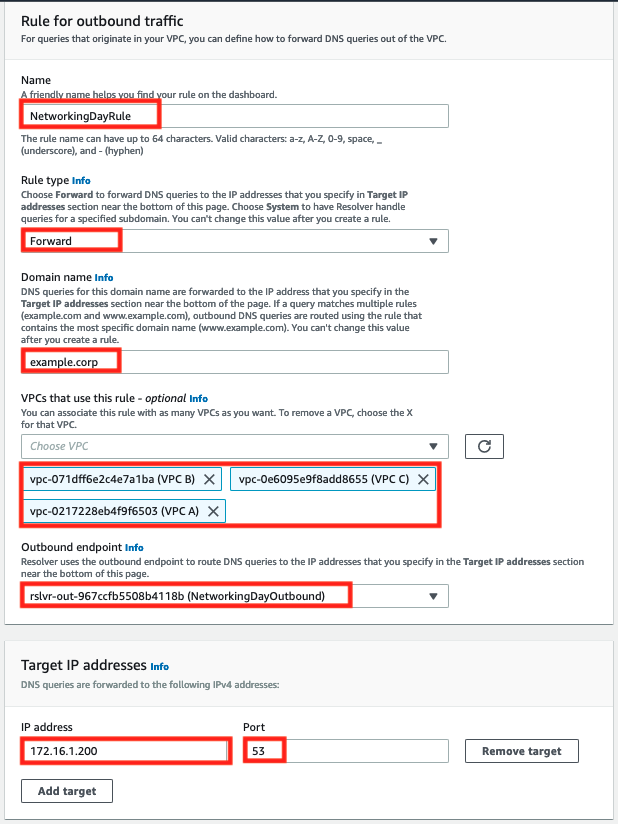
- Set Name as
- Click Submit to create the rule.
Testing the Route 53 Resolver rule
At this point, we have configured Route 53 resolver to forward queries to the datacenter's DNS server for the example.corp domain from any of the AWS VPC's A, B, or C. We can test name resolution by attempting to connect to the on-premises app server from one of the EC2 instances in our AWS VPCs.
- In the EC2 console navigate to Instances
- Select the check box next to
VPC B Private AZ1 Serverand click the Connect button above. - On the Session manager tab click Connect to open a command prompt
- Check setting of the DNS server on the instance by examining
resolv.conf:
cat /etc/resolv.conf
Note that the instance is using the AWS provided DNS server (e.g. 10.1.0.2) and not your on-premises DNS server for name resolution:
nameserver 10.1.0.2
search ec2.internal
- Check that the hostname for myapp.example.corp resolves to an IP address:
nslookup myapp.example.corp
Note that the instance is using the AWS provided DNS server (e.g. 10.1.0.2) and not your on-premises DNS server for name resolution:
nslookup myapp.example.corp
Server:         10.1.0.2
Address:        10.1.0.2#53

Non-authoritative answer:
Name:   myapp.example.corp
Address: 172.16.1.100
- Use curl to query the on-premises application server by its hostname, myapp.example.corp
curl http://myapp.example.corp
If name resolution and your application server are functioning, you will receive back a "Hello, world" response.
curl http://myapp.example.corp
Hello, world.
- Terminate the Session Manager connection.
Congratulations, you've established hybrid DNS that allows hostnames managed by the on-premises DNS server to be resolved from AWS hosts